Workforce Management > inContact WFM v1 Configuration > Labor, Shift and Schedule Settings > PTO Blackout Dates > PTO Blackouts Reference
Page Details: PTO Blackout Dates
Overview
The PTO Blackout Dates page allows you to add or delete PTO blackouts in your inContact WFM v1 system.
For more information, see PTO Blackout Dates Overview.
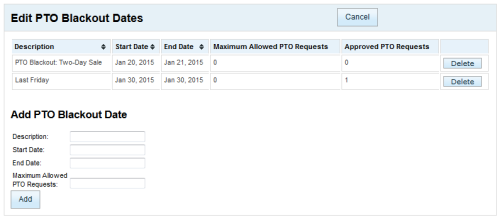
- Description
- In the Add PTO Blackout Date section, allows you to type a description for the blackout period. This description appears on employee schedules to let them know why the dates are blacked out. The description can be up to 256 characters, including spaces and punctuation. In the list of blackout dates, the description displays as text. You can sort the list of PTO blackout dates by the contents of this field by clicking the column header.
- Start Date
- In the Add PTO Blackout Date section, allows you to select a starting date for the blackout period using a calendar. In the list of blackout dates, the date displays as text (as shown above). You can sort the list of PTO blackout dates by the contents of this field by clicking the column header.
- End Date
- In the Add PTO Blackout Date section, allows you to select an ending date for the blackout period using a calendar. inContact WFM v1 automatically fills this field with the value you selected for Start Date. In the list of blackout dates, the date displays as text (as shown above). You can sort the list of PTO blackout dates by the contents of this field by clicking the column header.
- Maximum Allowed PTO Requests
- In the Add PTO Blackout Date section, allows you to type a the maximum number of PTO requests permitted for the blackout period. If you do not type a value, inContact WFM v1 assumes that no PTO requests are allowed and places a value of 0 in the field. This value displays in the list of blackout dates.
- Approved PTO Requests
- This field appears only in the list of blackout dates. It displays the number of PTO requests that have been approved in inContact WFM v1 for the blackout period.
