Edit Outbound Profiles
Required Permission — WFM Permissions>Forecaster>Outbound Profiles>Create, WFM Permissions>Forecaster>Outbound Profiles>Edit Others, or both
Overview
Outbound Profiles are sets of configuration options that can be used to generate outbound forecasts. These profiles can be used to approximate outbound call volumes or to generate new stream data.
This topic explains how to edit Outbound Profiles.
For more information, see Outbound Profiles Overview.
This page opens automatically when you complete the Add Outbound Profiles task. In this scenario, skip the first two steps of this task.
If you have permissions to view, but not edit, Outbound Profiles, the displayed fields will be read-only.
- Click WFOWFMv2 PortalForecaster Outbound Profiles.
- Click the Edit icon for the Outbound Profile you want to edit.
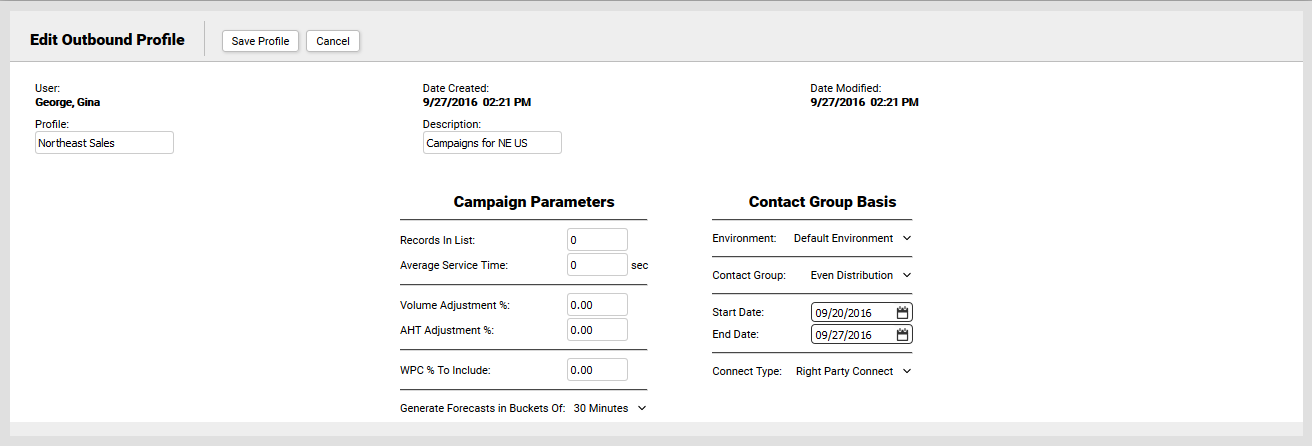
- Optional: Type a new value in the Profile field to change the name of the Outbound Profile.
- Optional: Type a new value in the Description field to change the description of the Outbound Profile.
- For Records in List, type a numeric value.
- For Average Service Time, type a numeric value.
- For Volume Adjustment %, type a numeric value. For example, type 30.00 to adjust the volume up by 30%. The field rounds to the nearest whole number (that is, 34.25 would round to 34.00 or 34%).
- For AHT Adjustment %, type a numeric value. For example, type 30.00 to adjust the AHT up by 30%. The field rounds to the nearest whole number (that is, 34.25 would round to 34.00 or 34%).
- For WPC % To Include, type a numeric value. For example, type 80.00 to use 80% of the WPC rate from the modeling period. The field rounds to the nearest whole number (that is, 84.25 would round to 84.00 or 84%).
- For Generate Forecasts in Buckets of, select one of the following values from the drop-down list: 15 Minutes, 30 Minutes, 1 Hour, or 1 Day. The default value is 30 Minutes.
- For Environment, select from the drop-down list of available Environments.
- For Contact Group, select from the drop-down list of Contact Groups in the Environment. You can also select Even Distribution.
- For Start Date, type a date that represents the first day of the period you want to use for forecast modeling.
- For End Date, type a date that represents the last day of the period you want to use for forecast modeling.
- For Connect Type, select either Right Party Connect or Connect from the drop-down list.
- Click Save Profile.