inContact WFMv2 Administration > System Settings and Audit Logs > Configure Application Settings
Configure Application Settings
Required Permission — WFM Permissions>System>Application Settings>Edit
Overview
inContact WFMv2 has a variety of settings that control aspects of the overall application.
This topic explains how to configure these application settings.
Application settings are typically configured during your implementation, and should only be changed after consultation with Support.
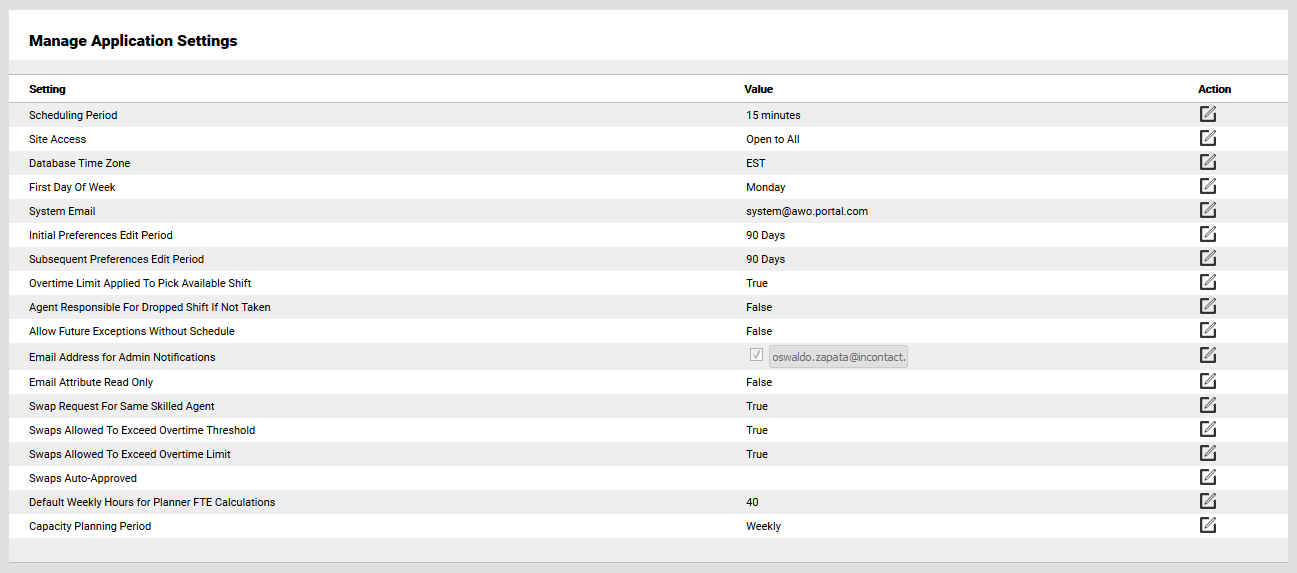
- Click WFOWFMv2 PortalSystem SettingsApplication Settings.
- To configure Scheduling Period, click the Edit icon and then select either 15 or 30 minutes from the drop-down list. Click the checkmark to save your changes. This value sets the smallest increment at which the Scheduler should generate schedules. When changed, the new value becomes effective with the next schedule request in the queue.
- To configure Site Access, click the Edit icon and then select either Open to All or Open to Administrators Only from the drop-down list. Click the checkmark to save your changes. This setting can be used to temporarily restrict Portal access to administrators.
- To configure Database Time Zone, click the Edit icon and then select one of the following values from the drop-down list: EST, CST, MST, or PST. Click the checkmark to save your changes.
- To configure First Day of Week, click the Edit icon and then select one of the following from the drop-down list: Saturday, Sunday, or Monday. Click the checkmark to save your changes. This setting specifies the day of week that is to be considered first for weekly forecasting or scheduling. Once the first day of week has been set, changing it will invalidate any reporting on existing runs.
- To configure System Email, click the Edit icon and then type an email address in the text field. Click the checkmark to save your changes. This setting specifies the email address displayed as the sender on emails sent by the Portal to agents or other users.
- To configure Initial Preferences Edit Period, click the Edit icon and then type a value in the text box, using the format xx days (for example, 90 days). Click the checkmark to save your changes. This setting specifies the number of days an agent must wait after initially entering preferences until they can change those preferences.
- To configure Subsequent Preferences Edit Period, click the Edit icon and then type a value in the text box, using the format xx days (for example, 90 days). Click the checkmark to save your changes. This setting specifies the number of days an agent must wait after changing their preferences until they can change the preferences again.
- To configure Overtime Limit Applied to Pick Available Shift, click the Edit icon and then select either True or False from the drop-down list. Click the checkmark to save your changes. This setting specifies whether the overtime limit set for an agent will be applied when a dropped shift is available and that agent volunteers to work it.
- To configure Agent Responsible for Dropped Shift if Not Taken, click the Edit icon and then select either True or False from the drop-down list. Click the checkmark to save your changes. This setting specifies whether an agent who drops a shift remains responsible for that shift if no other agent volunteers to work it. For more information, see <href needed>.
- To configure Allow Future Exceptions Without Schedule, click the Edit icon and then select either True or False from the drop-down list. Click the checkmark to save your changes. This setting specifies whether users can enter exceptions affecting a future week for which the agent is not currently scheduled.
- To configure Email Address for Admin Notifications, click the Edit icon. Then select the checkbox and type an email address in the text field. Click the checkmark to save your changes. This setting specifies the address to which inContact WFMv2 sends notifications for administrators. You can use a group address if you have multiple people who should receive these notifications.
- To configure Email Attribute Read Only, click the Edit icon and then select either True or False from the drop-down list. Click the checkmark to save your changes. When this setting is True, agents cannot edit their email addresses in the Workstation.
- To configure Swap Request for Same Skilled Agent, click the Edit icon and then select either True or False from the drop-down list. Click the checkmark to save your changes. When this setting is True, only shift swaps between agents with the same skill sets are permitted. When False, swaps are permitted when one agent has a subset of another agent's skill set.
- To configure Swaps Allowed to Exceed Overtime Threshold, click the Edit icon and then select either True or False from the drop-down list. Click the checkmark to save your changes. When this setting is True, shift swaps are permitted even if they result in one agent exceeding the overtime threshold (that is, 40 hours per week).
- To configure Swaps Allowed to Exceed Overtime Limit, click the Edit icon and then select either True or False from the drop-down list. Click the checkmark to save your changes. When this setting is True, shift swaps are permitted even if they result in one agent exceeding the overtime limit(that is, the amount of allowable overtime configured in your system).
- To configure Swaps Auto-Approved, click the Edit icon and then select either True, By List, or False from the drop-down list. Click the checkmark to save your changes. When this setting is True, shift swaps are auto-approved by inContact WFMv2, subject to the preceding settings and operating hours of the agents’ Organizational Unit. If this setting is False, shift swaps require a supervisor’s approval.
- To configure Default Weekly Hours for Planner FTE Calculations, click the Edit icon and then type a whole number in the text field. Click the checkmark to save your changes. This setting specifies the number of hours considered to be "full-time" in your organization, and is used only by the Capacity Planning feature.
- To configure Capacity Planning Period, click the Edit icon and then select either Weekly or Monthly from the drop-down list. Click the checkmark to save your changes. This setting defines the time unit for reporting in Capacity Planning.