

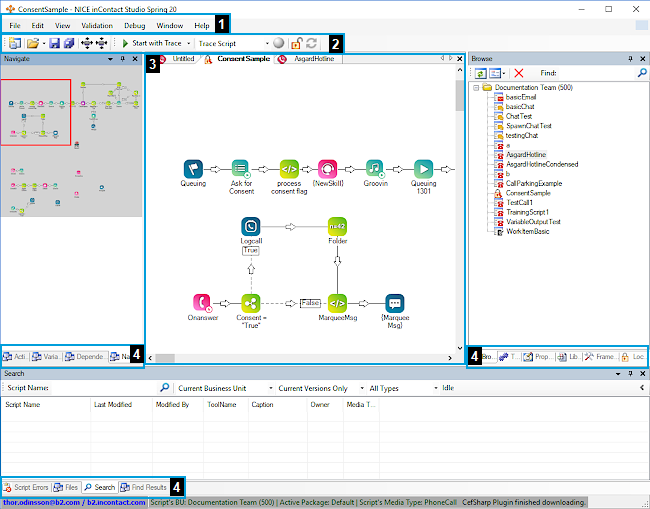
The Studio user interface consists of a canvas in the center, surrounded with a number of tabs on the left, right, and bottom. These tabs provide access to Studio actions![]() Performs a process within a Studio script, such as collecting customer data or playing music. and information about both the actions and your script.
Performs a process within a Studio script, such as collecting customer data or playing music. and information about both the actions and your script.
Studio Menu Bar
The main menu contains seven drop-down menus: File, Edit, View, Validation, Debug, Window, and Help. Many of the menu items are common commands such as saving a file or undoing a change. The common commands are not described in this topic.

File Menu
In addition to the common commands for a generic File menu, such as New, Open, Save, and Exit, the Studio File menu contains these additional options:
| Menu Option | Details |
|---|---|
| Import/Export |
Allows you to import a script from an XML file into Studio, or export a script to an XML file. |
| Recent |
Provides a list of scripts that you recently opened in Studio for the |
| Logout & Exit | Select to log out of Studio and close the application. Studio remembers your login even after you close the application. If you need to completely log out, use this option. |
Edit Menu
The Edit menu contains the common commands for Edit menus, including Undo, Cut, Copy, and Paste. You can use these options with Studio actions![]() Performs a process within a Studio script, such as collecting customer data or playing music. on the canvas. The standard keyboard shortcuts work for these commands (Ctrl+Z, Ctrl+X, Ctrl+C, and Ctrl+V). The Studio Edit menu also includes these options:
Performs a process within a Studio script, such as collecting customer data or playing music. on the canvas. The standard keyboard shortcuts work for these commands (Ctrl+Z, Ctrl+X, Ctrl+C, and Ctrl+V). The Studio Edit menu also includes these options:
| Menu Option | Details |
|---|---|
| Copy Script As Image |
Copies the current script to your clipboard as an image. You can paste the image to another location, such as an email or text document. |
| Find |
Opens the Find in Script window, where you can search for specific text in all of the scripts you have open or in just the script that's open in the top Canvas tab. |
| Go To |
Search for and navigate immediately to an action ID within the current script. You can view action IDs in the ID field of the Actions tab. |
| Compare | Enables you to compare two scripts by captions, parameters, branches, or position. For example, a pair of scripts may contain the exact same actions and branches, but might contain different parameters. By comparing the 2 scripts, you can view the differences (and similarities) in the Find Results tab. |
View Menu
The View menu provides the following options:
| Menu Option | Details |
|---|---|
| Help > Agent Info | View information about the NiCE CXone account you're currently logged in to Studio with. Information appears on the Properties tab. |
| Help > Login Info | View information about your current session in Studio. |
|
Browser, |
Click the tab name to open that tab in Studio. This is helpful for when you have closed a tab and need to reopen it. If you need to reopen the Script Errors, Actions, Variables, or Dependencies tabs, see the Validation menu. |
| Toolbars > Trace | Click to toggle whether you want to display the Trace option in the toolbar. |
Validation Menu
| Menu Option | Details |
|---|---|
| Windows |
Click to open any these tabs: Script Errors, Actions, Variables, and Dependencies. If you need to open tabs not in this list, see the View menu. |
| Syntax Check |
Checks an active script for connection and property errors, and displays warnings in the Script Errors tab. This is a basic method of testing and debugging your script. |
Debug Menu
Required permissions: Applications > Studio > Scripts >
| Menu Option | Details |
|---|---|
| Capture Script |
Capture a script to trace and document its progress as it runs. You can choose to capture the Next instance only or to capture on a Continuous basis as it runs. As each action in the script fires, the resulting information appears in the Trace Output tool. If you capture a script continuously, the trace files are saved on the NiCE CXone media server. You can use Debug > Load Remote Trace File to view these trace files. |
| Start with Trace |
Launches the active script and opens the Trace Output window to display the results of the script running. You can also start a trace from the toolbar using the Start with Trace button. |
| Load Debug Trace File |
Browse for a trace file and open it in the Trace Output window. |
| Load Remote Trace File |
Browse for a trace file on the NiCE CXone platform and open it in the Trace Output window. |
Window Menu
The Window menu allows you to navigate between open scripts in Studio. Selecting a script in this menu brings it to the front as the active tab. If you only have one script open, there's only one option in this menu.
Help Menu
The Help menu provides options to access the Studio online help, as well as other information that can assist you with Studio.
| Menu Option | Details |
|---|---|
| NiCE CXone Studio Documentation |
Opens a new browser tab of your default web browser and loads the Studio overview page of the online help. |
| Context Sensitive Help F1 |
Displays the online help topic for the action that's currently selected on the canvas. You can also press F1 on your keyboard to access the selected action's help topic. The help topics load in a new tab in your default web browser. |
| Change Password |
Launches the short process of changing your password for the account you used to log in to Studio. |
| Business Unit Configuration |
Displays information on how your |
| Troubleshooting > Manually Download CefSharp Program | Starts a new download of CefSharp, a plugin that Studio requires to run. |
| Troubleshooting > Clear Cache | Clears Studio's cache, which can be helpful if the application isn't working as expected. |
| About |
Displays basic information about Studio, such as the version. |
Studio Toolbar

The toolbar offers a mix of generic commands, such as opening or saving a script, and Studio-specific commands.
| Toolbar Option | Details |
|---|---|
| Increase/Reduce Space |
Click to increase or decrease the amount of space between actions on the canvas. Each click changes the amount of space by a small amount. |
| Start with Trace | Allows you to start a trace. |
| Trace Script |
Tracing a script launches the active script and opens the Trace Output window to display the results of the script running. The toolbar provides 3 commands related to tracing a script: starting the trace, selecting an ANI |
| Lock/Unlock Scripts |
Click to lock or unlock a script. Locking puts a script into read-only mode. Unlocking it allows you to edit it, but no other Studio users can edit it at the same time. Other users can modify the script after you unlock it or save and close it. When a script is locked, the canvas background appears white and the script icon on the tab is a locked padlock. When a script is unlocked, the canvas background appears gray and the icon appears as the script type icon. This option appears in Studio only if script locking is enabled. Your NiCE CXone administrator can enable this option. If you have the Scripts Lock Override permission, you can override another user's lock on a script so you can edit it. You can view all locked scripts on your business unit |
Studio Canvas
The canvas is the large space in the center of the Studio interface. It's where you create a script. You can drag actions from the Tools or Framework tabs onto the canvas. Scripts open as new canvas tabs, just like a web browser.
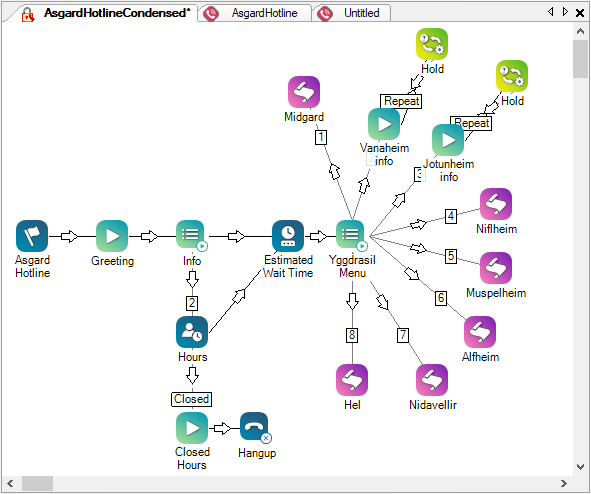
On the canvas you can:
- Click tabs or use the Window menu to switch between open scripts.
- Close a script tab by clicking the X on the canvas. The X is not on the script's tab, as it is in some web browsers. It's located in the top right corner of the canvas window.
- If you click in the white space of the canvas and then select the Properties tab, you can access the script's properties.
- If you close all script tabs, you can replace the canvas by creating a new script.
Studio Tabs
Tabs provide access to a lot of different information that you need while working in Studio. By default, the tabs are split into three groups. The groups are located to the left, right, and bottom of the canvas. All of the tabs are visible by default. If you close a tab, you can reopen it using either the View menu or the Validation > Windows menu. See the image at the top of this page for a visual guide to the default layout.
Default Tab Groups
The default tab groups are:
- Left side: These tabs are located on the left side of the Studio window by default:
- Navigate
- Dependencies
- Variables
- Actions
- Right side: These tabs are located on the right side of the Studio window by default:
- Framework
- Tools
- Library
- Browse
- Properties
- Bottom: These tabs are located at the bottom of the Studio window by default:
- Find Results
- Files
- Script Errors
- Search
Rearrange Tabs
The location of the tabs is customizable. You can:
- Drag and drop tabs on top of each other to move them to other locations in Studio. If you grab the title bar of a tab, the whole stack of tabs moves. If you want to move just one tab, grab the other end of the tab (the part that actually looks like a tab).
-
Pin a group of tabs to the edge of the interface window by clicking the pin icon in the top-right corner of the tab. When you click a pinned tab, it slides out so you can use it. When you click away from it, it minimizes back to the pinned edge.
 View example of pinned tabs
This example shows the default left and bottom groups of tabs pinned to the edges of the Studio window, while the group on the right is not pinned, but rather docked to the right edge of the window.
-
Use the drop zones to place tabs. When you click the title bar of a tab and drag it away from its current location, the Studio interface displays drop zone icons for all of the places where you can dock the tab. Hover the cursor over a drop zone and release your mouse button.
View example of placing a tab in a drop zone.
In this example, the user's cursor is hovering over the top drop zone icon in the T-shaped group of drop zones. The highlighted portion of the tab on the left shows where the tab that the user is moving would dock, if they released the mouse button.
Actions Tab
The Actions tab shows a list of all actions currently in the script. Actions are listed in the order they were added to the script. This tab displays the following information about each action:
-
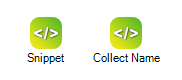
Caption: This is the text that appears under the action icon on the canvas. By default, the caption is the same as the action name. You can change any action's caption in the action's properties. This is a helpful way of noting what the action is accomplishing in the script. For example, for each Snippet action, you could change the caption to indicate what that instance of Snippet is doing in the script.
View image
This example shows the default caption for the Snippet action and a Snippet action with a custom caption.
- Tool Name: The name of the action. This name cannot be modified.
- ID: The action ID assigned to the action based on the order it was added to the canvas. Each instance of an action in a given script has a unique number.
Browse Tab
The Browse tab shows the Studio folders, where you store all scripts that you create for this
- Open scripts from this tab by double-clicking on a script. It opens in a canvas tab.
- View the script's history by right-clicking on a script and hovering your cursor over History.
- Open an older version of a script by clicking the version you want to see in the History list.
- Revert to a previous version of a script by opening the earlier version of the script and clicking Save As, then choosing the script in the list.
The Scripts page in the NiCE CXone ACD application also allows you to revert to an earlier version of a script if you have the appropriate permissions.
Dependencies Tab
Displays relationships between actions in the active script.
Files Tab
Required permissions: Applications > Studio > Prompts >
The Files tab contains all of the voice prompt recordings used in scripts. These files are stored in your
Find Results Tab
Displays the results of comparing with the Edit > Compare option.
Framework Tab
Contains a comprehensive list of all Studio actions.
Because some of the actions on this tab are more advanced, they're not made available to all users by default. If you don't see the tab in Desktop Studio, it hasn't been enabled for your business unit![]() High-level organizational grouping used to manage technical support, billing, and global settings for your NiCE CXone system.. If your organization has a need that can be met by using a Framework action, your account representative can enable the Framework tab in your business unit.
High-level organizational grouping used to manage technical support, billing, and global settings for your NiCE CXone system.. If your organization has a need that can be met by using a Framework action, your account representative can enable the Framework tab in your business unit.
If you have access to the Framework tab, be cautious about using unfamiliar actions. Many of the actions aren't documented in the online help. You can ask your account representative or submit a question to the NiCE CXone customer community to learn more about what an action does.
You can learn more about the actions available on this tab on the Framework Actions help page.
Locked Tab
Required permissions: Applications > Studio > Scripts >
Displays a list of scripts that have been locked. If your NiCE CXone user account has the Lock Override permission, you can override a script lock. Unlock a script by right-clicking on the script and selecting Kick <user> from editing script or clicking the Kick button (indicated by a red arrow).
Navigate Tab
Allows you to quickly navigate around larger scripts without using the scroll bars. The red box displays what you can see on the canvas.
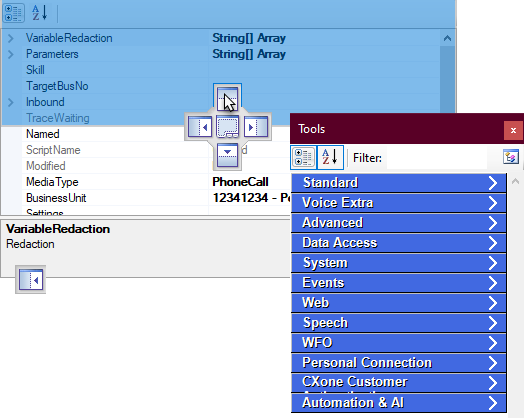
Properties Tab
The Properties tab shows information about the action that's currently selected. If no action is selected, this tab shows information about the entire script.
Each action has a unique set of variables, branches, and parameters. You can configure them in the action's properties to define how you want the action to function in the script. You can also view action properties by right-clicking on the action and select Properties.
Script properties allow you to simulate an inbound call to test the script. You can also redact one or more variables in the script.
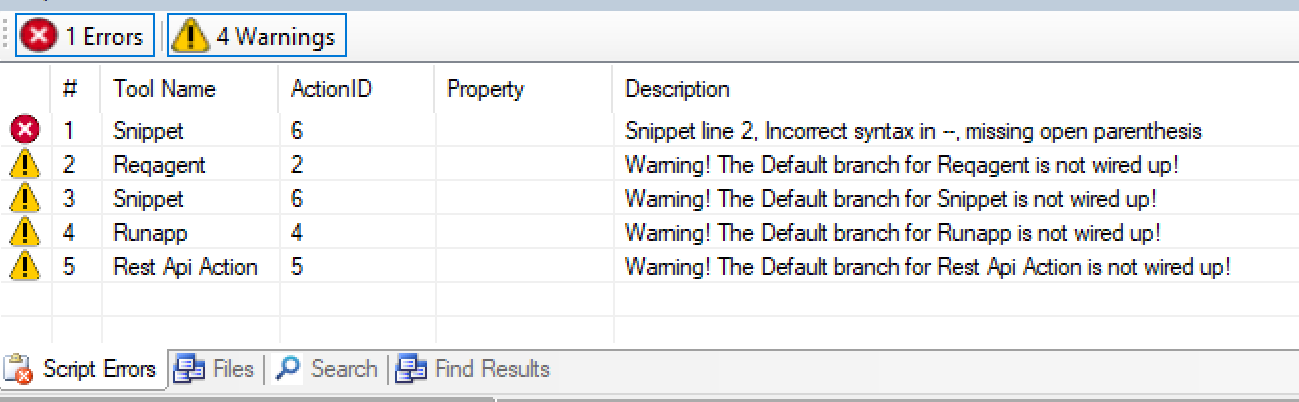
Script Errors
The Script Errors tab displays any warnings and errors related to your script. The tab won't show anything until you either save the script or run a syntax check. Warnings don't keep the script from running or saving, but errors do.
Search Tab
Allows you to search for a specific script. You can narrow your search by using a partial script name, business unit, old and new versions, and script types.
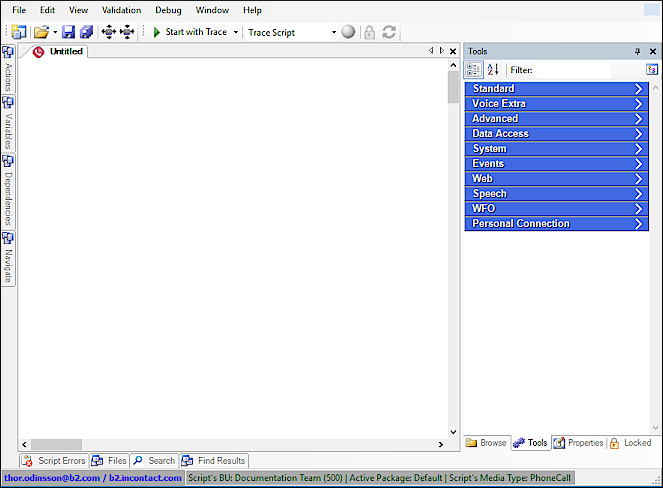
Tools Tab
Displays the most commonly used actions. Click the categories icon  to change how the actions are organized. You can have them displayed by categories or in alphabetical order. When the actions are in alphabetical order, you can click the sort icon
  to reverse the order of the list.
The grouping of default categories is called a palette. You can create your own categories and palettes by clicking the palette icon  in the upper right corner of the Tools tab. The default palette contains these categories:
| Category | Description |
|---|---|
| Standard | Basic and general actions used in any script type. |
| Voice Extra | Common actions used for voice media type scripts. |
| Advanced | Advanced actions typically used by experienced script developers. |
| Data Access | Actions related to accessing data from inData or customer databases. |
| System | Actions used for file storage and manipulation. |
| Events | Actions triggered by NiCE CXone. |
| Web | Actions used by system scripts. System scripts are default scripts that NiCE CXone uses internally. |
| Speech | Actions related to Automatic Speech Recognition (ASR |
| WFO | Actions related to Workforce Engagement (WEM). |
| Personal Connection | Actions related to NiCE CXone Personal Connection. |
| NiCE CXone Custom Authentication | Actions related to customer authentication. |
| Automation and AI | Actions related to automated AI, such as agent assistants |
Variables Tab
Displays variables available in the active script and the actions that reference each one.
Keyboard Shortcuts
Studio uses many of the commonly-known keyboard shortcuts, such as CTRL + C to copy something, but also offers many more shortcuts to streamline your workflow.
| Shortcut | Action |
|---|---|
| CTRL + A | Selects all the action icons in the active script. |
| CTRL + C | Performs the standard Windows copy function. |
| CTRL + E | Opens the Export to File window. |
| CTRL + F | Opens the Find in Script dialog. |
| CTRL + G | Goes to a specific script action item (that is, selects an action icon in the active script based on the ID you enter). |
| CTRL + I | Opens the Import From File... window. |
| CTRL + N | Opens the Create New Script window. |
| CTRL + O | Opens the Open Script From... window. |
| CTRL + S | Saves changes to the active script only. |
| CTRL + SHIFT + S | Saves changes to all open scripts. |
| CTRL + T | Captures a script trace for the next occurrence only. |
| CTRL + SHIFT + T | Starts a continuous script trace that runs until manually ended. |
| CTRL + V | Performs the standard Windows "paste" function. |
| CTRL + X | Performs the standard Windows "cut" function. |
| CTRL + Y | Reverts the script to its state prior to an "undo". |
| CTRL + Z | Performs the Windows "undo" function (that is, returns the script to its state prior to your last change). |
| Del or Delete | Deletes the selected item. |
| F1 | Launches online help for a selected action. |
| CTRL + F2 | Opens the Browse tab. |
| CTRL + SHIFT + F2 | Opens the Framework tab. |
| CTRL + F3 | Opens the Tools tab. |
| CTRL + SHIFT +F3 | Opens the Find Results tab (see Find in Script dialog). |
| CTRL + F4 | Opens the Properties tab. |
| CTRL + SHIFT +F4 | Opens the Locked tab. |
| F5 | Opens the Trace Output window. |
| CTRL + F6 | Opens the Files tab. |
| SHIFT + F6 | Checks the syntax for the active script and opens the Script Errors tab. |
| CTRL + F7 | Opens the Navigate tab. |
| CTRL + F9 | Opens the Search tab. |