

This page provides information about tasks you may need to do when working with scripts. In addition to the tasks described on this page, you can schedule scripts to run on the Script Schedules page in NiCE CXone.
View a Script's Properties
Required permissions: Studio Scripts View
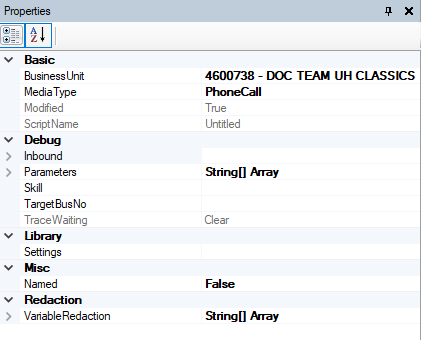
The script Properties tab shows you information about the current script. From here, you can view or change the script's media type, set up a simulated inbound interaction for testing, or configure variable redaction.
- In Studio, open a script.
- Click anywhere in the white space on the canvas workspace to ensure no actions are selected.
-
Click the Properties tab, which displays information about the script.
-
In the Basic section, you can:
-
View the BusinessUnit where the script is located.
-
View or change the MediaType of the script.
-
View whether the script has been Modified since it was last saved. If True, the script has changed.
-
View the ScriptName.
-
-
In the Debug section, you can set properties that are used when you debug the script with a trace. You can:
-
Configure any Parameters that you want to use when running a trace on this script.
-
Configure Inbound settings to simulate an inbound call with the script.
-
Assign an ACD Skill to use when simulating an interaction to debug an outbound script.
-
Set a target business unit
 High-level organizational grouping used to manage technical support, billing, and global settings for your NiCE CXone system.. This option is only used when running system scripts for organizations that have more than one NiCE CXone business unit.
 -
View if there is currently a pending request for a trace on this script. This is shown in the TraceWaiting property, which is read-only.
-
-
In the Library section, you can access script-specific settings, if any. Most script types don't have any properties in this section.
-
In the Redaction section, you can configure variable redaction. This removes variables from traces and logs.
View a Script's History
Required permissions: Studio Scripts View
The number of previous versions of a script that Studio keeps is configurable by a NiCE CXone administrator.
- In Studio, click the Browse tab.
- Right-click on a script and click History
- Click the version you want to view. If locking is enabled in Studio, the previous version of the script opens in read-only mode.
Change a Script's Media Type
The media type determines the kind of interaction the script can handle.
Required permissions: Studio Scripts Create/Edit
- In Studio, open a script.
- Click in an empty space on the script canvas to ensure no actions are selected.
- On the Properties tab, click the drop-down arrow next to the MediaType property and select a new media type for the script.
- Save the script.
Put a Script into Production
Required permissions: Points of Contact Edit
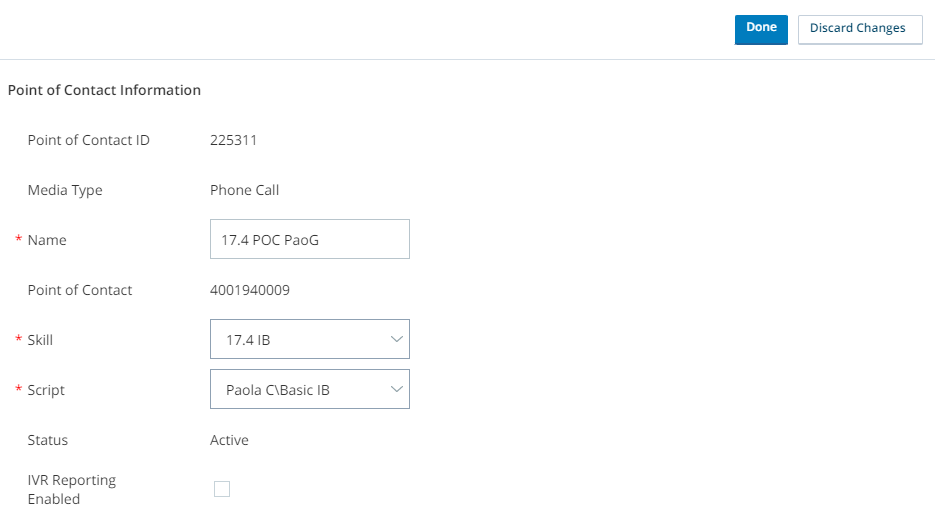
When a script is fully tested and ready to put into use in NiCE CXone, you can put it into production. To do that, you need to assign a script to a point of contact![]() The entry point that an inbound contact uses to initiate an interaction, such as a phone number or email address. in NiCE CXone ACD.
The entry point that an inbound contact uses to initiate an interaction, such as a phone number or email address. in NiCE CXone ACD.
If you use a naming convention to identify scripts that are in development or production, it helps you and other script developers in your organization know which scripts are ready to use. A naming convention doesn't tell NiCE CXone which scripts to use.
Only assign scripts to points of contact if you're certain that they're fully tested and ready for production. Putting a script that isn't ready into production can result in contacts not being routed for the selected point of contact.
- Click the app selector
 and select ACD.
 -
Go to Contact Settings > Point of Contact.
- Click the point of contact you want to assign a script to.
- Click Edit.
- Select the Script that you want this point of contact to use.
- Click Done.
Compare Scripts
Required permissions: Studio Scripts View
You can compare two scripts by captions, parameters, branches, or position. The Find Results tab shows the differences and similarities between the selected scripts.
- Open both scripts that you want to compare. Be sure to save any changes that you recently made.
- Click Edit > Compare to open the
- Select a script in the Left field, and the other script in the Right field. Pay attention to which script you select, as all scripts currently open in Studio appear in these drop-downs.
-
Configure the General Options and Compare Settings sections. These sections allows you to determine which elements of the scripts that you want to compare. Note that the Position element refers to the X and Y axis for each action on the canvas.
Learn more about fields in this step
Field Details Ignore Case Select if you want the comparison to ignore differences in case in the elements that are compared. For example, if you select Ignore Case, the captions First Level Menu and First level menu aren't noted as differences, but they are you don't select it. Compare Captions
Select if you want to compare the captions of actions in each script.
Compare Parameters Select if you want to compare the properties of actions in each script. Compare Parameters Line by Line Select if you want to compare the parameters line by line. Compare Branches Select if you want to compare the configured branches in each script. Compare Position Select if you want to compare the location of the actions on the canvas of each script. This option reports the position of each action with its X-Y axis coordinates. For example, {X=464, Y=416). - Click Compare. The results appear in the Find Results tab. If you do not have the Find Results tab open, click View > Find Results from the menu.
Redact Variables from Traces and Logs
Required permissions: Studio Scripts Create/Edit
Variable redaction eliminates variable values from traces and logs generated by a script. You can redact variables and objects.
Redaction is configured at the script level in the VariableRedaction field of a script's properties. Redacted values are replaced with a string of X characters. The length of the variable value determines how many Xs are used, meaning that a redacted five-letter word would result in five Xs. Partial variable redaction, such as part of a credit card number, is not supported.
Variable redaction occurs at the script level. It isn't an inheritable property. If a redacted variable is passed to other scripts, such as with a RunScript or RunSub action, that variable isn't automatically redacted in the subsequent scripts. If you want a variable to always be redacted, you must configure variable redaction in all scripts it might be passed to.
Variables that are passed into other scripts have a global scope. To redact them, you must include global: before the variable name in the VariableRedaction field to ensure that it's redacted.
Best practice is to never keep sensitive data in a script longer than necessary. In addition to redacting variable values, you can delete the data from the variable.
To redact variables:
- In Desktop Studio, click on the script canvas to make sure nothing is selected.
- Click the Properties tab.
- Click the ellipsis button
 next to the VariableRedaction field to open the String Collection Editor.
 - Enter the names of the variables you want to redact. These names should correspond to variables created in Assign actions in the script.
- Click OK.
Delete Sensitive Data from a Variable
In addition to configuring variable redaction, you can configure your script to delete sensitive data from a variable. This helps ensure that it doesn't persist in the script longer than necessary.
- In your script, place a Snippet action after the sensitive data has been used and is no longer needed.
- In the
- For a dynamic data object: DYNAMIC <object name>
- For a regular variable: ASSIGN <var name> = ""
- Save your changes.
Deactivate a Script
Required permissions: Applications > Studio > Scripts >
Scripts cannot be deleted from Studio. Instead, you can deactivate them. Deactivated scripts are no longer visible in Studio, but they can be seen on the Scripts page in the NiCE CXone ACD application.
You don't need to deactivate a script to prevent NiCE CXone from using it. NiCE CXone only uses scripts that are assigned to a skill![]() Used to automate delivery of interactions based on agent skills, abilities, and knowledge. and a point of contact
Used to automate delivery of interactions based on agent skills, abilities, and knowledge. and a point of contact![]() The entry point that an inbound contact uses to initiate an interaction, such as a phone number or email address..
The entry point that an inbound contact uses to initiate an interaction, such as a phone number or email address..
- On the Browse tab in Studio, locate the script you want to deactivate.
- Select the script and click the red X icon
 at the top of the tab.
 - Confirm that you want to deactivate the selected script.
- You can add notes to the script to explain why you deactivated the script:
- In NiCE CXone, click the app selector and select ACD > Scripts.
- Select Inactive from the Show drop-down.
- Click the script and add your notes on the Notes tab.
- In NiCE CXone, click the app selector
Reactivate a Script
Required permissions: Applications > Studio > Scripts >
You can reactivate a script to make it visible in Studio again.
- In NiCE CXone, click the app selector and select ACD > Scripts.
- Select Inactive from the Show drop-down.
- Click the script you want to reactivate.
- Click Activate on the Details tab of the script's page.
Revert to Previous Version of Script
Studio keeps previous versions of all scripts. Each time you save your changes, another version is added to the script file's history. You can revert to a previous version of a script file.
If you have saved a copy of a script under a different name and want to revert back to it, don't follow these steps. Instead, open the copy you want to revert to and use Save As to create a new copy. You can deactivate copies of scripts that you don't want anymore, or you can move them into a separate folder.
Revert to a Previous Version of a Script in Studio
Security profile: Studio Scripts Create/Edit
- On the Browse tab in Studio, locate the script you want to revert.
- Right-click on it and select History, then click the version you want to go back to. The selected version opens with the date and time it was saved appended to the end of its name. For example, a script that was saved on August 2, 2022 at 9:32:08, the end of the script name is 08022022093208.
- Click File > Save As and save a copy of the file with a new name. Historical versions of script files open in permanent read-only mode.
Revert to a Previous Version of a Script from NiCE CXone
Studio keeps previous versions of all scripts. Each time you save your changes, another version is added to the script file's history. You can revert to a previous version of a script file.
If you have saved a copy of a script under a different name as a backup and want to revert back to it, don't follow these steps. Instead, open the backup copy you want to revert to. You can work in the backup copy, or you can duplicate it to create a new working copy and leave the backup in place. You can deactivate copies of scripts that you don't want anymore.
Revert to a Previous Version of a Script in Studio
Permissions required: Applications > Studio > Scripts >
You must close the script in Studio before you revert it. If the script is open, you won't see the changes unless you close and reopen the script. If you leave the script open when you revert it, then make changes and save the script without closing and reopening it, you overwrite the reversion and must revert it again.
- On the Browse tab in Studio, locate the script you want to revert.
- Right-click on it and select History, then click the version you want to go back to. The selected version opens with the date and time it was saved appended to the end of its name. For example, a script that was saved on August 2, 2022 at 9:32:08, the end of the script name is 08022022093208.
- Click File > Save As and save a copy of the file with a new name. Historical versions of script files open in permanent read-only mode.
Revert to a Previous Version of a Script from NiCE CXone
Permissions required: Contact Handling > Central Scripts Access >
When scripts are reverted from NiCE CXone, the name of the file doesn't change as it does when you revert from Studio.
You must close the script in Studio before you revert it. If the script is open, you won't see the changes unless you close and reopen the script. If you leave the script open when you revert it, then make changes and save the script without closing and reopening it, you overwrite the reversion and must revert it again.
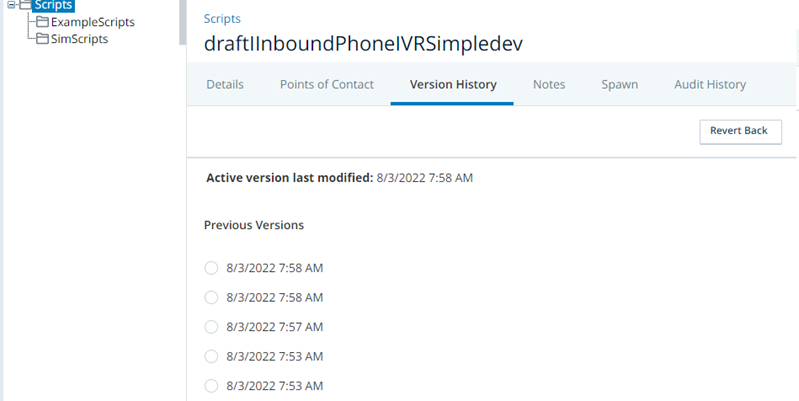
- In NiCE CXone, click the app selector and select ACD > Scripts.
- Click the script you want to revert. If the script you want to revert is currently deactivated, you must reactivate it first.
-
On the Version History tab, select the version you want to revert to from the Previous Versions list and click Revert Back.
- In Studio, open the script you reverted and continue working on it.
Upload Files in Studio
You can upload files to NiCE CXone using Studio. This includes audio files for prompts, ASR![]() Automatic Speech Recognition. Allows contacts to respond to prompts by speaking, pressing phone keys, or both. grammar files, and more. You can also view, upload, and manage prompts and other files on the Browse ACD Files page in NiCE CXone.
Automatic Speech Recognition. Allows contacts to respond to prompts by speaking, pressing phone keys, or both. grammar files, and more. You can also view, upload, and manage prompts and other files on the Browse ACD Files page in NiCE CXone.
-
On the Files tab in Studio, expand the folder you want to upload the file to. If you're uploading a prompt, expand the Prompts folder.
-
Click Upload File(s)
 and select one or more files to upload, then click Open. The file is uploaded and appears in the list on the tab.
 - You can also drag a file from the file browser on your computer to the Files window in Studio.