

This page provides information about essential script tasks, such as creating or opening scripts, adding and configuring actions, and locking or unlocking scripts.
Create a New Script
Security profile: Studio Scripts Create/Edit
If locking is enabled for Studio, your new script won't be locked until you save it.
-
In Studio, click New
 in the toolbar.
 -
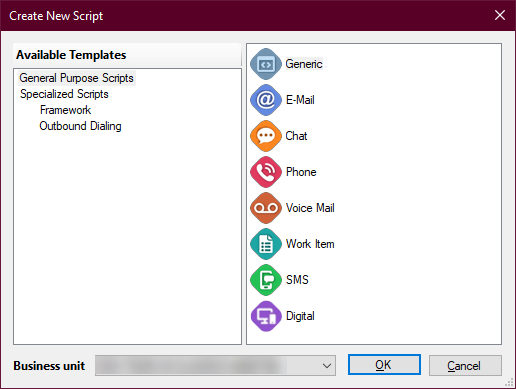
Select the script type you want to create from the list on the right side of the window. If you don't see the script types on the right side of the window, verify that General Purpose Scripts is selected under Available Templates.
- Click OK. A blank script canvas opens in Studio.
- Click Save and provide a name for your script. Choose the name carefully. You cannot rename scripts once they're saved.
Create a Script from a Template
Security profile: Studio Scripts Create/Edit
If locking is enabled for Studio, your new script won't be locked until you save it.
-
In Studio, click New
in the toolbar. -
Select a template category under Specialized Scripts in Available Templates, then click the template you want to use from the list on the right.
- Click OK.
- Save the script. Choose the name carefully. You cannot rename scripts once they're saved.
Open a Script
Security profile: Studio Scripts Create/Edit
You can open a script by:
- Clicking File > Open, selecting a script, and clicking Select.
- Clicking Open
 on the toolbar, selecting a script, and clicking Select.
 - Searching for a script on the Search tab, then double-clicking the one you want to open.
- Using the Browse tab to locate a script and double-clicking the one you want to open.
Never edit a production script directly. Saved changes go into effect immediately. If a change causes a problem with a script, it could impact your contact center's ability to function. If you need to make changes, use Save As to create a copy of the script and name it to indicate that it's in development. Only put it into production when it's fully tested and ready.
Import a Script
Security profile: Studio Scripts Import/Export
You can import a script from an XML file.
- In Studio, click File > Import from File.
- Navigate to the location of the script you want to import, select it, and click Open.
- Click Save.
- On the Save Script As window, choose the folder to save the script in.
- Enter a new File name for the script if you want to change it. Scripts cannot be renamed after they're saved.
- Click Save.
Export a Script
Security profile: Studio Scripts Import/Export
You can export a script as an XML file.
- In Studio, click File > Export to File.
- Navigate to the location on your computer where you want to save the exported script.
- Enter a File name for the script and click Save.
Add and Configure an Action in a Script
Security profile: Studio Scripts Create/Edit
Actions are the building blocks of all scripts. Most actions have a set of properties that must be configured to define the behavior of the action for the specific script you're creating. Refer to the online help for each action for information about the action's properties. Select the action on the script canvas and press F1 on your keyboard. The help page loads in your default browser.
This section describes adding an action from the Tools tab. If the Framework tab is enabled in Studio, you can add actions from it.
- In Studio, create or open a script.
-
On the Tools tab, locate the action you want to add. You can find actions by:
- Entering text in the Filter field to search for an action. You can search using a full or partial name. For example, if you enter ai, the search finds all actions whose names contain those letters anywhere in their names.
- Clicking Categories
 to toggle between viewing the actions by category or in one long list.
 - Clicking Alphabetical
 to toggle viewing the actions in alphabetical order or their default order.
- Click the action you want to add. You don't need to click and hold.
- Click on the script canvas to place the action.
-
Select the action and right-click to pop up the
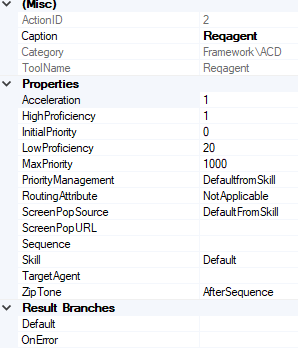
- Change the Caption property to a descriptive word or short phrase that indicates what that action does in the script. For example, for a Play action, change the caption to the name of the audio file it plays.
-
Configure the other properties as needed. You can configure properties by:
- Selecting an option: Click the down-arrow icon
 that appears in the right side of the field, then select an option from the drop-down list.
 - Using the Expression Editor window: Click the ellipsis icon
 that appears in the right side of the field, then enter text into the Expression Editor window.
 - Entering text directly: Click in the field and enter text directly. Some properties require static text or variables, but many properties can accept either.
- Double-clicking the action: Some actions have additional configuration settings that you can access this way.
- Selecting an option: Click the down-arrow icon
- Save your changes to the script.
Add an Action from the Framework Tab
Security profile: Studio Scripts Create/Edit
The Framework tab contains a comprehensive list of all actions available in Studio. Some of the actions on this tab are system or internal actions that can only be used after consulting a account representative. Use unfamiliar actions from this tab with caution.
The Framework tab is only visible if a account representative has enabled it for you. Learn more about the Framework tab and the actions it contains.
- In Studio, create or open a script.
- On the Framework tab, expand folders to locate the action you want to add.
- Click and drag the action to the script canvas.
Connect Actions and Create Branches
Security profile: Studio Scripts Create/Edit
- In Studio, create or open a script.
- Add at least two actions to the canvas.
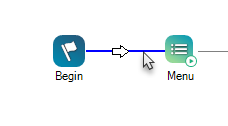
- Hover the cursor over the first action, then click and hold the arrow
 in the lower right corner of the action's icon to start a connector.
 -
Connect the first action to the second one by dragging the cursor away from the action and dropping it on top of the second action. If the first action has more than one branch condition available, the
-
On the
- Click OK.
- Repeat steps 3-5 to connect more actions. If you connect an action to more than one other action, use a different branch condition for each connection. You should always create a branch that uses the Default branch condition. This gives the script an option to follow if none of the other branches apply.
- Rearrange actions on the canvas if you need to make space for connections. Attached connectors move with an action. If you want to move more than one action at a time, you can:
- Click on the canvas and drag the cursor to draw a selection box around the actions you want to move. The selected actions are highlighted in red. Click on one of the selected actions to drag the group to a new location.
- Press CTRL and click each action you want to move, then click one of the selected actions and drag the group to a new location.
- Click an action, then click Edit > Selection in the Studio menu bar. Choose an option based on what you want to happen, then drag the highlighted actions to a new location:
- Select all above: All actions above the selected action across the entire width of the script are highlighted.
- Select all below: All actions below the selected action across the entire width of the script are highlighted.
- Select all to the right: All actions to the right of the selected action across the entire height of the script are highlighted.
- Select all to the left: All actions to the left of the selected action across the entire height of the script are highlighted.
- Verify that you don't have dead ends, where the script is stuck and has no way to end or move on to the next action. You can do this by testing the script.
- Save the script.

Create Variable Branch Conditions
Security profile: Studio Scripts Create/Edit
Variable branch conditions allow you to create custom conditions that must be met for the script to follow a particular branch. This is helpful when creating IVR![]() Interactive Voice Response. Automated phone menu contacts use via voice or key inputs to obtain information, route an inbound voice call, or both. menus. You can create a branch for each menu option, and set the condition for each one to be the number the contact must enter to select that option.
Interactive Voice Response. Automated phone menu contacts use via voice or key inputs to obtain information, route an inbound voice call, or both. menus. You can create a branch for each menu option, and set the condition for each one to be the number the contact must enter to select that option.
- In Studio, create or open a script.
- Add at least two actions to the canvas.
- Hover the cursor over the first action, then click and hold the arrow in the lower right corner of the action's icon to start a connector.
-
Connect the first action to the second one by dragging the cursor away from the action and dropping it on top of the second action. The
-
Click the + icon in the
- In the field that appears under Variable Branch Condit, enter the name of the condition you're creating. For example, to create a menu option for when the contact presses 3, enter 3 in the field.
-
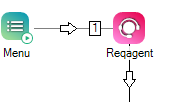
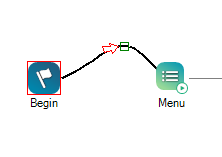
Click OK. On the canvas, the name of the variable rectangle appears in a rectangle on top of the connector. You can see an example of this in the following image.
 View image
The connector that goes from the Menu action to Reqagent shows the number 1 in a rectangle. This means that if the contact presses 1 when prompted by the menu, the script takes that branch and requests an agent.
Delete a Connector
Security profile: Studio Scripts Create/Edit
- In Studio, click the arrow in the connector you want to delete.
- Press the Delete key on the keyboard or click Edit > Delete.
Change a Connector's Shape
Security profile: Studio Scripts Create/Edit
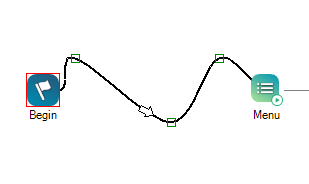
You can make connectors bend and curve so they fit into your script better. This can help you keep your scripts tidy and easier to read.
- In Studio, open a script.
-
Press and hold CTRL + Shift on the keyboard and hover the cursor over the connector you want to change the shape of until the line turns blue.
-
While the line is still blue, right-click on the connector. A small blue square appears. This is an anchor point.
-
Click and hold the anchor point and drag it in any direction until the connector has the shape you want.
-
You can repeat steps 2-4 on the same connector to add more anchor points if you want to add more curves to the connector.
- Click the arrow on the connector to see all anchor points on the line.
- Delete a single anchor point by pressing CTRL + Shift on the keyboard and then right-clicking on the anchor point you want to remove. The anchor point disappears and the curve of the connector line adjusts automatically.
- If you want to delete the entire connector, click in the connector's arrow so it turns red. Press Delete.

Lock and Unlock Scripts
Required permissions: Studio Scripts View, Create/Edit
If locking is enabled for Studio scripts, you can lock and unlock the scripts you're working on. Unlocked scripts are read-only. To edit a script, you must lock it. This allows you to work on it, but prevents other users from saving changes to it.
If you attempt to open a script that's locked by another user, Studio notifies you that the script is locked. You can override a locked script if your NiCE CXone
Depending on how Studio is configured, scripts open in either locked mode or read-only mode by default. When you create a new script, it is neither locked nor unlocked. When you save the script, it's automatically locked, even if the default behavior for Studio is set to open scripts in read-only mode.
- In Studio, open a script. If locking is enabled, the script opens either in read-only (unlocked) mode or locked mode depending on how Studio is configured. If locking isn't enabled, the script opens with a white canvas background and the icon on the script tab doesn't change to a lock.
- To lock a script so you can edit it, click the lock icon
 in the toolbar. The canvas changes from gray to white and the icon in the script tab changes to a lock.
 - To unlock a script and put it into read-only mode, click the unlock icon
 in the toolbar. The canvas changes from white to gray and the icon in the script tab changes to the icon for the script type.
Override a Locked Script
Required permissions: Studio Scripts Lock Override
When you open a script that's locked by another user, Studio displays a notification. You can override the lock on a script if you need to edit it. When you override a script lock, the other user's saved changed are kept. Studio displays a notification to the user the next time they log in. The notification might prompt them to review changes made to the script. You can review changes by viewing a previous version of the script, or by opening a previous version of the script and comparing it to the current version.
- In Studio, click the Locked tab.
- Select the script you want to override and click Kick
 .
. - Click OK when prompted to confirm you want to kick the other user from editing the script.