

A prompt is a message that plays for the contact. Prompts can ask the contact to input information or convey information without asking for input. Prompts can be played by auto-attendants, interactive voice response (IVR![]() Interactive Voice Response. Automated phone menu contacts use via voice or key inputs to obtain information, route an inbound voice call, or both.) systems, and other voice processing tools. In NiCE CXone, prompts can be prerecorded audio files or text that's read by a text-to-speech (TTS
Interactive Voice Response. Automated phone menu contacts use via voice or key inputs to obtain information, route an inbound voice call, or both.) systems, and other voice processing tools. In NiCE CXone, prompts can be prerecorded audio files or text that's read by a text-to-speech (TTS![]() Allows users to enter recorded prompts as text and use a computer-generated voice to speak the content.) service.
Allows users to enter recorded prompts as text and use a computer-generated voice to speak the content.) service.
Create a TTS Prompt
Required permissions: Applications > Studio > Scripts >
You can add a TTS![]() Allows users to enter recorded prompts as text and use a computer-generated voice to speak the content. prompt using the sequence editor or by entering the prompt directly to the Sequence property of a Studio action that supports prompts. These actions include:
Allows users to enter recorded prompts as text and use a computer-generated voice to speak the content. prompt using the sequence editor or by entering the prompt directly to the Sequence property of a Studio action that supports prompts. These actions include:
-
 Allows users to enter recorded prompts as text and use a computer-generated voice to speak the content.) prompts. If using a file, the entire file is played. Only the contact can hear the audio.
 -
-
Some actions, such as Reqagent, have a Sequence property but aren't linked to the Sequence editor. If you want to use the Sequence editor to create a prompt for these actions, you can temporarily add the
-
Add a Voiceparams action to your script somewhere before the action that supports TTS
Allows users to enter recorded prompts as text and use a computer-generated voice to speak the content.. If the properties set by the TTS-supporting action will be passed to other scripts, you may want to also place a Voiceparams action in the sub-scripts to ensure that those properties are not ignored. - In the properties of the Voiceparams action, click the drop-down in the TTSVoice field and select the language and voice that you want to speak the prompt.
- Create the prompt using the sequence editor or typing it into the Sequence property.
- Type the text of the prompt in the Phrase field without formatting. This allows you to see the entire prompt in one place, instead of broken into segments in the Sequence field. Content in the Phrase field is for your benefit only. The prompt doesn't speak this text.
- Click Apply to save the prompt to the selected action.
Create a TTS Prompt in the Sequence Editor
The sequence editor allows you to create a TTS prompt using an interface that adds the formatting for you. When you use the sequence editor, you add sequences![]() A segment of an audio prompt played for the contact. to the Sequence field. Each
A segment of an audio prompt played for the contact. to the Sequence field. Each
- In Studio, open or create a script. If necessary, add an action that supports prompts, such as Menu.
- Double-click the action you want to add a prompt to.
-
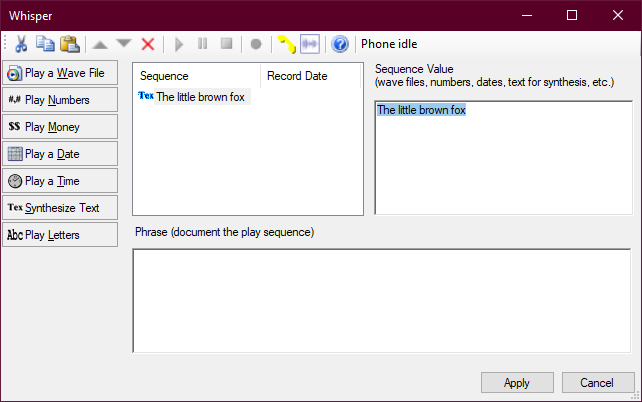
In the Sequence Editor window, click Synthesize Text. Default text appears in the Sequence and Sequence Value fields. The default text for Synthesize Text is The little brown fox.
- In the Sequence Value field, delete the default value, then enter the value you want for the prompt. For example, you would delete The little brown fox and add Thank you for calling Classics, Inc. We're here to help you read more.
-
If you are including money, dates, time, or text that you want spelled out letter by letter, such as the contact's name, use the other sequence options in the Sequence Editor.
Learn about the fields in this step
Sequence Type Details Supported formats:
mm-dd-yyyy
mm/dd/yyyy
Day of Week, Day Month
Day of Week, Month Day
Examples and how they're read:
1-23-2006: Monday January twenty third two thousand six
1/23/2006: Monday January twenty third two thousand six
Tuesday, 10 May: Tuesday tenth of May
Tuesday, May 10: Tuesday May tenthNote: Date formats differ by language and country. Use the format that your contacts will recognize and understand.
Example: 2 May 2022 12:04:00 AM
Read as: two M A Y two zero two two one two colon zero four colon zero zero A MYou can also have text spelled out by using a <spell> </spell> tag in a Synthesize Text sequence. For example:
"%I have your name as <spell>{Name}</spell>. If this is correct, press 1, otherwise press 2"
Example: 3.50
Read as: Three dollars and fifty centsExample: 42
Read as: Forty two
hh:mm
hh:mm:ssExamples and how they're read:
12:34 PM: Twelve thirty-four PM
12:45:15 PM: Twelve forty-five and fifteen seconds PMExample: Wednesday, April 27, 2022
Read as: Wednesday April twenty-seven two thousand twenty-two -
If you want to change the order of the segments in the Sequence field, select the sequence you want to move and click the up or down arrows
 . When the script plays a prompt, its sequences are read in order from top to bottom.
 -
Insert a pause between words or phrases using one of the following methods:
- Use a recorded file of silence: Create a WAV file or upload a sound file of silence using the Sequence Editor. Click Play a Wave File and select the silence file. If necessary, click the WAV file in the Sequence field and use the arrow keys to move the prompt to where you want it to be.
- Use a Wait action: Use one Play action for the segments of the prompt that you want to separate with silence, then add a Wait action between them. Configure Wait with the length of the pause.
- Use a recorded file of silence: Create a WAV file or upload a sound file of silence using the Sequence Editor. Click Play a Wave File and select the silence file. If necessary, click the WAV file in the Sequence field and use the arrow keys
- Modify entries in the Sequence field if necessary. Select a sequence in the Sequence field and change the content in the Sequence Value field.
- Type out the full text of the prompt in the Phrase field without formatting. This allows you to see the entire prompt in one place, instead of broken into sequences in the Sequence field. Content in the Phrase field is for your benefit only. The TTS service doesn't speak this text.
- Click Apply to save the prompt.
Create a TTS Prompt in the Sequence Property
You can create a TTS![]() Allows users to enter recorded prompts as text and use a computer-generated voice to speak the content. prompt in an action's Sequence property by entering sequences with the appropriate formatting. A sequence is a series of characters, words, or phrases, or sentences. The TTS service recognizes several types of sequences. You can include more than one sequence in the Sequence property. Each sequence must:
Allows users to enter recorded prompts as text and use a computer-generated voice to speak the content. prompt in an action's Sequence property by entering sequences with the appropriate formatting. A sequence is a series of characters, words, or phrases, or sentences. The TTS service recognizes several types of sequences. You can include more than one sequence in the Sequence property. Each sequence must:
- Be enclosed in double quotes.
- Include the string reference character required by the type of information the sequence contains. The only sequence type that doesn't require a string reference character is an audio file sequence.
- Follow supported formats for information such as dates, time, and money.
- Contain no more than 300 characters. If you need to include text that's more than 300 characters, split it between multiple sequences.
You can use variable substitution with the Sequence property. The prompts passed into the variable must be formatted appropriately.
Classics, Inc. has decided to redo one of the prompts in their IVR![]() Interactive Voice Response. Automated phone menu contacts use via voice or key inputs to obtain information, route an inbound voice call, or both. menu. The management team writes the script for the new prompt and gives it to Beowulf Herot, the Studio script developer at Classics, Inc. The prompt is for customers who request their account balance and the due date for their next bill. When Beowulf completes the prompt, it contains the following sequences:
Interactive Voice Response. Automated phone menu contacts use via voice or key inputs to obtain information, route an inbound voice call, or both. menu. The management team writes the script for the new prompt and gives it to Beowulf Herot, the Studio script developer at Classics, Inc. The prompt is for customers who request their account balance and the due date for their next bill. When Beowulf completes the prompt, it contains the following sequences:
"%The current balance on the account of {firstName} {lastName} is "
"${accountBal} "
"%. Your next payment is due on "
"@{billDueDate} "
"%. To hear this information again, press 1. To hear the address to send your payment by mail, press 2. To sign up for electronic bill pay, press 3. To return to the main menu, press the star key. "
Create a Dynamic TTS Prompt
You can create a dynamic prompt in a Snippet action. This is helpful if you have a prompt that changes continually. You can enter the prompt directly into the Snippet editor window, or you can create it in the Sequence Editor and copy it into the Snippet action.
- In Studio, open an existing script or create a new one.
- Add a Snippet action and the action that will play the prompt, such as Play.
- Place Snippet before Play and connect them.
-
Create the prompt in the
Some actions have a Sequence property but not the sequence editor. If the action you need to use doesn't support the sequence editor, add a Play action to your script, create your prompt, and copy it from the Sequence property. Delete the extra action after creating the prompt.
- Double-click the Snippet action.
-
In the
DYNAMIC [dynamic object name] = [sequence]
-
Add a dollar sign character ( $ ) to the front of the sequence definition, before the first double quote. Use backslash characters to escape all double quotes in the prompt. For example:
ASSIGN promptList = $"\"{promptPath}YourAccountBalanceIs_{lang}.wav\" \"%{accountBalance}\" \"{promptPath}ToPayYourBillPress_{lang}.wav\"" -
Add any other variables to the snippet that are required to complete the prompt, if they're not in your script already.
For example:
ASSIGN env = "PROD" ASSIGN lang = "ENG" ASSIGN promptPath = "Prompts\{env}\" ASSIGN accountBalance = "$52.65" ASSIGN promptList = $"\"{promptPath}YourAccountBalanceIs_{lang}.wav\" \"%{accountBalance}\" \"{promptPath}ToPayYourBillPress_{lang}.wav\"" - Click Apply.
- On the script's canvas workspace, select the action that will play the prompt.
- In the Sequence property, enter the name of the dynamic object that holds the prompt in the Snippet action. For the example used in this section, you would enter {promptList}.
- Click Apply.
Record Audio Prompts in Studio
Required permissions: Applications > Studio > Scripts >
You can record a voice prompt through the Sequence Editor in Studio. You must have access to a phone to record a prompt with this method. You'll provide the phone number, then receive an automated call that will record what you say.
The audio files you record in Studio are stored as WAV files in your NiCE CXonetenant![]() High-level organizational grouping used to manage technical support, billing, and global settings for your NiCE CXone system.. You can use them as audio prompts in any action that supports sequences. You can see all available audio files on the Browse ACD Files page in NiCE CXone.
High-level organizational grouping used to manage technical support, billing, and global settings for your NiCE CXone system.. You can use them as audio prompts in any action that supports sequences. You can see all available audio files on the Browse ACD Files page in NiCE CXone.
-
In Studio, open an existing script or create a new one.
- Add an action that supports the Sequence Editor to the script, such as Play or Whisper.
-
Double-click the action icon to open the Sequence Editor.
-
Click Play a Wave File and select New.
-
Select NewPrompt().wav in the Sequence field, then type over the default value in the Sequence Value field to rename the WAV file. When you change the name of a file in the Sequence Value field, the name also changes in the list of sequences.
-
Click the Connect Prompt Manager icon
 in the toolbar to open the Prompt Manager Login window.
 -
Enter the phone number of a phone that you have access to right now. You will receive a call on that phone so that you can record the prompt.
-
Click Connect to receive a call from the recording service.
-
Answer the phone call. Some of the icons in the Sequence Editor toolbar become available and the toolbar displays a Prompt Manager Ready message. The icons that are now available allow you to control the recording during the call.
-
Click the Record icon
 to begin recording your prompt.
 -
When you hear a beep from the call, clearly speak your prompt or message.
-
When you are done recording, click the Stop icon
 . Don't hang up until you've reviewed the prompt.
 -
To review your recording, click the Play icon
 .
. -
If the voice prompt is acceptable, end the call. If it is not acceptable, click the Record icon to record the prompt again.

Assign an Audio Prompt to an Action
Required permissions: Applications > Studio > Scripts >
After you record or upload a new audio prompt, you can add it to the action you want to play that prompt.
You can enter the file name for a recorded, uploaded audio prompt in the Sequence property of the action. You can also use the Sequence Editor, as described in this task.
- In your script, double-click the action you want to assign the prompt to.
- In the Sequence Editor, click Play a Wave File and select Browse.
- Select the prompt you want to play and click OK.
- Click Apply to save your selection and close the Sequence Editor.
Edit Prompts in Studio
Required permissions: Applications > Studio > Scripts >
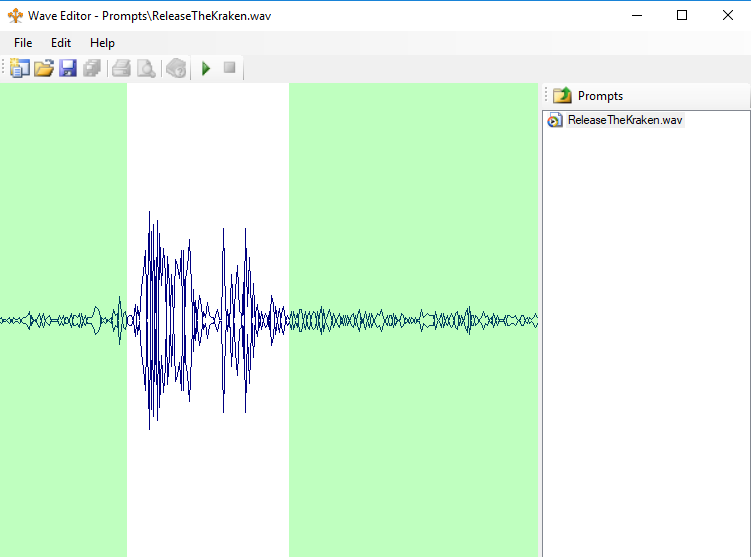
The Wave Editor allows you to trim unwanted audio from the beginning and end of a WAV file.
- Double-click an action that supports prompts. The Sequence Editor may already be open if you just recorded a prompt.
- Click the Edit Wave icon
 in the toolbar to launch the Wave Editor.
 - Select the WAV file that you want to edit from the Prompts column.
- Click the left mouse button to highlight the beginning of the prompt that you want to trim out.
- Click the right mouse button to highlight the end of the prompt that you want to trim out.
- You can check that you've trimmed the appropriate amounts of audio by clicking the green Play icon to play the prompt with the highlighted sections you want to remove.
- Click Edit>Trim to remove the highlighted sections of the WAV file.
- Save your changes.
Upload Audio Prompts
Required permissions: Applications > Studio > Prompts >
If you use a third-party audio application to record a prompt, you can upload it in Studio. Any prompt you upload must be in the supported audio format:
- Bit rate: 64 kbps
- Audio sample size: 8 bit
- Channels: 1 (mono)
- Audio sample rate: 8 kHz
- Audio format: CCITT μ-Law
You can also view, upload, and manage prompts and other files on the Browse ACD Files page in NiCE CXone.
-
On the Files tab in Studio, expand the folder you want to upload the file to. If you're uploading a prompt, expand the Prompts folder.
- Drag a file from the file browser on your computer to the Files window in Studio.
- Click the Refresh icon and verify the prompt's Date Modified field has been updated.
Download or Delete Audio Prompts and Other Files
Required permissions: Applications > Studio > Prompts >
You can download or delete prompts and other files from Studio to your computer. You can also do this on the Browse ACD Files page in NiCE CXone.
-
On the Files tab in Studio, expand the folder where the file is located.
- To download a file, drag it from the Studio file browser to the desktop or a folder on your computer.
- To delete a file, select it and click the red X icon
 . Click Yes to confirm you want to delete the file.