

Optional tasks in NiCE CXone Salesforce Agent include Omni-channel set up and creating quick replies.
Manage General Salesforce Agent Settings
You can modify the maximum number of people allowed in a single call and change whether agents are able to delete commitments.
- Click the app selector
 and select ACD.
 -
Go to ACD Configuration > Business Units.
- Locate the business unit you want to modify and click to open it.
- In the Details tab, click Edit.
- Scroll down to the Salesforce Agent section.
- If you want to change your Maximum Number of Conference Parties (including Agent), select a number from the drop-down.
- If you want to change whether your agents can delete callback commitments and whether notes are required, set the Delete Commitments field to Can't Remove, Can Remove - With Notes, or Can Remove - Without Notes.
- Click Done.
Configure Screen Pops
You can configure and customize screen pops, or windows of information about the contact with whom the agent is currently connected, by creating a query using NiCE CXone IVR![]() Interactive Voice Response. Automated phone menu contacts use via voice or key inputs to obtain information, route an inbound voice call, or both. script variables and specifying certain settings in your Salesforce SoftPhone Layout and data mapping.
Interactive Voice Response. Automated phone menu contacts use via voice or key inputs to obtain information, route an inbound voice call, or both. script variables and specifying certain settings in your Salesforce SoftPhone Layout and data mapping.
A screen pop goes through four phases:
-
The NiCE CXone IVR/ACD
 System that recognizes, routes, and connects contacts to available agents based on skill and priority. system receives a call.
 - The system delivers the call to an agent with query control variables.
- The Salesforce Extension performs a query of contact records using the variables.
- The Salesforce Extension opens a page unless you configure it not to. You might choose to have no action occur in situations where the query returns no matches.
-
Configure the Softphone Layout in Salesforce. Specify:
- Which objects the script will search for the contact's information when an agent receives an inbound call.
- The action that occurs when a query returns one record, multiple records, and no records.
- The fields that appear in the softphone A software program for making telephone calls over the Internet using a computer instead of a telephone. when a single match is found.
-
Create a script in Studio that opens an existing Salesforce case number for the contact. The script should search for the case and, if the case exists, deliver the number and the call metadata to the Salesforce Extension. If the case number does not exist, the script should send the caller’s phone number (ANI
Also known as caller ID. Listed phone number of an incoming voice call.) to the extension, which searches for and opens the caller's contact record. -
Create the controlled variables for the script to send to the extension. To do so, use Studio to set the ScreenPop property to TRUE (see the Assign script action for more information) and use one or both of the following methods to create controlled variable queries:
-
sfdc# variables for simple queries
For
sfdc#variables,#is a number from 0-9. These variables identify portions of the query and have the syntaxobject.field>value.If you use multiple
sfdc#variables, you must combine them into a single query. Group variables that apply to the same object as "AND" queries, or queries where all conditions must be true for a record to be a match.Example 1:
If the IVR script sends the following variables:
sfdc0=case.priority>high
sfdc1=case.isclosed>false
sfdc2=case.contactid>00330000018BBL3M
The extension runs the following SOQL query:
SELECT id FROM case WHERE priority=high AND isclosed=false AND contactid=00330000018BBL3The query finds all open, high-priority cases that belong to a specific contact in Salesforce.
Example 2:
If the IVR script sends the following variables:
sfdc0=case.priority>high
sfdc1=case.isclosed>false
sfdc2=case.contactid>00330000018BBL3
sfdc3=activity.whoid>00330000018BBL3
The extension runs the following two SOQL queries:
SELECT id FROM case WHERE priority=high AND isclosed=false AND contactid=00330000018BBL3
SELECT id FROM activity WHERE whoid=00330000018BBL3
The query finds all open, high-priority cases that to a specific contact and all activity history records belonging to that same contact.
-
sfdcquery# variables for complex queries
For
sfdcquery#variables,#is a number from 0-9. These variables are simple strings that are independent from one another and specify a full SOQL query.When you configure the SoftPhone Layout so that the extension displays a search results page when the query returns multiple matches, and multiple
sfdcquery#variables that specify different queries that return one or more matches, the extension combines all the matches into a single results page.When you use
sfdcquery#andsfdc#variables at the same time, both types run queries.Example 1:
If the IVR script sends the following variables:
sfdcquery0="SELECT id FROM opportunity WHERE accountid=0013000000VKCU9"The extension runs the following SOQL query:
SELECT id FROM opportunity WHERE accountid=0013000000VKCU9Example 2:
If the IVR script sends the following variables:
sfdcquery0="SELECT id FROM opportunity WHERE ACCOUNTID=0013000000VKCU9"
sfdcQUERY2="SELECT id FROM openactivity WHERE accountid=0013000000VKCU9 AND isclosed=false"
The extension runs the following SOQL queries:
SELECT id FROM opportunity accountid=0013000000VKCU9
SELECT id FROM openactivity WHERE accountid=0013000000VKCU9 AND isclosed=false
The query finds all opportunities assigned to the account and all non-closed open activity objects assigned to the account. The results from both queries are displayed.
Example 3:
If the IVR script sends the following variables:
sfdc0="case.priority>high"
sfdc1="case.isclosed>false"
sfdc2="case.contactid>00330000018BBL3"
sfdc3="activity.whoid>00330000018BBL3"
sfdcquery0="SELECT id FROM opportunity WHERE accountid=0013000000VKCU9"
sfdcquery2="SELECT id FROM openactivity WHERE accountid=0013000000VKCU9 AND isclosed=false"
The extension runs the following queries:
SELECT id FROM case WHERE priority=high AND isclosed=false AND contactid=00330000018BBL3
SELECT id FROM activity WHERE whoid=00330000018BBL3
SELECT id FROM opportunity WHERE accountid=0013000000VKCU9
SELECT id FROM openactivity WHERE accountid=0013000000VKCU9 AND isclosed=false
The query finds all high-priority, open cases for the identified contact, all activity records assigned to the contact, all opportunity records assigned to the identified account, and all non-closed open activity records that are assigned to the identified account. The results appear in the way you requested in your SoftPhone Layout settings.
If you do not create query variables, Salesforce Agent runs a default query, or a query that searches for objects listed in the Salesforce SoftPhone Layout configuration. Salesforce Agent runs the default query for the ANI in the phone number fields of these objects.
All variables supplied by the script are passed to the Visualforce page as a query string, including query variables and all other published variables. Salesforce stores all published variables in a custom field on the User object where custom JavaScript code, Visualforce, and Apex pages can access them.
While custom fields can be accessed by custom code, you should only read from them. You should not update or delete them. This can cause unexpected behavior in Salesforce Agent.
-
-
In Studio, set the ScreenPopSource property of the Reqagent script action to Default from Skill.
- In NiCE CXone, enable the Use Screen Pops option for each skill Used to automate delivery of interactions based on agent skills, abilities, and knowledge. you want to run the query. For more information, see Configure Screen Pops.
Configure Custom Buttons
Salesforce allows you to customize the agent’s experience inside the application; for instance, you may want to configure a custom button in Salesforce to allow agents to open a certain page. However, when NiCE CXone integrates with Salesforce, you must consider certain pieces of logic and information from the NiCE CXone platform before making customizations. This capability allows you to create any logic in the IVR![]() Interactive Voice Response. Automated phone menu contacts use via voice or key inputs to obtain information, route an inbound voice call, or both. script needed to capture, retrieve, or generate information or metadata about a contact and use it to drive a customized experience within Salesforce while keeping elements of the actual customized experience within Salesforce. This means that you should assign variables to the information or metadata you want to send to Salesforce and publish them. To publish them, you must set the variable ScreenPop property to TRUE. The Salesforce Extension stores these variables as a pipe-delimited list in a custom field on the user object, and they are available to any custom code in the Salesforce environment. A sample use case with code follows the task instructions.
Interactive Voice Response. Automated phone menu contacts use via voice or key inputs to obtain information, route an inbound voice call, or both. script needed to capture, retrieve, or generate information or metadata about a contact and use it to drive a customized experience within Salesforce while keeping elements of the actual customized experience within Salesforce. This means that you should assign variables to the information or metadata you want to send to Salesforce and publish them. To publish them, you must set the variable ScreenPop property to TRUE. The Salesforce Extension stores these variables as a pipe-delimited list in a custom field on the user object, and they are available to any custom code in the Salesforce environment. A sample use case with code follows the task instructions.

A contact center administrator wants a button that automatically creates a new case and pre-populates the contact ID and phone number. Salesforce provides a way to create a custom button and assign it to multiple layouts, so it is visible to agents in the context of their work. In this instance, the New Case button would be on the Contact page layout.
The button definition executes JavaScript code that accesses the published variables from the NiCE CXone platform and opens a new Case screen in edit mode with fields pre-populated as needed.
The following sample code shows you how to take variables from the IVR script and create a button that will create a new case object and pre-populate it with values from the script.
{!REQUIRESCRIPT("/soap/ajax/20.0/connection.js")}
var userVal = "{!User.Custom_Screenpop__c}";
var splitVals = userVal.split("|");

// this is the main URL that we will pop…
// we will add a query string to it that auto-populates
// values in the new case object. “/500” means “a case”,
// and “/e” means “open in edit mode”. These are
// Salesforce conventions.
var mainUrl="/500/e?"

// These are Salesforce field names that can be used on
// the query string to prepopulate. “cas4”
// is the name of the “accountName” field on the
// contact. “cas3” is the “contact name”. The
// other field names are for custom fields (such
// as a product family lookup field, a field for
// the NiCE CXone  “contact ID”, the ANI, etc.
//
// Consult the Salesforce community for information about
// the format of URL’s that prepopulate field values on new
// objects.
var accountName="cas4="
var contactName="cas3="
var ani="00N70000002Ur4E="
var caseProductFamily="00N70000002Hmyh="
var contactId="00N70000002WnS6="
var type="cas11=Phone"
var finalUrl=""

function Begin() {
	// for each variable from the platform,
	// check to see if it’s one of the variables
	// with a value we need to pre-populate. If
	// so, we should save its value and add it to
	// the appropriate variable, so we can build
	// the final URL.
		for (var i = 0; i < splitVals.length; i++) {
			var keyValue = splitVals[i].split("=");
			if (keyValue[0].toLowerCase()=="accountname") {
				accountName = accountName + keyValue[1]
			}
			else if (keyValue[0].toLowerCase()=="contactname") {
				contactName = contactName + keyValue[1]
			}
			else if (keyValue[0].toLowerCase()=="ani") {
				ani = ani + keyValue[1]
			}
			else if (keyValue[0].toLowerCase()=="case_product_family") {
				caseProductFamily = caseProductFamily + keyValue[1]
			}
			else if (keyValue[0].toLowerCase()=="contactid") {
				contactId = contactId + keyValue[1]
			}
		}

	// construct the final URL
	finalUrl = mainUrl + accountName + "&" + contactName
	finalUrl = finalUrl + "&" + ani + "&" + contactId
	finalUrl = finalUrl + "&" + caseProductFamily

	// this bit of code checks to see if we are running
	// in the Service Cloud Console… if we are, we call
	// “srcUp()” which opens the new case object in an SCC
	// tab. Otherwise, we just open the new case object.
	if (typeof(srcUp) == 'function') {
		srcUp(finalUrl)
	} else {
		window.location=finalUrl
	}
}
Begin();
-
Create a custom button and add it to your page layout. For instance, on the Contact object and page layout. The button could be configured to Execute JavaScript.
-
Create code that can access NiCE CXone variables from the User.Custom_Screenpop_c field. The following code shows how to access data in this field and parse it into a collection of variable names and values for use in your JavaScript.
{!REQUIRESCRIPT("/soap/ajax/20.0/connection.js")} // get the contents of the field var userVal = "{!User.Custom_Screenpop__c}"; // create an array that splits on the “|” symbol var splitVals = userVal.split("|"); // each element of the splitVals array will be in the // format of “varName=value”, where “varName” is the variable // name published from NiCE CXone . - Publish variables from the IVR script that you want to use in the JavaScript code.
Customize the Interface with Studio Actions
You can use Studio actions like Indicate, Messages, Page, and Runapp to customize the Salesforce Agent interface and help guide agents through calls.
-
You can use the Indicate action to allow agents to launch hard-coded links to web pages or applications. These can be common references or resources that agents can quickly access directly from the Salesforce Agent interface. You can also use the Indicate action to generate a custom button that agents can click to open a web page. When a call is active, the button appears at the bottom of the phone control panel if you choose an agent handling a contact as your recipient. Choosing any other recipient causes the button to appear at the top of Salesforce Agent.
-
You can use the Messages action to configure an agent message to appear in the top bar of Salesforce Agent and in the Messages window. You can send a message to a single agent, a team, all agents, or a skill
Used to automate delivery of interactions based on agent skills, abilities, and knowledge.. An icon in the marquee displays the number of messages. You can also create a message in NiCE CXone by setting up Agent Messages.
- You can use the Page action to automatically open pages you create in Studio as certain events occur in Salesforce Agent.
- You can use the Runapp action to automatically open a web page when a certain action occurs. Salesforce pages open according to your SoftPhone Layout settings. If the button opens an external web page, these settings are disregarded and the page opens in a new window.
Locale Settings
The locale setting in Salesforce controls how Salesforce Agent displays numbers, currency, and dates. To modify the format of dates and numbers according to your location, you must modify the Locale setting for the user in Salesforce. These settings also allow you to enable localization for Salesforce Agent. The user language selection in Salesforce controls the language selection for Salesforce Agent, but you must enable languages for users to apply them. Salesforce supports the following languages:
- Chinese (Simplified)
- Chinese (Traditional)
- English
- French
- German
- Italian
- Japanese
- Korean
- Portuguese
- Russian
- Spanish
Proper names and the names of custom unavailable codes are not localized unless you entered them in NiCE CXone using the appropriate language.

-
Click Setup in the upper right corner.
-
Use the Search box to search for Users, then click Users.
-
Click Edit next to the user you want to modify. Do not click the Full Name.
-
In Locale Settings, update the Locale and Language fields to the preferred locale and language.
-
Click Save.
Enable Service Cloud User
Enabling the Service Cloud User positions the agent interface as a minimized bar in the lower right corner of the screen. The bar flashes to indicate an incoming contact.
This option is only available to users using the Service Cloud component. If you do not see the Service Cloud User option for your agents, follow the steps below to enable Service Cloud User on your own profile.
-
Click the drop-down arrow next to your username and select Setup.
-
Use the Search box to search for Manage Users, then click Users.
-
Click Add or edit users and set user quotas.
-
Click Edit next to the user you want to enable with Service Cloud User. Do not click the Full Name.
-
Select the checkbox next to Service Cloud User.
-
Click Save.
Enable Personal Connection
- Contact your account representative to enable PC in your business unit High-level organizational grouping used to manage technical support, billing, and global settings for your NiCE CXone system..
- Create a PC outbound phone skill Used to automate delivery of interactions based on agent skills, abilities, and knowledge. in NiCE CXone. Enable screen pops in the skill and assign the skill to the agents who will use PC.
- Upload a calling list in NiCE CXone or through Proactive XS. Generate your call lists with the Salesforce IDs to enable generating screen pops from a unique external ID rather than through the default ANI Also known as caller ID. Listed phone number of an incoming voice call. query in Salesforce. Alternately, you can also use query variables in your IVR Interactive Voice Response. Automated phone menu contacts use via voice or key inputs to obtain information, route an inbound voice call, or both. script to control what the Salesforce Agent searches for in the query.
- Go into Skill Control in NiCE CXone and start the PC skill. The agent must opt in to begin PC dialing.
Upload a Custom Ring Tone
The maximum file size you can upload is based on your Salesforce file settings. Generally, the maximum size is between 2MB to 25MB. The larger the file size, the more impact it will have on performance when your agents receive a call. The default ring tones are 3 KB.
-
Click App Launcher (indicated by a dot grid) and search for Files.
-
Click Libraries > Asset Library > Upload Asset File.
-
Click Upload File and select the MP3 file to upload. Click OK.
- In the Asset Name field, assign a unique name to the ring tone. In the API Name field, assign a unique name beginning with "Ring". Click Save.
- Instruct your agents to select the new ring tone.
Configure Dynamic Data Display for Inbound Calls
Required Permission:
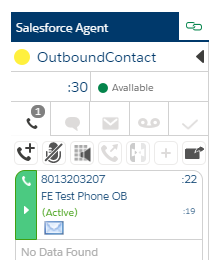
Dynamic data display is only available in the Salesforce Agent Lightning.
Salesforce Agent automatically displays a customer's caller ID, the skill, and a timer when an agent receives an incoming call. With dynamic data display, you can use Studio scripting to display additional customer data to agents receiving incoming calls. You can pull customer data from other applications. Agents will not need to gather that information from the customer.
Dynamic data display will only work for agents who have the inbound skill that you use in the script.
Setting up dynamic data display requires modifying a template script in Studio. The script uses the CustomEvent action, which is found on the Framework tab in Studio. This tab is normally hidden, but if you use dynamic data display, you need the tab to be visible. Enabling this tab can only be done by a account representative.

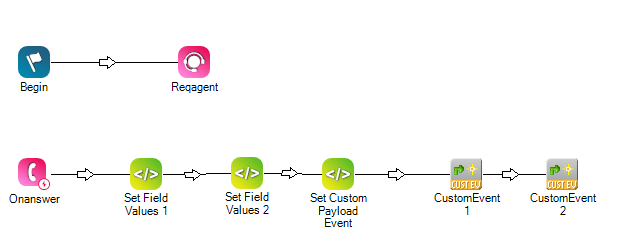
The template script starts by requesting an agent. It has two branches, one for Onanswer and one for Onhold. You can add additional branches for Onreskilland Ontransfer, if you want. Each branch allows you to deliver custom data to the agent in a specific circumstance, such as when the agent answers the interaction or if the interaction is transferred to a new agent.
Each branch contains two Snippet actions and a CustomEvent action. The Set Field Values Snippet action defines the fields and data you want to display for the agent. The Set Custom Event Payload Snippet action converts the defined fields to JSON. The CustomEvent action passes the defined data in JSON format to the agent. You don't need to modify the Set Custom Event Payload Snippet or the CustomEvent action.
The CustomEvent action has limit of 2048 characters. This means that if the payload array elements contain more characters than that, you must split them up across multiple CustomEvent actions. If you don't split the elements up, the result is invalid JSON and Salesforce Agent displays nothing.
-
Download the ZIP file containing the template script: IB_Phone_AFSFDynamicData.zip.
-
Extract the template script from the ZIP file.
-
In Studio, import the IB_Phone_AFSFDynamicData.xml file.
-
Save the script in a new folder with a name that identifies the purpose of the script. For example, you could call it IBCustomScript or give it the name of the point of contact.
-
Configure the Skill property of the Reqagent action with the inbound skill you want to associate with the script.
-
If you want to add data to pass during events such as OnHold, Onreskill, and Ontransfer, select all of the actions in the script for OnAnswer, then copy and paste them into the script and connect them to the correct event action. If you don't want to use one of the default events that are included in the template script, delete it.
-
For each branch in your script, customize the data displayed to the agent. If the data you're passing is larger than 2048 characters, follow the steps to add additional CustomEvent actions and finish the script.
-
Double-click the Set Field Values Snippet action and modify the default global variables to customize the appearance of the text the agent sees. You can override the default for specific fields.
Learn more about fields in this step
Field Details defaultFontSize Specify the font size. You can specify the size in pixels (px), points (pt), or as a percentage (%). defaultFontWeight
Specify the font weight as either normal or bold.
defaultFontStyle Specify the font style as either normal or italic. - The Snippet code includes a dynamic variable called reqPayloadField. Copy and customize it for each field you want to include. You can add up to ten fields.
Array of variables for adding fields to the script
reqPayloadField[1].id="Field1"
reqPayloadField[1].text="<Your dynamic text goes here>"
reqPayloadField[1].style.fontSize="{defaultFontSize}"
reqPayloadField[1].style.fontWeight="{defaultFontWeight}"
reqPayloadField[1].style.fontStyle="{defaultFontStyle}"
reqPayloadField[1].style.align="center"
reqPayloadField[1].style.backgroundColor="#FF0000"
reqPayloadField[1].style.fontColor="#FFFFFF"
Learn more about variables in this stepField Details id Required. The value must be Field1, Field2, Field3, and so on. Increment the number for each field you add. The index number for each variable in the array must match the field number. text Required. Set the value to the text you want the agent to see for this field. style.fontSize Optional. If you want to override the global default, replace {defaultFontSize} with a font size in pixels (px), points (pt), or as a percentage (%). style.fontWeight Optional. If you want to override theglobal default, replace {defaultFontWeight} with normal or bold. style.fontStyle Optional. If you want to override the global default, replace {defaultFontStyle} with normal or italic. style.align Optional. Configure the text alignment. The default is center. You can set it to left or right. style.backgroundColor Optional. Configure a background color for this field. Use a hexadecimal color code, such as #FFFFFF. style.fontColor Optional. Configure the color of the text. Use a hexadecimal color code, such as #947928.
-
-
For OnHold, OnReskill, or OnTransfer events, you need to number the fields of the recPayloadField variable according to how you want data passed to the agent. You can:
-
Continue increasing the field numbering from event action to event action. If you choose this option, all of the fields from the previous events are passed to the subsequent events.
View an example of this option
This example shows the numbering of reqPayloadField variable fields increasing from the OnAnswer event to the OnHold event. In this situation, fields 1 through 5 are passed to the agent in addition to fields 6 through 9 as defined in the OnHold event.
OnAnswer Event - Fields in Set Field Values Snippet:
reqPayloadField[1].id="Field1"...
reqPayloadField[5].id="Field5"OnHOld Event - Fields in Set Field Values Snippet:
reqPayloadField[1].id="Field6"...
reqPayloadField[4].id="Field9" -
Restart field numbering with 1 for the next event. Only the fields defined in the Set Field ValuesSnippet actions for that event are passed to the agent.
View an example of this option
In this example, only the fields defined in the Set Field Values Snippet connected to the OnHold event are passed to the agent. This is because the OnHold Field1 replaces the OnAnswer Field1, and so on.
OnAnswer Event - Fields in Set Field Values Snippet:
reqPayloadField[1].id="Field1"...
reqPayloadField[5].id="Field5"OnHOld Event - Fields in Set Field Values Snippet:
reqPayloadField[1].id="Field1"
...
reqPayloadField[4].id="Field4"
-
-
For every CustomEvent action in the script, verify that the following properties have the specified values. If any of the values are different, the script won't work.
-
TargetAgent—{__agentId}
-
EventName—Contact_CustomMessages
-
Data—{reqPayload}
-
Add Multiple CustomEvent Actions
If the payload array elements you're passing to Salesforce Agent contain more than 2048 characters, you need to add additional CustomEvent actions and split the elements between them. If you don't, the data is truncated. This results in invalid JSON and Salesforce Agent displays nothing to the agent.
- Determine how many CustomEvent actions you need and add them to the script. For example, if the total number of characters you need to pass is 3016, you would need two CustomEvent actions.
- Arrange the CustomEvent actions on the right side of the Set Custom Event Payload Snippet action and connect them using the Default branch condition.
- Change the Caption property of each CustomEvent action to CustomEvent#, where # is a number that increments sequentially for each additional action. For example, the first action would be CustomEvent1, the second would be CustomEvent2, and so on.
-
Add one Set Field Values Snippet for each CustomEvent action in the script and then:
- Arrange them next to each other on the left side of the Set Custom Event Payload Snippet action.
- Add numbers to the Caption property of each Set Field Values Snippet action, as you did for the CustomEvent actions.
- Connect them using the Default branch condition.
If you added two CustomEvent actions, your script would look like the one in the example image below.
-
Customize each Set Field Values Snippet action with the data you want it to pass. Ensure that the suffixes and index numbers used in each snippet follow these guidelines:
- Suffix for reqPayloadField variable—The reqPayloadField variable needs a numeric suffix to identify each set of fields separately. This allows you to assign a set to each of the CustomEvent actions. For example, in the first Set Field Values Snippet, the variable would be reqPayloadField1, and in the second it would be reqPayloadField2, and so on.
- ID subfield—The ID subfield of the reqPayloadField variable needs to increment consecutively across all Set Field Values Snippet actions. If the first Set Field Values Snippet has eight fields, the first field in the second Set Field Values Snippet starts with id="Field9".
- Index value of reqPayloadField—The index value of the reqPayloadField arrays must start with 1 in each new Set Field Values Snippet.
For example:
Set Field Values Snippet #1:
reqPayloadField1[1].id="Field1"...
reqPayloadField1[8].id="Field8"Set Field Values Snippet #2:
reqPayloadField2[1].id="Field9"...
reqPayloadField2[5].id="Field13" -
Follow these steps to modify the global variables and format the fields in each Set Field Values Snippet:
-
Double-click the Set Field Values Snippet action and modify the default global variables to customize the appearance of the text the agent sees. You can override the default for specific fields.
Learn more about fields in this step
Field Details defaultFontSize Specify the font size. You can specify the size in pixels (px), points (pt), or as a percentage (%). defaultFontWeight
Specify the font weight as either normal or bold.
defaultFontStyle Specify the font style as either normal or italic. - The Snippet code includes a dynamic variable called reqPayloadField. Copy and customize it for each field you want to include. You can add up to ten fields.
Array of variables for adding fields to the script
reqPayloadField[1].id="Field1"
reqPayloadField[1].text="<Your dynamic text goes here>"
reqPayloadField[1].style.fontSize="{defaultFontSize}"
reqPayloadField[1].style.fontWeight="{defaultFontWeight}"
reqPayloadField[1].style.fontStyle="{defaultFontStyle}"
reqPayloadField[1].style.align="center"
reqPayloadField[1].style.backgroundColor="#FF0000"
reqPayloadField[1].style.fontColor="#FFFFFF"
Learn more about variables in this stepField Details id Required. The value must be Field1, Field2, Field3, and so on. Increment the number for each field you add. The index number for each variable in the array must match the field number. text Required. Set the value to the text you want the agent to see for this field. style.fontSize Optional. If you want to override the global default, replace {defaultFontSize} with a font size in pixels (px), points (pt), or as a percentage (%). style.fontWeight Optional. If you want to override theglobal default, replace {defaultFontWeight} with normal or bold. style.fontStyle Optional. If you want to override the global default, replace {defaultFontStyle} with normal or italic. style.align Optional. Configure the text alignment. The default is center. You can set it to left or right. style.backgroundColor Optional. Configure a background color for this field. Use a hexadecimal color code, such as #FFFFFF. style.fontColor Optional. Configure the color of the text. Use a hexadecimal color code, such as #947928.
-
-
Modify the Set Custom Event Payload Snippet following these steps:
-
For each CustomEvent action you add, you need one set of these lines of code in the Set Custom Event Payload Snippet:
DYNAMIC payloadJSON
payloadJSON.contactId = "{contactid}"
payloadJSON.messages = reqPayloadField
ASSIGN reqPayload = '{payloadJSON.AsJson()}'
Modify each set as follows:
- payloadJSON—This variable needs to be unique for each set of lines you added. Add a numeric suffix to the end of this variable everywhere it appears in each set of lines. Increment it by one for each set of lines you added. For example, set one would be payloadJSON1, set two would be payloadJSON2, and so on.
- reqPayloadField—In each set of lines, change the name of this variable to match the name of the variable in the corresponding Set Field ValuesSnippet. For example, in the first Set Field ValuesSnippet, this variable is named reqPayloadField1, so in the first set of lines in the Set Custom Event PayloadSnippet, the name of the variable should be reqPayloadField1.
- reqPayload—In each set of lines, add a suffix to the end of this variable. Increment the suffix to match the other variables in each set of lines. For example, in the first set of lines, this variable would be ReqPayload1.
For example, if you have two CustomEvent actions, you would have:
DYNAMIC payloadJSON1 payloadJSON1.contactId = "{contactid}" payloadJSON1.messages = reqPayloadField1 ASSIGN reqPayload1 = '{payloadJSON1.AsJson()}' DYNAMIC payloadJSON2 payloadJSON2.contactId = "{contactid}" payloadJSON2.messages = reqPayloadField2 ASSIGN reqPayload2 = '{payloadJSON2.AsJson()}' -
-
Modify the Data property in each CustomEvent action with the reqPayload# variable that has the same suffix number as the action's Caption. For example, the action captioned CustomEvent1 would use the rePayload1 variable.
-
Repeat the steps in this task for all of the event actions in your script (OnAnswer, OnHold, OnReskill, OnTransfer). When you perform step 5 to increase the numbering of the ID subfield of the recPayloadField variable, you can:
-
Continue increasing the field numbering from event action to event action. If you choose this option, all of the fields from the previous events are passed to the subsequent events.
View an example of this option
This example shows the numbering of reqPayloadField variable fields increasing from the OnAnswer event to the OnHold event. In this situation, fields 1 through 5 are passed to the agent in addition to fields 6 through 9 as defined in the OnHold event.
OnAnswer Event - Fields in Set Field Values Snippet:
reqPayloadField[1].id="Field1"...
reqPayloadField[5].id="Field5"OnHOld Event - Fields in Set Field Values Snippet:
reqPayloadField[1].id="Field6"...
reqPayloadField[4].id="Field9" -
Restart field numbering with 1 for the next event. Only the fields defined in the Set Field ValuesSnippet actions for that event are passed to the agent.
View an example of this option
In this example, only the fields defined in the Set Field Values Snippet connected to the OnHold event are passed to the agent. This is because the OnHold Field1 replaces the OnAnswer Field1, and so on.
OnAnswer Event - Fields in Set Field Values Snippet:
reqPayloadField[1].id="Field1"...
reqPayloadField[5].id="Field5"OnHOld Event - Fields in Set Field Values Snippet:
reqPayloadField[1].id="Field1"
...
reqPayloadField[4].id="Field4"
-
-
For every CustomEvent action in the script, verify that the following properties have the specified values. If any of the values are different, the script won't work.
-
TargetAgent—{__agentId}
-
EventName—Contact_CustomMessages
-
Data—{reqPayload#}, where # is a different number in each instance of the action
-
If you experience issues with importing or saving the scripts, please contact the NiCE CXone Implementation Team.
Bulk Delete Users
Use this option to delete multiple inactive users all at once.
-
In Salesforce, click the navigation drop-down menu
 from the home screen.
 -
Click Salesforce Agent Settings.
-
If you don't see this option, click Edit > Add More Items > Salesforce Agent Settings.
-
-
Sign in with your NiCE CXone credentials.
-
Scroll down to the Purge Custom Settings section.
-
Click Bulk Delete Inactive Users Records to delete the inactive users' custom setting records in both Salesforce Agent Classic and Salesforce Agent Lightning.
-
Click Bulk Delete Classic Users Records to delete all the users' custom settings in Salesforce Agent Classic only.
-