|
|
Initiates custom functionality from the script, specifically launching a form, webpage, or application. Any URLs targeted to a contact panel must be configured to allow being displayed in an iframe. Agents must have their Panels setting in MAX set to On. Salesforce Agent and Salesforce Agent Lightning support this action. This action submits information through the Ondata branch. A common use of Runapp is to pop a standard form or custom URL for agents with the You can use In NiCE CXone Agent Workspace (Agent), this action only displays the URL link. It does not display the page via iframe. Also, a custom form displays as a link. It is suggested to use the POPURL action instead. OpenURL is the only supported Action Type for Salesforce Agent. If you want to show a custom form, use the Indicate action. |

Supported Script Types
|
|
|
|
|
|
|
|
|
Generic |
Chat | Phone | Work Item | SMS |
|


Comparison of Similar Actions
The following actions have similar functions, but with some key differences:
- Runapp: Initiates custom functionality from the script, specifically launching a form, webpage, or application.
- PopURL: Opens webpage URLs and provides options for the location and styling of the panel that pops the webpage.
-
Input Properties
These properties define data that the action uses when executing.
|
Property |
Description |
|---|---|
|
Caption |
Enter a short phrase that uniquely identifies this action in the script. The caption appears on the script canvas under the action icon. |
|
AgentID |
The agent ID. You can use a variable for this field, such as Outbound skills have a custom script assigned, therefore when Runapp fires in the outbound custom script, it uses the Begin action since it already "knows" who the agent is (the one making the outbound call). Therefore, a screen pop will only work if {__agentID} is used as the variable name. For inbound scripts, the script does not "know" who the agent is until Onanswer fires, which sets the agent ID variable to AGENTID. You can use the RunApp Property editor to configure this property by double-clicking the action. |
|
ActionType |
You can use the RunApp Property editor to configure this property by double-clicking the action. |
|
ActionValue |
The value needed by the specified ActionType. Variables are supported in this property by encapsulating the variable in {braces}.
You can use the RunApp Property Editor to configure this property by double clicking the action. |
|
WaitForSubmit |
Determines whether the system waits for a submit action by the agent. When set to True, the system waits for the agent's submit action. Field names become variables in the script with the field value as the variable's value. When set to False, you must include the Ondata action in the script, which returns the field names and values to the script as variables. WaitForSubmit is only applicable if the Action Type is ShowCustomForm. It works in conjunction with WaitTimeout. Disable this property when using this action in a script that integrates a CRM |
|
WaitTimeout |
The number of seconds that will trigger the OnTimeout branch if the Action Type is ShowCustomForm. |
Result Branch Conditions
Result branch conditions allow you to create branches in your script to handle different outcomes when an action executes.
|
Condition |
Description |
|---|---|
|
Default |
Path taken unless the script meets a condition that requires it to take one of the other branches. It is also taken if the action's other branches are not defined. |
| Submit | Path taken if WaitForSubmit is set to True. |
| Timeout | Path taken if there is no response for the number of seconds specified. |
|
OnError |
Path taken when the action fails to execute properly. For example, when there is an unexpected problem such as poor connectivity, syntax errors, and so on. The _ERR variable, with a single underscore character, should be populated with a condensed explanation of the problem. |
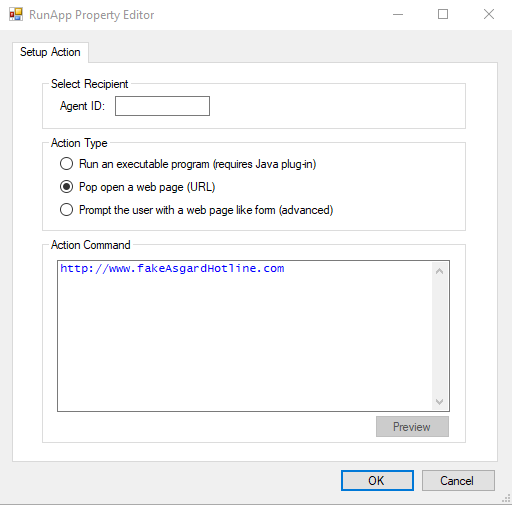
Runapp Wizard
You can also configure the action directly in the action's properties.
- Double click the Runapp action to open the RunApp Property Editor wizard.
- Enter the agent ID for the agent to receive the Runapp action. For outbound scripts, use {__agentID} as the variable name, for all other scripts use {AGENTID}.
- Select the action type.
Field Description Run an executable program Runs a local executable. This option uses a Java plugin that is only functional with Internet Explorer, which NiCE CXone does not support. This requires a local executable which resides in the Windows path or with the full path entered in the ActionValue field. The file path must include double back slashes (\\) in the path. For example, C:\\Program Files\\NiCE CXone\\studio.exe. Most modern browsers do not support running executable programs. If you want to use this type, ensure that your agents use a compatible browser.
Pop open a web page Enter the full URL of the webpage in the Action Command field. The page will be opened with the default browser on the agent's local computer.
Prompt the user with a web page like form - Enter the HTML code to generate a form in the Action Command field. You do not need to include the opening and closing <form> tags.
- Click Preview to see the form.
- Click OK.