

The Salesforce Agent Settings screen allows you to configure settings that control the behavior of the Salesforce Agent (SFA) agent application. At the bottom of the Salesforce Agent Settings screen, you can click Download Agent Settings Log.
NiCE CXone and Salesforce Presence Sync Settings
To use agent presence sync and determine the settings associated with it, complete the following steps:
-
If using Salesforce Classic, click All Tabs
 > Salesforce Agent Settings.
If using the Lightning Experience, click App Launcher
 > View All > Salesforce Agent Settings.
 -
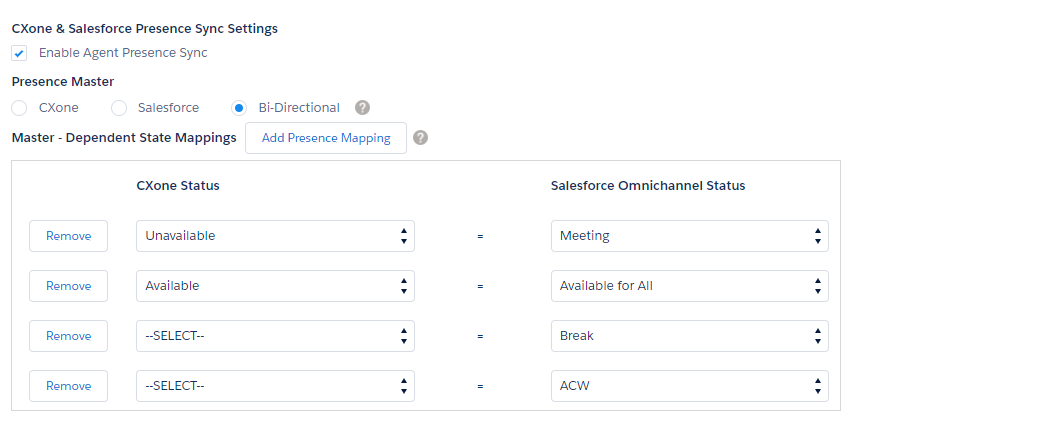
Select Enable Agent Presence Sync.
-
Determine the presence master.
-
NiCE CXone—Sets NiCE CXone as the master for availability settings. This is a one-way sync. For example, if the agent's status in the Salesforce Omni-Channel Widget is Available, the agent's status in Salesforce Agent will be the same.
-
Salesforce—Sets Salesforce as the master for availability settings. This is a one-way sync. For example, if the agent's status in Salesforce Agent is Available, then that the agent's status in the Salesforce Omni-Channel Widget will be the same.
-
Bi-Directional—Neither application is the master. This option updates both based on changes to the agent status in either Salesforce Agent or the Salesforce Omni-Channel Widget. This option is only available in Salesforce Agent Lightning.
NiCE CXone status options are configured using unavailable codes. Salesforce Omni-Channel status options are configured using presence configurations.
-
-
Click Add Presence Mapping to create different data mappings for each Salesforce profile. You can also create a default configuration that applies to any profile that does not have its own settings.
-
Click Save.
Task Creation Settings
When you Enable Screen Pops skills in NiCE CXone, the trigger event is set to Linked as the default.
-
If using Salesforce Classic, click All Tabs
> Salesforce Agent Settings.If using the Lightning Experience, click App Launcher
> View All > Salesforce Agent Settings. -
Determine task creation settings using the following selections for each channel:
-
Create Task—Salesforce creates a task, or record, for each interaction.
-
Always Create New Task—When selected, forces the creation of a new task. This allows you to work on other items without risking the mapping of data from a new contact to a manually created task for another contact.
-
Create Task For Refused Contacts—When selected, forces the creation of a new task for refused contacts.
-
Pop Task—Pops either the task associated with the current contact or a new task, as designated.
-
-
You can restore mapping to default values by clicking Reset To Default.
-
You can determine the record type by selecting Record Type to use when creating the Task record. From the drop-down, select the record type previously created in Salesforce. See the Salesforce documentation for more details of creating a record type.
-
Click Save.

Directory Use
-
If using Salesforce Classic, click All Tabs
> Salesforce Agent Settings.If using the Lightning Experience, click App Launcher
> View All > Salesforce Agent Settings. -
If your agents are using Personal Connection and you want searches in the directory to use the information in the External ID field, rather than the phone number, you can select Configurable Search for Personal Connection.
-
You can ensure agents cannot transfer calls using the directory history, by selecting Hide the history from directory when transferring calls.
-
Click Save.
Configure Data Storage
Follow the steps below if you want Salesforce Agent to save NiCE CXone variables to a field in the User object for use by JavaScript code.
-
If using Salesforce Classic, click All Tabs
> Salesforce Agent Settings.If using the Lightning Experience, click App Launcher
> View All > Salesforce Agent Settings. -
Select Store Salesforce Agent Script Variables.
Salesforce Agent stores variables as name/value pairs delimited with the pipe sign ( | ). For example:
ANI=8015550100|DNIS=8005550122|OPTION=3. -
Click Save.
Transfer Bookmark
-
If using Salesforce Classic, click All Tabs
> Salesforce Agent Settings.If using the Lightning Experience, click App Launcher
> View All > Salesforce Agent Settings. -
You can allow agents to transfer Name and Relates To field values along with voice interactions by selecting Transfer Name and Relates To selection on Call Transfer. When enabled, the agent that receives the transferred voice interaction will also receive those field values.
-
You can delete the saved transfer data for that day by clicking Clear Bookmark Data.
-
Click Save.
Manual Selection of Name or Relates To Fields
When you enable Require manual selection of Name and Relates To fields, agents must manually select the fields for the Name drop-down and Relates To drop-down in the agent interface. Otherwise, those fields are automatically populated. This setting is disabled by default.
Display Text or Icons
In Salesforce Agent Lightning, you can determine whether the agent interface displays text or icons.
-
If using Salesforce Classic, click All Tabs
> Salesforce Agent Settings.If using the Lightning Experience, click App Launcher
> View All > Salesforce Agent Settings. -
Select one of the following options:
-
Display Text—The agent application will show text on buttons and labels. This is the default setting.
-
Display Icons—The agent application will show icons instead of text on buttons and labels. If this is enabled, agents can hover over the icon to see the related text if necessary.
-
-
Click Save.
Entity Mapping
The Salesforce Extension can store metadata and agent notes about the call in a special activity object. You can map data from Salesforce Agent to any object and field in Salesforce. This mapping occurs through a centralized extension configuration document stored in Salesforce. Salesforce stores the NiCE CXone data to the most recently opened instance of an object type. You can create custom objects and fields to store NiCE CXone data if you don't want to store it in any of the standard objects or fields. See the Salesforce documentation for more details.
The administrator package contains a sample extension configuration document. To store default call data to custom fields on the task object, remove the comments in the configuration document. You should provide agents with an after-call work period to take notes. Agents can also identify the contact, case, or opportunity record to link to the call record. The sample configuration document defines the following custom fields:
-
ANI—The phone number from which the contact called.
-
ContactID—The unique ID that identifies the call on the NiCE CXone platform.
-
Disposition—The disposition
 Result assigned by the agent or system at the end of a voice (disposition) or digital (status) interaction. code the agent selected for the call.
 -
Skill—The skill
Used to automate delivery of interactions based on agent skills, abilities, and knowledge. queue to which the call was queued before it was delivered. -
Call_Direction—Whether the phone call was inbound or outbound.
-
Agent_Name—The name of the NiCE CXone agent to whom the call was routed.
Under Entity mapping for Who & What (Classic)/Name & Relates To (Lightning) fields, determine entity mapping settings. The Who or Name drop-down is used to select any associated individuals, such as a contact or a supervisor, and the What or Relates To drop-down is used to select any associated accounts, cases, or opportunities.
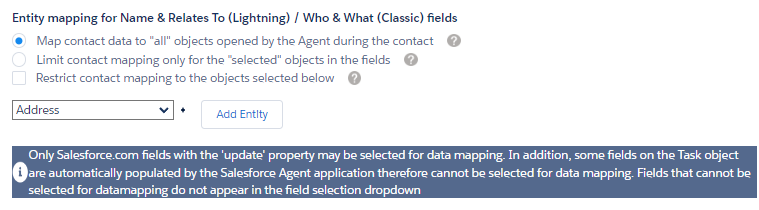
There are three options available:
-
Map contact data to "all" objects opened by the Agent during the contact—The default behavior of the agent application is to write contact data to Salesforce entities you define for all entities the agent opens during an interaction.
-
Limit contact mapping only for the "selected" objects in the fields—This option writes contact information per the mapping you define to only one selected Salesforce entity shown in the Who & What fields.
-
Restrict contact mapping to the objects selected below—This option allows you to control which objects you want your agents to be able to select in the Who and What fields. Using the Add and Remove arrows, add objects from the Available column to the Selections column to include them in your agent's options.
To map NiCE CXone data values to Salesforce fields and objects, follow these steps:
-
If using Salesforce Classic, click All Tabs
> Salesforce Agent Settings.If using the Lightning Experience, click App Launcher
> View All > Salesforce Agent Settings. - In the drop-down, select the object (or entity) and click Add Entity.
- Once the object populates, click Add Field to the right and add fields for the object.
- In the first drop-down, select the Salesforce object field.
- In the second drop-down, select CallInfo, ChatInfo, Email Info, ScriptVariable, SMS Info, Digital Info, VoiceMailInfo, or WorkItemInfo to see variables related to the interaction type. If you are using Salesforce Agent Lightning, you can also select Master Contact ID, Omni Group ID, or Parent Contact ID. Configure the populated fields as needed.
The variables you see differ based upon the interaction type you select.
Learn more about fields in this stepField
Details
ANI The phone number from which the contact called. Callback Time When a disposition requires this, the values selected or entered by the agent as part of the disposition are passed into Salesforce. CallDirection Whether the call is inbound or outbound. CallDurationInSeconds The number of seconds the interaction lasted. CallStartDateAndTime The date and time the interaction was started or delivered. CallEndDateAndTime The date and time the interaction ended. ChatTranscript The full transcript of the chat. Comment The disposition comment or notes. CommitmentAmount
When a disposition requires this, the values selected or entered by the agent as part of the disposition.
ContactId The unique NiCE CXone identifier for the interaction. CustomValue1 & CustomValue2 Used by Personal Connection to allow a custom dialing list value to be easily passed into Salesforce. DispositionValue The disposition value the agent selected after the interaction. DNIS The number the caller dialed. DurationInSeconds The number of seconds the interaction lasted. FileDuration The length of the voicemail file. Skill Name The name of the skill to which the interaction was routed. Tags The tags assigned to the interaction to track specific attributes of the contact.
ID, Payload, & Type An arbitrary value that can be set by whomever or whatever creates the work item. The field is used to push information from the “work item creator” to the “work item handler”. The ScriptVariable field indicates the value of a named variable from the IVR
Interactive Voice Response. Automated phone menu contacts use via voice or key inputs to obtain information, route an inbound voice call, or both. workflow script. If you select this type of data value, you can type in a script variable name. The variable must be published from the IVR script for the value to be saved to Salesforce. The Use Screen Pops permission for the skill setting must be enabled in order for the variable to be mapped. -
Select the NiCE CXone value to save to the Salesforce object field.
-
Click Save.
Add Agent Custom Settings to Navigation Items
You can add Agent Custom Settings to the navigation items in your Salesforce Agent Lightning apps.
-
Log in to Salesforce Agent Lightning as an administrator.
-
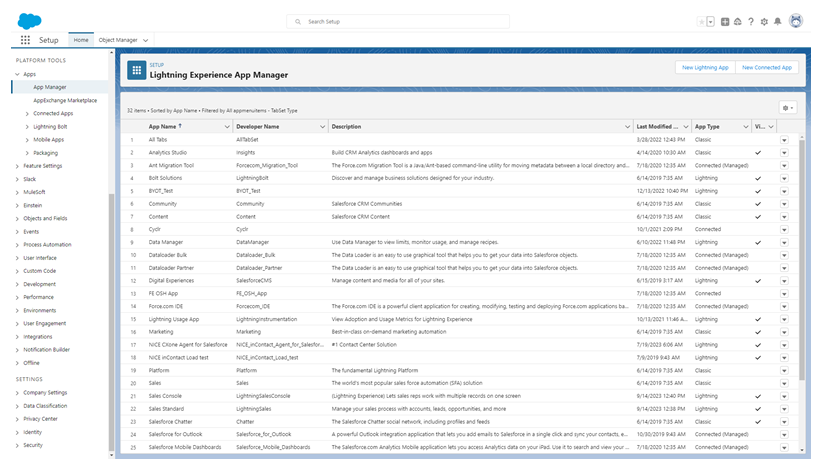
Click Setup
 in the top right corner of the page and select Setup from the drop-down.
 -
Under Platform Tools in the left menu, click Apps > App Manager. You can also search for App Manager in the Quick Find bar.
-
Click Actions
 > Edit on the application you want to add navigation items to. This will open the Lightning App Builder.
 -
Under App Settings, click Navigation Items.
-
Select Agent Custom Settings in the Available Items section and click Add
 .
. -
Click Save. Agent Custom Settings will now display in the navigation drop-down for the app you edited.