This page describes the general process you must follow when implementing a custom virtual agent integration. Every environment and every custom integration is different. Your situation may require additional tasks not described here. It's your responsibility to understand what your integration requires, and if additional tasks are needed, where they fit into the process described on this page.
Complete each of these tasks in the order given.
Set Up the Virtual Agent and Authorization Server
Set up the virtual agent in the provider's environment. Complete thorough testing to ensure that it works as you expect it to.
If your integration uses dynamic authentication, set up the authorization server.
Set Up the Proxy Tunnel Endpoint
To complete this task, you must put the proxy tunnel code in place and run the commands that initiate the code and expose the endpoints. The exact steps and commands required will be different for every environment.
Set Up Required Studio Scripts
Required permissions: Applications > Studio > Scripts > Create/Edit, Import/Export Debug, Lock Override; Applications > Studio > Prompts > Record; Applications > Studio > File Browser > Edit, Create
Ensure that all required Studio scripts are in your production environment. You may need to:
- Export the scripts from one environment and import them into another. You may want to create a folder specifically for scripts related to your custom virtual agent integration.
- Save the scripts with new names. If you use naming conventions for version management, you need to change the scripts' names to move them from development to production. Studio doesn't support changing script names. To rename them, you must use the File > Save As option.
Ensure that the virtual agent actions are correctly set up. This means that:
- The Custom Exchange Endpoint app is created in Virtual Agent Hub.
- Every virtual agent action in your scripts has the Custom Exchange Endpoint app assigned to it.
- The connection between the script and the virtual agent works as expected after you move the script into production. Do some testing from the Custom Exchange Endpoint app in Virtual Agent Hub to verify the connection.
Configure the Connection Between NiCE CXone and Your Virtual Agent
Required permissions: Applications > Studio > Scripts > Create/Edit
The connection between your virtual agent and NiCE CXone is the virtual agent action in your Studio scripts. The action must be configured with the details needed so the two systems can communicate. You do this by creating a configuration app in Virtual Agent Hub, then assigning it to every instance of the virtual agent actions in your script.
You only need to complete this task once, even if you have more than one virtual agent action in your script.
The virtual agent actions are VoiceBot Exchange and TextBot Exchange.
The Configuration Page for the Custom Exchange Endpoint app is different depending on which integration version you're using. Follow the steps in the section below for your version. The differences between the versions are:
- 1.0.0: Supports a single authorization header. The header is sent with the
- 2.0.0: Supports multiple authorization headers. The headers are sent with the
- 3.0.0: Supports multiple authorization headers and StandardBot. The headers are sent with the
Integration versions 1.0.0 and 2.0.0 will be deprecated in a future release. Version 3.0.0 is the preferred version to use with custom virtual agent integrations. If you currently use version 1.0.0 or 2.0.0, plan to upgrade to 3.0.0. Version 3.0.0 is nearly identical to version 2.0.0. The primary difference is that 3.0.0 adds support for StandardBot.
Configure Integration Version 1.0.0
- In Studio, open or create a script and add a virtual agent action, if it doesn't contain one already.
- Double-click the virtual agent action to open Virtual Agent Hub.
- Click Add Bot.
- Enter a Virtual Agent (Bot) Name and select Custom Exchange Endpoint as the Bot Provider.
- Click Next.
-
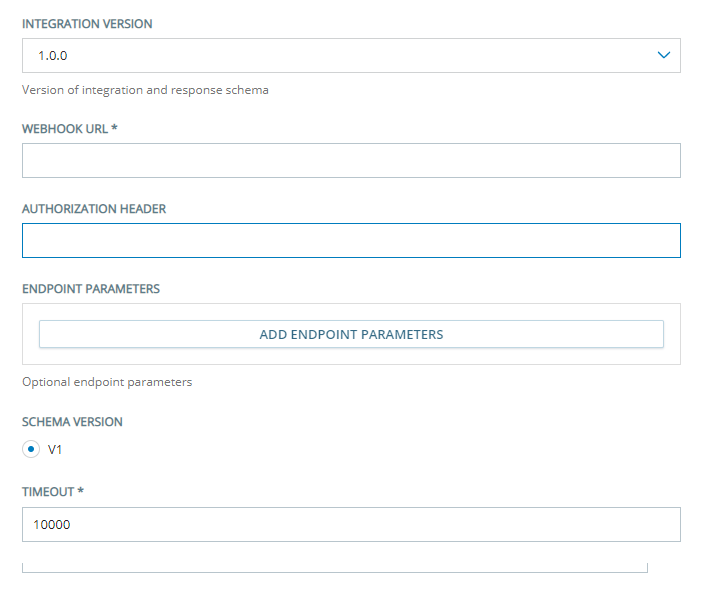
Select Integration Version 1.0.0.
- Enter the Webhook URL for your virtual agent. This is the endpoint the script sends all requests to.
- If you're using authorization with your custom virtual agent integration, enter the Authorization Header from your virtual agent service. The header is sent with the
-
To include parameters with each request sent to the virtual agent service, click Add Endpoint Parameters. Enter the parameter's Name and Value. Repeat this step to add more parameters.
 Learn more about the fields in this step
Field Details Endpoint Parameters Allows you to include configuration parameters with each request sent to the virtual agent service.
You can add as many configuration parameters as you want. For example, you could include JSON web tokens (JWT), encrypted data, or unique IDs that you want to pass to your virtual agent provider.
These parameters are contained in the botConfig section of the
This field is optional.
-
To change the default Timeout, enter the number of milliseconds the script waits for the virtual agent service to respond before timing out. The default is 10000.
Learn more about the fields in this step
Field Details Timeout The timeout triggers the OnError branch (for textbot actions) or the OnUserInputTimout branch (for voicebot actions) in the Studio script.
- Click Next on the Configuration page.
- Complete the Voice and Transcript pages in the Add Bot wizard.
- Test your integration.
- Assign the Custom Exchange Endpoints configuration app to the virtual agent actions in your script.
Configure Integration Version 2.0.0 and 3.0.0
- In Studio, open or create a script and add a virtual agent action, if it doesn't contain one already.
- Double-click the virtual agent action to open Virtual Agent Hub.
- Click Add Bot.
- Enter a Virtual Agent (Bot) Name and select Custom Exchange Endpoint as the Bot Provider.
- Click Next.
-
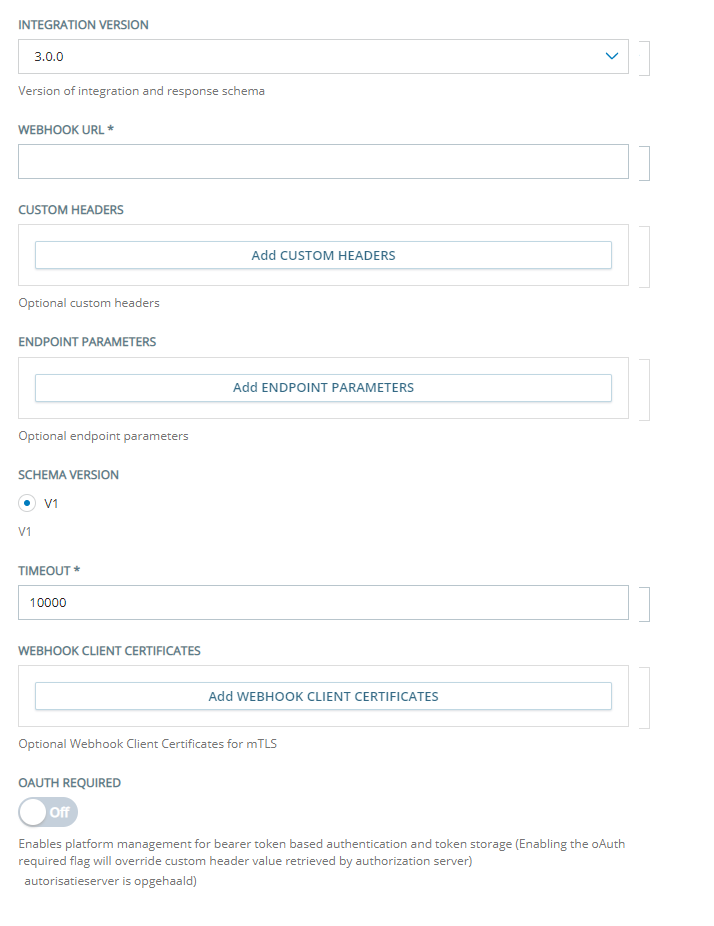
Select Integration Version 2.0.0 or 3.0.0.
- Enter the Webhook URL for your virtual agent. This is the endpoint the script sends all requests to.
-
To send headers with the webhook URL, click Add Custom Headers. This includes authorization headers. Enter the header's Name and Value. Repeat this step to add more headers.
If you're using OAuth dynamic authentication, skip this step.
-
To include parameters with each request sent to the virtual agent service, click Add Endpoint Parameters. Enter the parameter's Name and Value. Repeat this step to add more parameters.
Learn more about the fields in this step
Field Details Endpoint Parameters Allows you to include configuration parameters with each request sent to the virtual agent service.
You can add as many configuration parameters as you want. For example, you could include JSON web tokens (JWT), encrypted data, or unique IDs that you want to pass to your virtual agent provider.
These parameters are contained in the botConfig section of the
This field is optional.
-
To change the default Timeout, enter the number of milliseconds the script waits for the virtual agent service to respond before timing out. The default is 10000.
Learn more about the fields in this step
Field Details Timeout The timeout triggers the OnError branch (for textbot actions) or the OnUserInputTimout branch (for voicebot actions) in the Studio script.
- To use mTLS authentication with your custom virtual agent integration, click Add Webhook Client Certificates and configure the details of your certificate.
- To configure dynamic authentication with your custom integration, click O Auth Required to toggle it to On and configure the required fields.
- Click Next on the Configuration page.
- Complete the Voice and Transcript pages in the Add Bot wizard.
- Test your integration.
- Assign the Custom Exchange Endpoints configuration app to the virtual agent actions in your script.
Configure mTLS Authentication with Client Certificates
You can add client certificates and keys to your Custom Exchange Endpoints app to use mTLS authentication with your custom integration.
Before you begin, you must have a certificate and private key in PEM format.
-
In Virtual Agent Hub, select the Custom Exchange Endpoints app you want to modify.
-
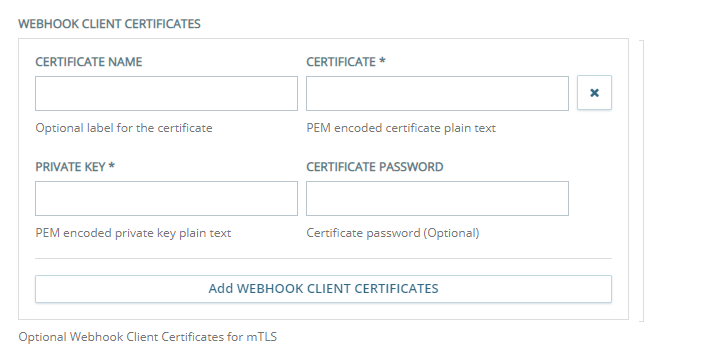
Click Add Webhook Client Certificates.
-
Enter an optional Certificate Name. This can be any word or phrase that identifies the certificate.
-
Copy the encoded plain text from the certificate's PEM file and paste it into the Certificate field.
-
Copy the encoded plain text of the private key from the PEM file and paste it into the Private Key field.
-
Enter the Certificate Password.
-
If you need to add more client certificates, click Add Client Certificates and repeat steps 2-5.
-
Save your changes.
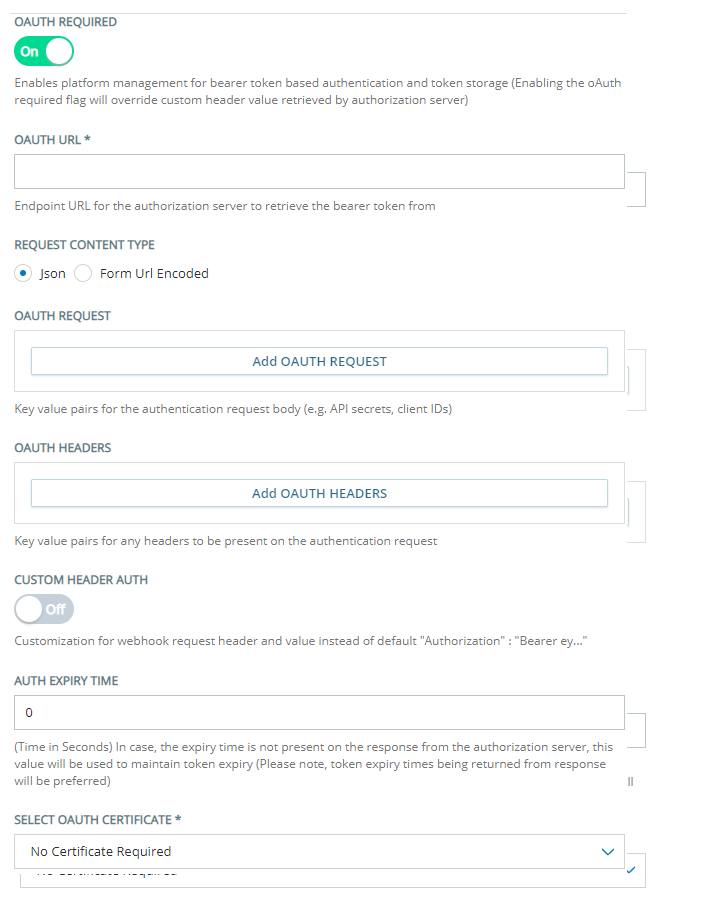
Configure Dynamic Authentication with OAuth for Version 2.0.0 or 3.0.0
If you're using dynamic authentication with your custom integration, you can have the Custom Exchange Endpoint app to manage your tokens. If you enable this option, it overrides the custom header value retrieved by the authorization server.
- In Virtual Agent Hub, select the Custom Exchange Endpoints app you want to modify.
- Click O Auth Required to toggle it to On.
- Enter the URL of your authorization server in the OAuth URL field.
- Select JSON or Form URL Encode under Request Content Type. This is the body type of the OAuth requests.
- Click Add OAuth Request and enter the key-value pairs that form the authentication request body. This includes thing such as API secrets and client credentials. Enter the key Name and Value. Repeat this step to add more request parameters.
- Click Add OAuth Headers and enter the key-value pairs for any headers your authorization server requires requests to include. Enter the key Name and Value. Repeat this step to add more header parameters.
-
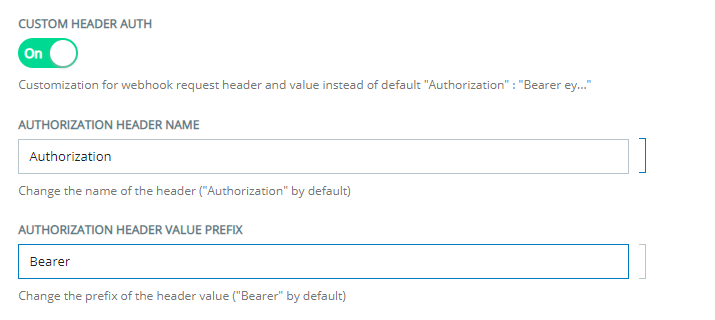
To customize the authorization headers sent with requests to your virtual agent provider, click Custom Header Auth to toggle it On and then:
- Enter a new Authorization Header Name to change the name of the key in the key-value pair for the authorization header. The default is Authorization.
- Enter a new Authorization Header Value Prefix to change the prefix sent with the header value. The default is Bearer.
-
To customize how long the authorization token lasts before expiring, enter a new Auth Expiry Time. The default is 0.
Learn more about the fields in this step
Field Details Auth Expiry Time When a token expires, a new token must be requested.
A token's expiry time can come from multiple sources. NiCE CXone uses them in this order:
- Expiry time returned in the OAuth response from the OAuth server.
- Expiry time configured in this field.
- Default system expiry time (3600).
-
Select an option from the Select OAuth Certificate drop-down to indicate if you want to use a certificate with your OAuth authorization server. If you want to use a certificate, you can choose to Use Webhook Client Certificate or Add New Client Certificate For Auth Server.
Learn more about the fields in this step
Option Details Add New Client Certificate for Auth Server Select this option if you want to add a new certificate to use with your OAuth server. To use this option, you must have a certificate and private key in PEM format
The OAuth Client Certificates section appears on the page below Select OAuth Certificate . Click Add OAuth Client Certificate and configure the details about the certificate you're adding:
- Certificate Name: Enter an optional name for the certificate. This can be any word or phrase that identifies the certificate.
- Certificate: Copy the encoded plain text from the certificate's PEM file and paste it into this field.
- Private Key: Copy the encoded plain text from the private key's PEM file and paste it into this field.
- Certificate Password: Enter the certificate password in this field.
No Certificate Required Select this option if you don't want to use a certificate with your OAuth server. Use Webhook Client Certificate Select this option if you want to use the same certificate that you added to use with mTLS authentication. - Click Save.
Configure Voice and Transcript Options
The Voice page allows you to configure the Custom Exchange Endpoints app to be for a voice virtual agent or a text virtual agent. For text virtual agents there are no additional settings to configure. For voice virtual agents, you can select:
- The kind of voice integration you're doing.
- The transcription (speech-to-text/STT) service you want to use.
The Transcript page in the Custom Exchange Endpoints wizard allows you to select whether you want your integration to capture transcripts of the virtual agent's conversations with contacts.
- In Virtual Agent Hub, add the Custom Exchange Endpoint app and complete the Configuration page for version 1.0.0 or version 2.0.0/3.0.0.
- Click Next on the Configuration page.
-
If you're setting up a text virtual agent integration, select Text Only on the Voice page under Voice Integration Options and then click Next. Skip to step 10 in this section.
-
If you're setting up a voice virtual agent, select the option for the kind of voice integration you're setting up from the list on the Voice page under Voice Integration Options.
Learn more about fields in this step
Option Details Turn by Turn Control ( Select this option if the Studio script controls and defines the conversational flow. To use this option, your script must use
SIP Integration (Back Channel) This option is not supported.
Custom Telephony Select this option if you're using a different telephony option with your integration. You may need to contact your account representative for more information. -
Under Transcription Options, select speech-to-text service you want to use.
Learn more about fields in this step
Option Details Use bot account transcription Select this option to use your virtual agent provider's default transcription service. Use Turn-by-Turn Transcription Profile Select this option to use NiCE CXone Turn-by-Turn Transcription.
Select the Turn-by-Turn Transcription Profile to use or click Add New Turn-by-Turn Transcription Profile to create a new one.
- Click Next.
-
On the Transcript page, select the option for whether you want to capture the virtual agent's conversation transcripts.
Learn more about fields in this step
Option Details Intent information only Select this option if you want to want to capture intent information only. Captured data is stored only for the duration of the interaction by default.
This option requires custom scripting.
Nothing Select this option if you don't want to capture conversation transcriptions or intent The meaning or purpose behind what a contact says/types; what the contact wants to communicate or accomplish. information. Transcript and intent information Select this option if you want to capture both transcript and intent data. Captured data is only stored for the duration of the interaction by default.
This option requires custom scripting.
Transcript only Select this option if you want to capture transcript information only. Captured data is stored only for the duration of the interaction by default. This option requires custom scripting.
- Click Next.
- Test your virtual agent integration if you want, or click Add to add the Custom Exchange Endpoints configuration app to Virtual Agent Hub.
Test Your Custom Virtual Agent Integration
Required permissions: Applications > Studio > Scripts > Create/Edit
This step tests the connection between NiCE CXone and the virtual agent. It ensures that the virtual agent functions the way you expect it to when communicating with NiCE CXone.
You can test many aspects of your virtual agent to make sure everything works as intended. You can run tests from the virtual agent app's properties page in Virtual Agent Hub. When testing, you can:
- Verify that the virtual agent app is correctly configured to communicate with the virtual agent provider.
- Add custom payload JSON to test the virtual agent's handling of custom payload data.
- Trigger a welcome intent event to test how the virtual agent begins a conversation.
- Trigger a custom intent event to test any custom events you've created for your virtual agent.
- Trigger a timeout event to test how the virtual agent responds when the contact times out.
- Test how the virtual agent handles DTMF Signaling tones that are generated when a contact presses a key on the telephone keypad. input.
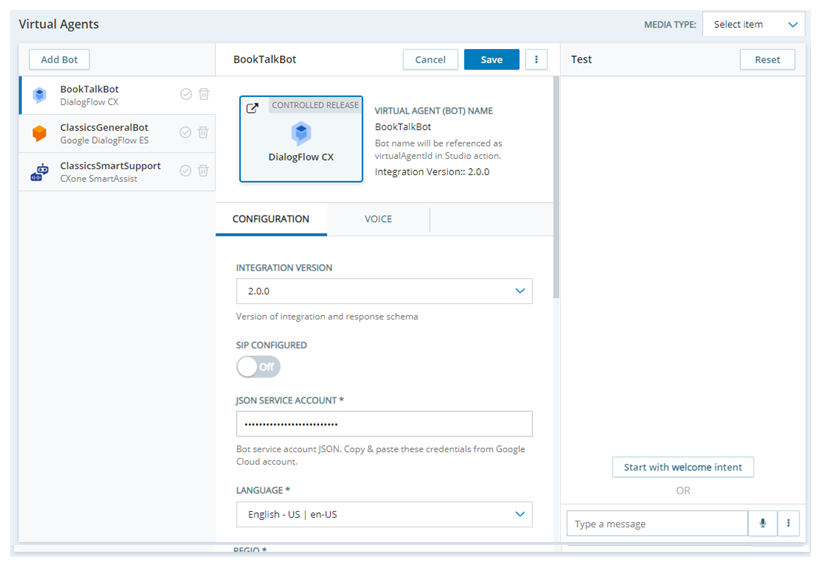
The following image is an example of the properties page for a virtual agent app in Virtual Agent Hub. It shows the Configuration and Voice tabs and the Test pane.
- In Studio, open or create a script and add a virtual agent action, if it doesn't contain one already.
- Double-click the virtual agent action to open Virtual Agent Hub.
- Click to select the configuration app for the virtual agent you want to test from the list on the left.
-
In the Test pane, enter a test message in the Type a message field and press Enter to send it.
- Click Start with welcome intent to start a test conversation from the beginning. The virtual agent responds with its default welcome message. You can enter test messages.
-
Click More Options
 to test other aspects of your virtual agent.Learn more about fields in this step
Field Details Add Custom Payload JSON Select to test sending custom payload JSON to your virtual agent.
Enter the custom payload in the Add Custom Payload JSON text box that appears on the Test + Add page. Press Enter after each line.
Send a test message when you're ready to test the custom payload. When you're finished testing custom payload, click Close on the Add Custom Payload JSON pane.
Trigger Welcome Intent Event Select to test the default Welcome intent The meaning or purpose behind what a contact says/types; what the contact wants to communicate or accomplish.. The virtual agent sends the welcome message. Enter a message to respond. Trigger Custom Intent Event Select to test a custom intent event. Enter the Event Name in the pop-up that appears and click Trigger. The virtual agent sends the message for the intent you entered. Send a response to test the intent. Trigger Timeout Event Select to view the default timeout intent. The virtual agent sends the timeout response message that it's configured with. DTMF Input Select to test your voice virtual agent's response to DTMF Signaling tones that are generated when a contact presses a key on the telephone keypad. tones. Enter DTMF Characters and click Input to see the virtual agent's response to those characters. - Click Reset to start your test again.
-
If you need to make changes based on the results of your testing, you can:
- Modify the Studio scripts for the virtual agent.
- Modify the configuration settings in the virtual agent's app in Virtual Agent Hub.
- Modify the virtual agent's configuration settings in the provider's console. Click the large square button on the app properties page in Virtual Agent Hub. The example at the beginning of this section shows the Google Dialogflow CX app with the provider button. It has the
 icon on it to indicate that the link opens an external site.
- Test the virtual agent thoroughly after each change to your scripts or any configuration settings.
- When you're finished testing, click Close.
Assign the Virtual Agent to a Studio Action
Required permissions: Applications > Studio > Scripts > Create/Edit
When the virtual agent![]() The meaning or purpose behind what a contact says/types; what the contact wants to communicate or accomplish. app is set up and configured in Virtual Agent Hub, you need to assign it to the virtual agent action in your script. This connects the action and the script to your virtual agent provider.
The meaning or purpose behind what a contact says/types; what the contact wants to communicate or accomplish. app is set up and configured in Virtual Agent Hub, you need to assign it to the virtual agent action in your script. This connects the action and the script to your virtual agent provider.
- In Studio, open the script you want to modify.
- Locate the VOICEBOTSTREAMaction in your script. If you haven't done so already, add it from the Actions palette.
- Click Open Editor on the action to open Virtual Agent Hub.
-
-
In the left column, locate the virtual agent profile that you want to assign to the action and click the checkmark
 next to it.
An alternative to using the checkmark is to create a variable in your Studio script. Use the variable to pass the virtual agent app name into the Virtual Agent ID property of the Virtual Agent Hub action you're using.
- Click Close.
Complete Channel-Specific Requirements
Required permissions: Contact Handling > ACD> Points of Contact > Edit, Create; Contact Handling > ACD> Chat Profiles > Edit, Create; Global > User Settings > Skills > Edit, Create; Global > User Settings > Campaigns > Edit, Create; Global > User Settings > Users > Edit, Create;
Set up the channel![]() Various voice and digital communication mediums that facilitate customer interactions in a contact center. that contacts will use to initiate interactions with your virtual agent.
Various voice and digital communication mediums that facilitate customer interactions in a contact center. that contacts will use to initiate interactions with your virtual agent.
For NiCE CXone chat or voice channels:
- Create a campaign or choose an existing campaign to use.
- Create an ACD skill Used to automate delivery of interactions based on agent skills, abilities, and knowledge. for voice or ACD chat. You don't need to add agents to the ACD skill.
- Create a point of contact. Choose the ACD skill and the script you created for your custom virtual agent integration.
If you use a naming convention as version control with your Studio scripts, be sure to save your script with its production name before assigning it to the point of contact.
Ensure that you have completed all requirements for your channel, including things such as:
- Creating a chat profile for ACD chat.
- Adding the chat to your website or mobile app .
Test The Script from the Point of Contact
Required permissions: Contact Handling > ACD > Points of Contact > View, Edit
When the point of contact![]() The entry point that an inbound contact uses to initiate an interaction, such as a phone number or email address. is set up, you need to test your script starting from the point of contact. You can use script tracing to check on the effectiveness of your script and identify any issues that arise.
The entry point that an inbound contact uses to initiate an interaction, such as a phone number or email address. is set up, you need to test your script starting from the point of contact. You can use script tracing to check on the effectiveness of your script and identify any issues that arise.
The testing you did earlier in the implementation process tested the connection between the virtual agent and NiCE CXone. The testing in this step verifies the entire integration, from the contact through NiCE CXone to the virtual agent.
- In Studio, open the script that the point of contact calls.
- Click Debug > Capture Script > Next Instance Only.
-
Initiate an interaction. How you initiate it will vary by channel
Various voice and digital communication mediums that facilitate customer interactions in a contact center.. For example:- For a voice channel, call the phone number assigned to the point of contact The entry point that an inbound contact uses to initiate an interaction, such as a phone number or email address..
- For an ACD chat channel, visit the web page with the chat option and start a chat.
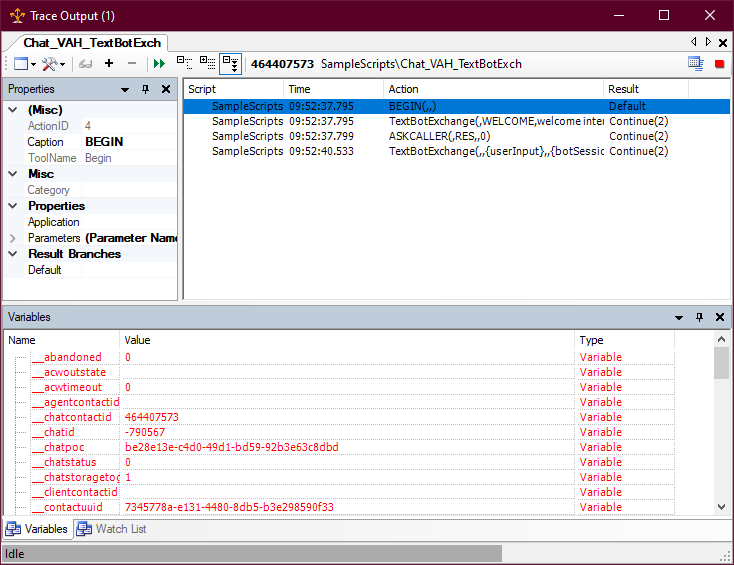
In Studio, the Trace Output window opens. It displays the progress of the script as you type responses and the virtual agent responds.
- For a voice channel, call the phone number assigned to the point of contact
-
Click an action in the main pane in the Trace Output window.
- The Variables tab shows all of the variables that exist in the script when the selected action has completed. It also shows the value that each variable holds at that point in the script.
- The Properties tab shows you the properties for the selected action. You can use this to verify the action's current configuration.
- Return to the script and make changes, if necessary.
- Select an action and press F1 on your keyboard to access online help for that action. The online help page for each action describes the properties and other information about using the action in a script.
- If you want to start over, click End Chat, refresh the browser window, and repeat this process, starting with step 2.