

This page provides reference information and resources to help during the planning and implementation of your custom virtual agent integration.
Architecture
When designing your custom virtual agent integration, there are some important considerations to keep in mind regarding latency. Best practice is to have the custom endpoint interact with only one component in the architecture. The more components the endpoint interacts with during a single request, the greater the chances are of latency occurring. A component is a process such as a speech-to-text or a natural language understanding engine.
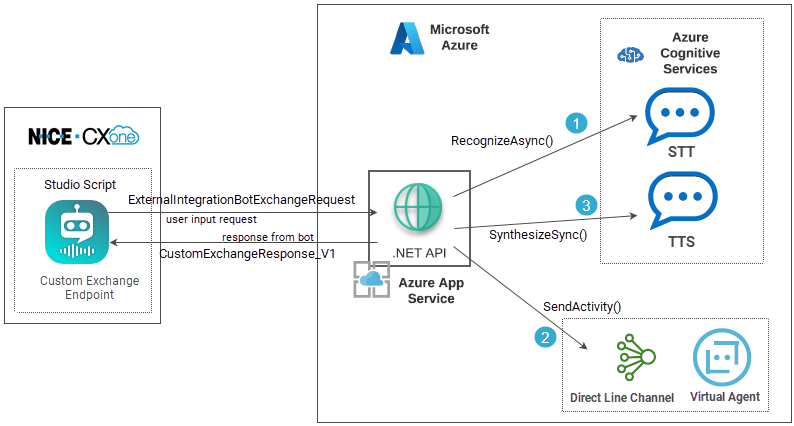
The following example shows an architecture that's prone to latency. This is because multiple API interactions are required to generate a response for a single request.
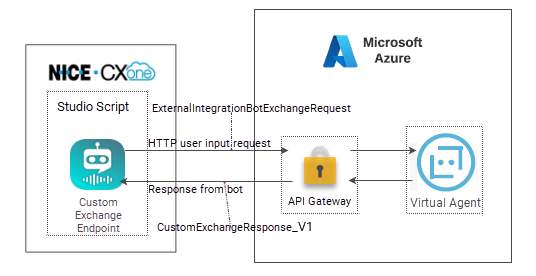
A more efficient architecture makes only one interaction per request. This minimizes the chances of latency occurring during a conversation with a contact.
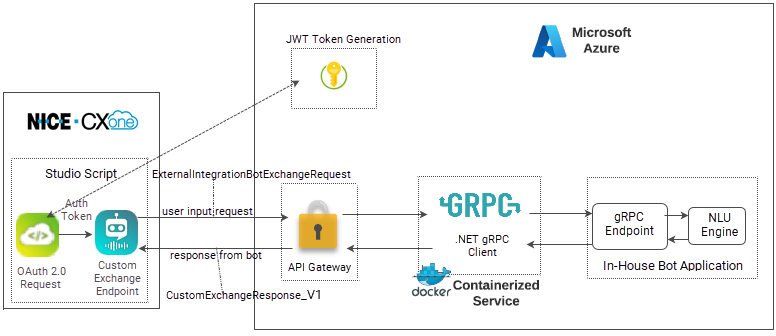
Proxy Tunnel and Webhook Design
The proxy tunnel is the middleware between NiCE CXone and your virtual agent service's endpoint. All requests and responses pass through it. Additionally, it translates the requests and responses into the format needed by the destination system. The following diagram illustrates this process:

The diagram shows that the proxy tunnel receives a request from NiCE CXone (shown with a solid line) and translates it into the format the virtual agent can understand (shown with a dashed line). Then it receives a response from the virtual agent (dashed line) and converts it into the format that NiCE CXone understands (solid line).
It's important to understand the schemas of NiCE CXone and your virtual agent, as well as the requirements of your specific integration plan. The schemas and parameters must be mapped and translated correctly. This ensures that the expected information is passed between NiCE CXone and the virtual agent. Additionally, your integration may not need all the parameters contained in the schemas. A thorough understanding of your integration ensures that only the required parameters are translated.
Proxy Tunnel Requirements
The proxy tunnel is also a webhook. It must be a public URL. It receives the conversational requests from the Studio scripts. The webhook endpoint must:
- Support a POST request with a serialized request body in the
- Convert the
- Convert the response into the
The proxy tunnel endpoint can be located on premises or it can be hosted in a cloud service, such as Google Cloud, Microsoft Azure, or Amazon Web Services. Use HTTPS in your endpoint.
If you want to use mTLS authentication between NiCE CXone and the webhook, you must enable it in the webhook.
Updates to the Request and Response Schemas
The request and response schemas may change with NiCE CXone new releases. This can impact the functioning of your custom virtual agent integration. Virtual Agent Hub allows you to choose when you move to a new version of the integration. This allows you to update the proxy tunnel, your scripts, and your virtual agent service to handle the changes to the schemas.
When you're ready to move to the new version, you can select it in the Integration Version field in the Custom Exchange Endpoint app in Virtual Agent Hub.
Use Cases
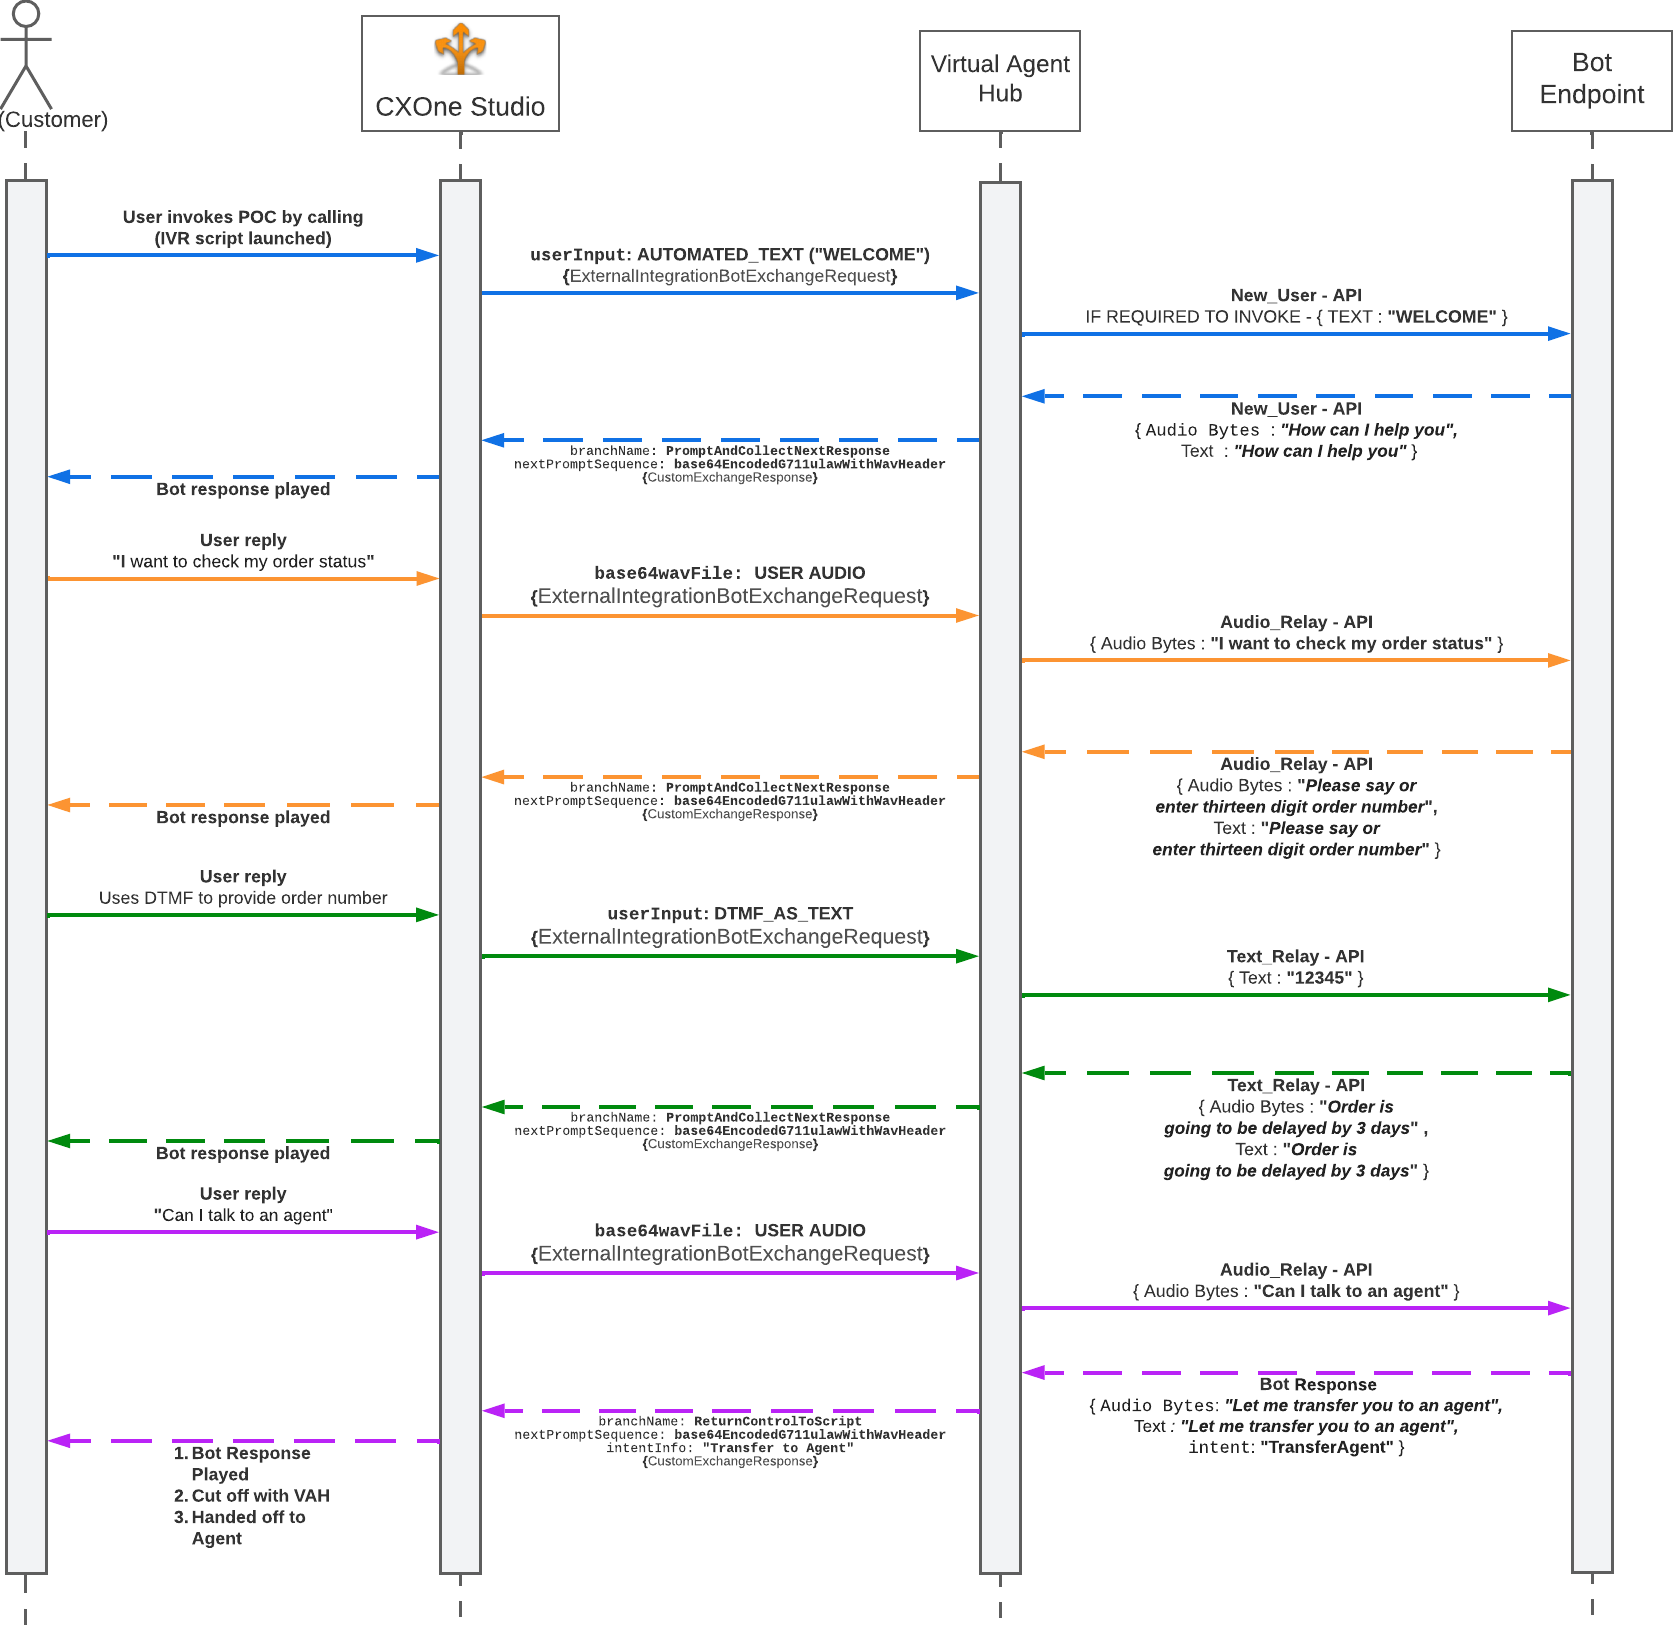
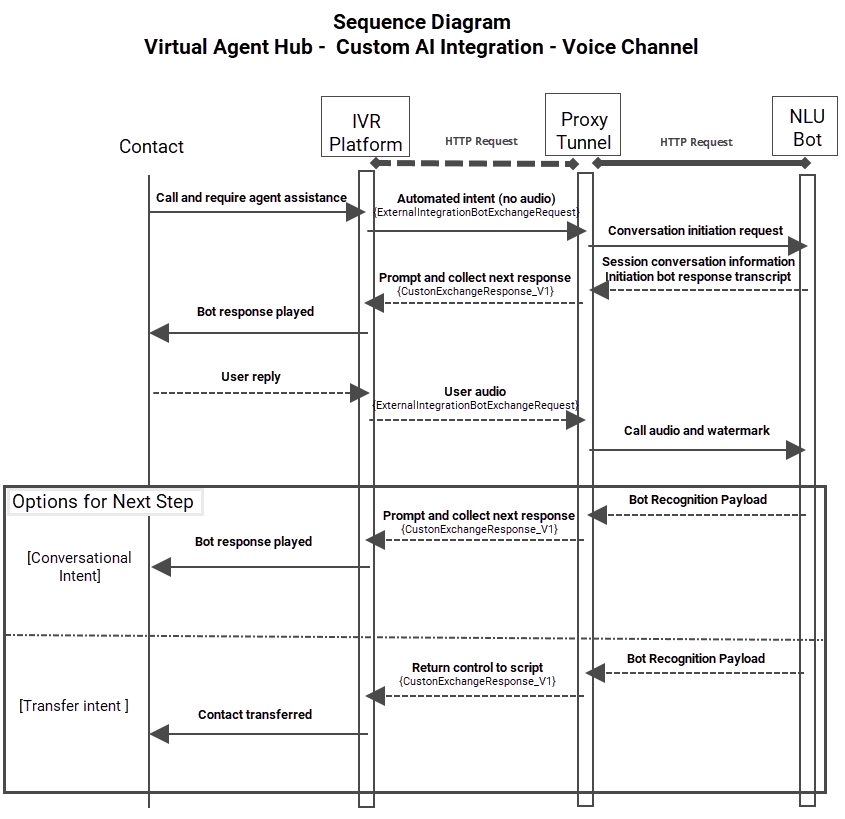
The following sequence diagram shows a use case of an order status query on a voice channel. This example shows the requests and responses throughout the interaction. It includes text-to-speech and speech-to-text as the contact's verbal requests are converted to text and the virtual agent's responses are converted to synthesized speech. The example also shows the contact using DTMF![]() Signaling tones that are generated when a contact presses a key on the telephone keypad. to enter the order number.
Signaling tones that are generated when a contact presses a key on the telephone keypad. to enter the order number.
To see more detail, open this image in a new tab.
As you design the proxy tunnel, you must document the request and response schemas. An example of this is provided in the example technical design document (TDD). Additional examples of custom virtual agent integrations are available. These designs show other possibilities for how the proxy tunnel can look in different network architectures.
Sequence Diagrams
Sequence diagrams show how various parts of a custom virtual agent integration interact and the order those interactions take place. They show a timeline of an interaction, starting in the top left corner, then moving back and forth down the page.
Sequence diagrams are an important part of planning your custom virtual agent integration. You can use them to map out the flow of requests and responses between NiCE CXone, Virtual Agent Hub, the proxy tunnel, and your virtual agent. They may also be helpful in determining the flow your Studio script must follow.
You can create different diagrams for the various use cases your integration might have. A detailed example of a use case is shown in the section on proxy tunnel design on this page.
NiCE CXone Configuration Requirements
A point of contact![]() The entry point that an inbound contact uses to initiate an interaction, such as a phone number or email address. is required to link the channel
The entry point that an inbound contact uses to initiate an interaction, such as a phone number or email address. is required to link the channel![]() Various voice and digital communication mediums that facilitate customer interactions in a contact center. contacts use with the Studio script that handles those interactions. If interactions can come from more than one channel, you need a point of contact for each channel. You can have more than one channel call the same script, as long as the media type matches.
Various voice and digital communication mediums that facilitate customer interactions in a contact center. contacts use with the Studio script that handles those interactions. If interactions can come from more than one channel, you need a point of contact for each channel. You can have more than one channel call the same script, as long as the media type matches.
You must choose an ACD skill![]() Used to automate delivery of interactions based on agent skills, abilities, and knowledge. when creating points of contact. With virtual agent interactions, the ACD skills assigned to points of contact aren't used for routing contacts. However, they do affect reporting. Depending on the reports your organization uses, you may need to create new ACD skills for use with your custom integration. If you have multiple points of contact for your custom integration, you may want separate ACD skills for each for reporting purposes. If you create separate ACD skills, you also need a campaign for each ACD skill.
Used to automate delivery of interactions based on agent skills, abilities, and knowledge. when creating points of contact. With virtual agent interactions, the ACD skills assigned to points of contact aren't used for routing contacts. However, they do affect reporting. Depending on the reports your organization uses, you may need to create new ACD skills for use with your custom integration. If you have multiple points of contact for your custom integration, you may want separate ACD skills for each for reporting purposes. If you create separate ACD skills, you also need a campaign for each ACD skill.
![]() Any channel, contact, or skill associated with Digital Experience (DX). points of contact, skills, and scripts used with traditional ACD channels.
Any channel, contact, or skill associated with Digital Experience (DX). points of contact, skills, and scripts used with traditional ACD channels.
Refer to these pages in the NiCE CXone online help for information about each task:
- Create a campaign for voice or NiCE CXone chat channels.
- Create an ACD skill for voice or NiCE CXone chat channels. You don't need to add users to the ACD skill that you assign to the point of contact. ACD skills aren't used to route interactions to virtual agents. However, if your script allows contacts to transfer to a live agent, you need one or more ACD skills to use in your script when an agent is requested.
- Create a point of contact for voice or NiCE CXone chat channels. The point of contact must be configured with the name of the ACD skill that uses it and the script that you want to run when a contact is routed to the named ACD skill.
In addition to the ACD skills required for the points of contact, you may need other ACD skills to complete the scripts required by your custom virtual agent integration. For example, you may need ACD skills to route contacts to live agents if the virtual agent determines that a live agent is required. You can use existing ACD skills or create new ones.
Script Requirements and Guidelines
Custom virtual agent integrations require at least one Studio script that includes a virtual agent action. Many times, integrations require multiple scripts. Virtual agent actions connect NiCE CXone to your virtual agent provider.
Sample scripts are provided for you to use as a reference.
- Download a sample text virtual agent script (ZIP file).
- Download a sample voice virtual agent script (ZIP file).
Media Type
Create your scripts with the correct media type for the channel![]() Various voice and digital communication mediums that facilitate customer interactions in a contact center. you want it to support. To support phone interactions, the script must have the voice media type. To support text-based interactions, the script must have the
Various voice and digital communication mediums that facilitate customer interactions in a contact center. you want it to support. To support phone interactions, the script must have the voice media type. To support text-based interactions, the script must have the
Types of Scripts
You may need more than one script to integrate your virtual agent. Each of the following scenarios requires its own script:
- Inbound interactions: Inbound interactions happen when a contact initiates the interaction. For example, by calling your organization or starting a chat from your website.
- Outbound interactions: Outbound interactions happen when your organization initiates the interactions. For example, by calling a contact to remind them about their upcoming appointment, or messaging them over a direct messaging digital channel with an account update.
Virtual Agent Studio Actions
There are two Studio actions available to use with virtual agent scripts, Voicebot Exchange and Textbot Exchange. Use the one appropriate for the type of interaction your bot will handle.
Script Requirements
You must define the conversational flow between the contact and the virtual agent![]() A software application that handles customer interactions in place of a live human agent. in your script. You can do this using custom code in Snippet actions. The example scripts show how to do this. Refer to the Snippet Action Code section below to learn more.
A software application that handles customer interactions in place of a live human agent. in your script. You can do this using custom code in Snippet actions. The example scripts show how to do this. Refer to the Snippet Action Code section below to learn more.
To complete the virtual agent script, you may also need to:
- Configure the virtual agent action, which includes adding it to Virtual Agent Hub and assigning it to the action in your script. Refer to the online help for the action you're using for information about the action's properties.
- Add initialization snippets as needed to the script using Snippet actions. You can do this to customize your virtual agent or to send customer identification information to the virtual agent.
- Reconfigure the action connectors to ensure proper contact flow and correct any potential errors.
- Connect all branches appropriately.
-
Add code to handle authorization. The script must pass authorization headers with each conversation turn. If you are using integration version 1.0.0 and want to use dynamic authentication, you must configure your script to handle it. If you're using integration version 2.0.0 or 3.0.0, Virtual Agent Hub handles dynamic authentication automatically after you set it up.
Integration versions 1.0.0 and 2.0.0 will be deprecated in a future release. Version 3.0.0 is the preferred version to use with custom virtual agent integrations. If you currently use version 1.0.0 or 2.0.0, plan to upgrade to 3.0.0. Version 3.0.0 is nearly identical to version 2.0.0. The primary difference is that 3.0.0 adds support for StandardBot.
- Use the OnReturnControlToScript branch to handle hanging up or ending the interaction. If you use the Default branch, your script may not work as intended.
- Complete any additional scripting and test the script.
Ensure that all parameters in the Virtual Agent Hub actions in your script are configured to pass the correct data. See the online help topic for the action you're using for information about how to configure each parameter.
If you need assistance with scripting in Studio, contact your account representative, see the Scripting Guide section in the online help, or visit the NiCE CXone Community site.
Snippet Action Code
Scripts for virtual agent integrations require Snippet actions to add variables, objects, and custom code into the script. Code in Snippet actions must be written in Snippet, an in-house programming language developed for NiCE CXone. Reference material for Snippet is available in the NiCE CXone online help.
Examples of snippet code for custom virtual agent integrations is provided for you to use. The following snippets are available:
Additional Script Needs
You must also have scripts that:
- Route contacts to the virtual agent script using one or more ACD skills
 Used to automate delivery of interactions based on agent skills, abilities, and knowledge.. For example, you might have an IVR Interactive Voice Response. Automated phone menu contacts use via voice or key inputs to obtain information, route an inbound voice call, or both. script that routes contacts to the virtual agent script when they choose a particular menu option.
 - Handle any routing required after the conversation is complete or the virtual agent determines the contact needs a live agent.
- Define DTMF Signaling tones that are generated when a contact presses a key on the telephone keypad. routing options for tones that don't lead to the virtual agent. This applies to voice-based virtual agents only.
These requirements can be met in one script or several. Scripting best practice is to use several smaller scripts. This makes it easier to manage each piece separately. You can use the RunSub action or Runscript action to link scripts together.
Authorization and Authentication
Authorization and authentication are important for the security of the communication between NiCE CXone, the proxy server, and the virtual agent provider. Services often require authorization, authentication , or both before they allow requests to pass through. Custom virtual agent integrations with NiCE CXone support options for both authentication and authorization:
- Authorization using headers: You can use authorization with headers with any integration version.
- Dynamic authentication using tokens: You can use dynamic authentication with integration version 2.0 and up.
- Authentication between the client and server with mTLS: You can use mTLS authentication with integration version 3.0.0 and up. Currently it's only supported with custom virtual agent integrations.
Integration versions 1.0.0 and 2.0.0 will be deprecated in a future release. Version 3.0.0 is the preferred version to use with custom virtual agent integrations. If you currently use version 1.0.0 or 2.0.0, plan to upgrade to 3.0.0. Version 3.0.0 is nearly identical to version 2.0.0. The primary difference is that 3.0.0 adds support for StandardBot.
Headers
Headers are key-value pairs that are sent with every request made to the virtual agent. They contain credentials that allow the virtual agent service to authenticate the request. You must generate the credentials in the virtual agent service. When you use headers for authentication in your custom virtual agent integration, your script must be configured to send the header information with every request.
All versions of the custom exchange endpoint support headers:
- In version 1.0.0, you can only send one header, and the key name is hard-coded as Authentication.
- Version 2.0.0 and 3.0.0 support multiple headers. You can use any key-value pairs. None of the key names are hard-coded. You need to use key-value pairs that your virtual agent expects. Obtain the required header information from your virtual agent provider.
This example shows an authorization header request that uses headers only:
{
	"accessKeyId": "12998c017066eb0d2a70b94e6ed3192985855ce390f321bbdb832022888bd251===",
	"accessKeySecret": "e97deac957f87d18ef0058a07dfa52501b312382691f5a1de5a712871fef69ee==="
}
More information about using headers in integration versions 1.0.0 and 2.0.0 and 3.0.0 is available in the sections that follow.
Dynamic Authentication
Dynamic authentication uses tokens instead of headers. You must have a separate authorization server. A token is obtained from the authorization server and stored in cache. It lasts a defined amount of time before it expires and another token must be obtained.
You can use dynamic authentication in both versions of the custom exchange endpoint. However, there are differences between the versions:
- In version 1.0.0, you must configure your script to manage all aspects of token management.
- In version 2.0.0 and 3.0.0, the Custom Exchange Endpoint app in Virtual Agent Hub manages the tokens using the information you provide in the app.
The following example shows an authorization header using tokens. The key-value pairs in authorization request headers and responses may vary based on how the authorization service is configured. The access token in the following example has been shortened to save space.
{
	"access_token": "eyJ0eXAiOiJKV1QiLCJhbGciOiJSUzI1Ni",

	"expires_in": 3600,

	"token_type": "Bearer"

}
More information about using token-based authentication in versions 1.0.0 and 2.0.0 and 3.0.0 is available in the sections that follow.
Authorization in Version 1.0.0
In custom exchange endpoint version 1.0.0, you can send one header with each request. Add the header details in the Authorization Header field in the Custom Exchange Endpoint app in Virtual Agent Hub. The request that's sent to the virtual agent endpoint contains a key-value pair where the key is named Authorization and the value is the header you put in Authorization Header. You must generate the header value in your virtual agent service. Your script must be set up to include the header with every request.
If you want to use dynamic authentication with custom exchange endpoint version 1.0.0, you need to configure your script to handle it. It's not supported by default. Use the REST API Studio action to communicate with the authentication server. The script must handle the expiration of the token and be able to request a new token, if needed. You can use either the Custom Payload or the Bot Session State snippet to send the access token. You can add additional parameters to either snippet to include the access token during a given conversational turn. The Bot Session State snippet is the preferred method. The following example shows an architecture where the script requests authentication tokens:
Authorization with Headers in Version 2.0.0 and 3.0.0
In custom exchange endpoint version 2.0.0 and 3.0.0, you can send more than one header with each request. Add your header details in the Custom Headers fields in the Custom Exchange Endpoint app in Virtual Agent Hub.
The headers can be any key-value pairs, but the key names must match what your virtual agent expects. This is different from version 1.0.0, where the key is named Authorization and cannot be changed.
Your script must be set up to include the headers with every request.
If you configure an authorization header in Custom Headers and you also use OAuth, the authorization header from OAuth overrides the setting in the custom header.
Dynamic Authentication with Tokens in Version 2.0.0 and 3.0.0
In custom exchange endpoint version 2.0.0 and 3.0.0, Virtual Agent Hub manages dynamic authentication tokens. This means you don't need to configure your script to handle them, as you do with version 1.0.0.
Configure the Custom Exchange Endpoint app in Virtual Agent Hub with the following information:
- Authorization server URL.
- Key-value pairs for the authentication request body. This can be things such as API secrets or client credentials.
- Key-value pairs for the header in the authentication request.
Expiration times for tokens can exist in three places: on the OAuth server, in the Custom Exchange Endpoints app in Virtual Agent Hub, and the default setting. The system uses them in this order:
- If an expiration time is sent in the OAuth response from the OAuth server, that time is used to determine when the authorization token expires.
- If the OAuth response doesn't include an expiration time, then the time you configure in the Custom Exchange Endpoints app in Virtual Agent Hub is used.
- If the app doesn't have an expiration time set, then the default is used. The default is 3600 seconds (one hour).
Additionally, if you use dynamic authentication, you can customize the key-value pairs sent with authorization headers to the virtual agent provider. By default the authorization header name is Authorization. You can also change the prefix added to the header value. The default is Bearer.
Authentication with Client Certificates and mTLS
Custom virtual agent integrations in Virtual Agent Hub support mTLS (Mutual Transport Layer Security). mTLS is a transport layer protocol that authenticates clients and servers. It provides added security to client-server communication. With TLS authentication, there is validation of a certificate between two servers. mTLS validates a certificate between a client and the server. The client can be either a web browser or an API call.
To use mTLS authentication with your custom virtual agent integration, your webhook must have mTLS enabled. You can add a client certificate and key to the Custom Exchange Endpoints app in Virtual Agent Hub. NiCE CXone uses this information when negotiating the handshake with webhook.
Virtual Agent Intents
Your virtual agent must be able to identify what the contact wants. It does this using the intents you configure it to recognize. The intents you need depend on the use cases for the virtual agent. Once you know the intents you need, you must configure the virtual agent in the provider's management console. The terminology some providers use for the concept of intent may vary.
NiCE CXone requires that your virtual agent have responses for certain intents. All other intents depend on your organization's plans for the virtual agent. At a minimum you must define:
- A Greeting/Welcome intent: This is the default message the virtual agent starts with when a contact initiates a conversation.
- A Fallback intent: This is what the virtual agent says when none of its other responses apply.
- A Timeout/Silence intent: This is what the virtual agent says when the contact has been silent for a long time.
- An End/Completion intent: This is how the virtual agent ends the conversation.
Virtual Agent Use Cases
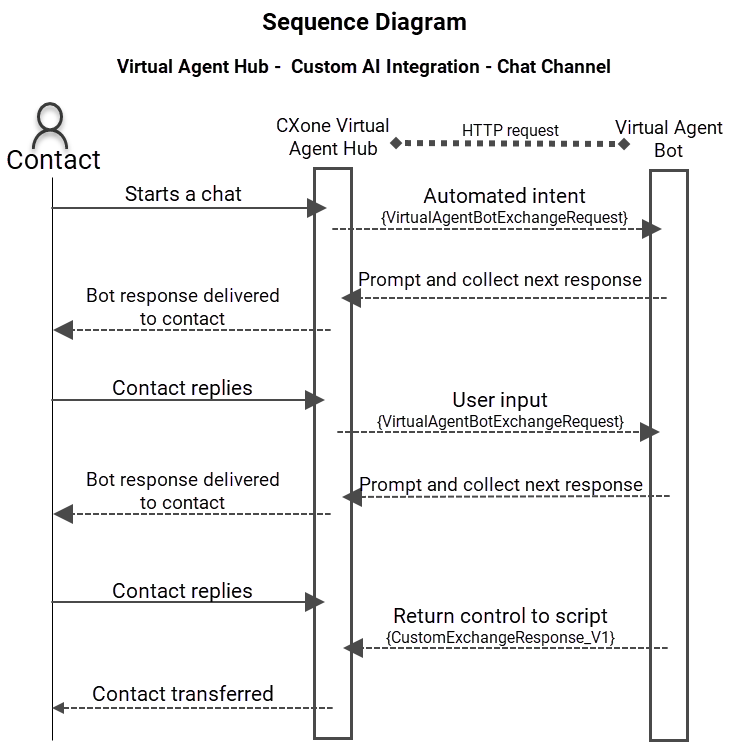
When planning your virtual agent, you need to consider the kinds of scenarios it will handle. Build use cases for these scenarios, including the conversational flows it must follow for each one. For each use case, create a sequence diagram that maps the requests and responses throughout the interaction.
For example, a use case might be responding to questions about order status. The conversational flow might look like this:
Virtual Agent: "How can I help you?"
Contact: "I want to check my order status."
Virtual Agent: "Please say or enter your thirteen-digit order number now."
Contact: "Let's see, the order number is '2390294837290."
Virtual Agent: "Unfortunately, your order is delayed by three days."
Contact: "Oh, that's not good. I really need it sooner. Is there any way I can talk to someone about that?"
Virtual Agent: "Yes, I'll transfer you to an agent who can help you."
A sequence diagram for this use case might look like the one in the following example:
To see more detail, open this image in a new tab.
Conversation Transcripts
NiCE CXone can collect the transcripts and intent![]() The meaning or purpose behind what a contact says/types; what the contact wants to communicate or accomplish. data from voice and chat virtual agent conversations. You can use the information in whatever way meets the needs of your organization. For example, you could have them saved to an external database. You could also have them sent to the agent application for interactions that are escalated to live human agents. This feature must be enabled in the configuration app for your virtual agent in Virtual Agent Hub. By default, transcripts and intents are not collected.
The meaning or purpose behind what a contact says/types; what the contact wants to communicate or accomplish. data from voice and chat virtual agent conversations. You can use the information in whatever way meets the needs of your organization. For example, you could have them saved to an external database. You could also have them sent to the agent application for interactions that are escalated to live human agents. This feature must be enabled in the configuration app for your virtual agent in Virtual Agent Hub. By default, transcripts and intents are not collected.
The exact data that's collected depends on how the feature is configured. You can have only transcripts collected, only intents, or both transcripts and intents. If you have more than one virtual agent, you can configure each one separately.
What you do with the collected data is up to you. If you want to save it for record-keeping, the virtual agent's Studio script must be configured to do so. By default, when conversation transcript collection is enabled, the collected data is stored until the interaction is complete.
Using this feature requires custom scripting in the virtual agent Studio script. It must also be enabled on the Transcript page in the virtual agent's configuration app in Virtual Agent Hub.
NiCE CXone API Endpoints and Schemas
The API endpoints and schemas that NiCE CXone uses are defined in Swagger documentation ![]() . You can use this information when mapping the requests and responses between NiCE CXone and your virtual agent provider as part of creating the proxy tunnel webhook.
. You can use this information when mapping the requests and responses between NiCE CXone and your virtual agent provider as part of creating the proxy tunnel webhook.
- ExternalIntegrationBotExchangeRequest: This is the endpoint for requests going from NiCE CXone to your virtual agent via the proxy tunnel.
- CustomExchangeResponse: This is the endpoint for responses coming from the virtual agent to NiCE CXone.
Schemas are defined on the Schemas page. However, always check the Swagger page to ensure you're using the most up-to-date version of the schemas.