

NiCE CXone provides a default experience for the customer side of a chat interaction. If you want to customize that experience, you must set up the customer chat interface before performing the following tasks.
Complete each of these tasks in the order given.
Create a Campaign
Required permissions: Campaigns Create
If you've already created a campaign![]() A grouping of skills used to run reports. that you plan to use, you can skip this step. For example, you may have a campaign that you intend to use across several channels.
A grouping of skills used to run reports. that you plan to use, you can skip this step. For example, you may have a campaign that you intend to use across several channels.
- Click the app selector
 and select ACD.
 - Go to Contact Settings > Campaigns.
- Click Create New.
- Enter a value in the Campaign Name field.
- Choose the Division you want to assign the campaign to. This option is only available if your system is configured for divisions. After you have assigned the campaign to a division, you cannot change the division assignment.
- Click Create Campaign.
Create a Chat Skill
Required permissions: Skills Create and Skills Edit
The name of a skill should be meaningful and unique. It's helpful to be consistent when naming skills. Decide on a standard format for skill names that works for your organization.
A skill name must have a minimum of 2 characters and a maximum of 30. Skill names may only contain letters, numbers, and these special characters:
- Hyphens (-)
- Underscores (_)
- Periods (.)
- Colons (:)
-
Click the app selector
and select ACD. -
Go to Contact Settings > ACD Skills.
-
Click Create New > Single Skill.
- Set the Media Type to Chat.
- Enter a Skill Name.
- Select the Campaign you want the skill to be part of.
-
Configure the remaining optional fields in the Skill Information section as needed.
 Learn more about fields in this step
Field Details Type Specifies whether the work items generated for this ACD skill enter the real-time queue or the persistent queue on creation:
- The persistent queue pauses the work item script until the work item is delivered to an agent. In that time, you can't perform any actions on the work item, but is still tracked and reported as usual.
-
Real-time work items remain active and count toward real-time system limits for interactions.
There are limits on the number of work items that can be queued. It's important to understand these limits and how they impact your contact center's ability to handle interactions.
When creating a work item point of contact (POC), make sure it uses a skill with the correct Type. A POC intended for persistent work items must be assigned to a skill created with Persistent selected. You cannot use a real-time skill POC to queue a persistent work item.
Transferred to Script Specifies the script that runs when an agent transfers a contact from another skill to this skill. The transferred contact switches to this script rather than running scripts from the original ACD skill. You could use this field for overflow or supervisor escalation scripts, which often include multiple queue scripts with varying logic that differ from normal inbound logic.
This does not work if the work item Type is set to Persistent.
The hours of operation profile that controls when agents can transfer a contact to this ACD skill. For example, if the Sales at the Longbourn contact center closes at 4:00 in the afternoon, and an agent in Support tries to transfer a contact to Sales at 4:30, the agent receives a warning message that says the ACD skill is closed. If the agent selects Proceed, the contact either hangs in the queue until an agent with that ACD skill becomes available or hears a message that you configure for the ACD skill when it's closed. To completely block agents from transferring to closed skills, enable Do not allow transfers to skill when closed below.
If you add an existing inbound skill to an hours of operation profile, that profile automatically appears in this field.
Do not allow transfers to skill when closed Determines whether interactions can be transferred to this skill when its hours of operation profile is set to Closed. Select to prevent transfer or leave unselected to allow transfer during closed hours.
Workforce Intelligence Minimum Agents The minimum number of agents that must belong to this ACD skill. This setting prevents automatic actions associated with Workforce Intelligence rules from removing too many agents from the ACD skill. When the number of agents reaches this number or lower, all skill removal actions, even automatic ones, require approval.
This setting doesn't affect agentless ACD skills.
Workforce Intelligence Minimum Available Agents The minimum number of available agents that must be maintained for this ACD skill. This setting prevents automatic actions associated with Workforce Intelligence rules from removing too many agents from the ACD skill. When the number of available agents reaches this number or lower, all ACD skill removal actions, even automatic ones, require approval.
This setting doesn't affect agentless ACD skills.
Show Agent Typing Indicator When enabled, chat typing indicators display when the contact or the agent are typing so that the recipient knows the other person is responding.
Show Patron Typing Preview Allows an agent to preview a contact's message before the message is actually sent, giving the agent extra time to prepare to address the contact's questions or concerns.
Chat Warning Threshold Number of seconds that must pass until a chat inactivity warning appears to an agent. This is helpful for agents handling multiple chats.
-
If your system is configured for divisions, use the Division field to specify which division
Separate data securely between lines of business. Data can only be accessed from within the division it's part of. to assign the skill to. After you have assigned the skill to a division, you cannot change it. To configure this option, you must have the Division Assignment permission. - If you want to use screen pops A pop-up window with information about the contact that appears on an agent's screen after an event such as connecting to a contact. for this skill, select the Use Screen Pops checkbox. Modify the optional settings in the Screen Pops section if you want to customize your screen pops. This capability is only supported for Agent Workspace (Agent) suite. You can also do this later.Learn more about fields in this step
Field Details Use Custom Screen Pops Select to enable. Allows you to use a separate application or website to run the screen pops. Application or
Webpage
Select how your screen pops will appear.
If you chose Application, enter either the entire path to the executable. if you chose Webpage, enter the full URL.
To have custom variables appear in the screen pop, the variable must be configured to do so in your custom Studio script.
You can customize the title of the tab that pops up in the MAX interface by appending the icAgentPanelTitle= parameter to the URL.
-
If you want to change the default prioritization settings for this skill, modify the settings in the Priority Management While in Queue section. You can also do this later.
Learn more about fields in this step
Field
Details
Initial Priority Enter a numeric value you want to set as the base level priority
Skill-based designation of the importance of contacts that determines delivery order. for all contacts in an inbound skill or for fresh records and retries in an outbound skill (callbacks Holds a customer's place in queue and automatically calls the customer when they move to the front of the queue. always take priority and are not affected by this setting). The default value is 0. Enter a numeric value to determine how quickly the priority of the skill increases. For every minute a contact stays in queue, the priority increases by the value you configure for Acceleration.
The default value is 1. The minimum value is 0 and the maximum priority is the value configured in the Maximum Priority field.
For example, if the Initial Priority is 4, and you set Acceleration to 1, then with each passing minute that the contact is not handled, the priority increases by one. In this example, if the contact has been in queue for three minutes, then the priority will be raised to 7.
Priority increments in seconds. For example, when Acceleration is 1, a contact's priority increases by 0.5 after 30 seconds in queue.
For Personal Connection skills, set this value to 0 because there is no queue of contacts.
You can set Initial Priority for one skill lower than another skill, but if you set Acceleration for that skill higher, it can jump spots in the queue. For example, you set Initial Priority for Skill A to 1 and Acceleration to 5. You set Initial Priority for Skill B to 3 and Acceleration to 1. Initially, a contact for Skill B will be first in queue because it has a priority of 4, but after one minute, Skill A will take its place at the top because its priority will be 6.
NiCE CXone combines the acceleration value with the time the contact has been in queue and the initial priority using the formula Overall Priority = (Time * Acceleration) + Initial Priority.
Maximum Priority Enter a numeric value to determine the maximum priority a contact can have. If you choose not to use Acceleration, this value should match the Initial Priority. The default value is 1000.
The maximum priority for digital contacts is 1000.
-
If your organization uses dynamic delivery, use the Routing Configuration section to customize the routing experience for this skill. To do so, select an Evaluation Criteria and configure any related settings.
Learn more about fields in this step
-
If you want to change the default service level settings for this skill, modify the fields in the Service Level section.
Learn more about fields in this step
Field
Details
Service Level Threshold The number of seconds agents have to respond to meet an SLA
Commitment between service provider and customer with defined service level thresholds including quality, availability, and responsibilities.. For example, if your SLA for this skill is to respond to 80% of contacts within 20 seconds, enter a value of 20.Service Level Goal
The percentage of contacts agents must respond to by the Service Level Threshold to meet the SLA. For example, if the SLA for this skill is to respond to 80% of contacts within 20 seconds, enter a value of 80.
Enable Short Abandon Threshold Select to enable. Allows you to trackabandoned
Call that enters the contact center system, but the caller ends the call before reaching an agent. contacts that fall within the Short Abandon Threshold for this skill.Short Abandon Threshold The number of seconds that must pass for an abandoned interaction to be considered a short abandon. For example, if the value is set to 10 and an interaction drops from the queue after seven seconds without being delivered to an agent, it is reported as a short abandon. The default value is 15 seconds.
Short Abandons Counts short abandons, as defined by the Short Abandon Threshold, against the service level for reporting purposes.
Scenario
Setting
SLA Value
Short abandon, NOT counted Short Abandons set to No -1 Short abandon, counted Short Abandons set to Yes 1 Abandoned after threshold Any 1 Answered after SLA Any 1 Not answered at all Any 1 - If you want to turn on messaging time out for the skill, select the Enable Chat Messaging Time out checkbox.
Modify the remaining settings in the Automated Chat Messaging Time out section.
The Automated Chat Messaging Timeout setting in the default skill assigned to the point of contact overrides the setting in any skill the contact is transferred to. You cannot use scripting to override or maintain certain time out settings. So, be careful to avoid this issue when configuring scripts, skills, and points of contact.
Learn more about fields in this stepField Details Time to Inactive Chat Message Number of seconds until the inactive chat message displays to contact. Initial countdown begins once the agent accepts the chat.
Inactive Chat Message
Allows you to configure the message that displays to the contact when the chat becomes inactive.
Chat Termination Count Down Number of seconds until the chat terminates. This countdown begins from when the systems sends the inactive chat message.
Chat Terminated Message Allows you to configure the message that displays to the contact once the chat terminates due to inactivity.
- If you want to test how contacts in this skill change in priority over time compared to other skills, use the Priority Comparison tool.
You can also do this later.
In the Skills to Compare section, click the plus sign +.
Add Available skills until all skills you want to compare are in the Selected list. You don't need to add the skill you are currently editing; it appears in the graph automatically.
- Click Done.
Use the Elapsed Time and Time Interval fields to define the period of time you want the graph to cover and the time interval
A period between points, limits, or events, such as dates or times. you want to mark a new point on the graph.Click Compare.
- Click Create. Complete additional configurations to customize or manage your skills.
Add Users to the Skill
Required permissions: Skills Edit, Skills User Assignment
- Click the app selector and select ACD.
-
Go to Contact Settings > ACD Skills.
-
Click the skill
Used to automate delivery of interactions based on agent skills, abilities, and knowledge. you want to edit. -
Click the Users tab.
- Select the checkbox for each user you want to assign to the skill. Click Add Users.
-
Set the Proficiency for each user in this ACD skill to a number between 1 (highest) and 20 (lowest). Click Save Proficiencies.
If you don't click Save Proficiencies before leaving the page, all users you added to the skill profile will be removed.
Create a Chat Script
Required permissions: Scripts Create
- In Studio, click File > New.
- In the Create New Script window, select the
-
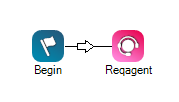
Add BEGIN and REQAGENT actions to the canvas and connect them.
Used to automate delivery of interactions based on agent skills, abilities, and knowledge. specified in the point of contact associated with this script. If you want to route to a different skill, change the value in the Skill property of the REQAGENT action. - If you configured screen pops A pop-up window with information about the contact that appears on an agent's screen after an event such as connecting to a contact. in the skill, configure the screen pop content. You may need to contact your account representative for guidance.
-
You can customize the script with additional actions you want to occur during chat events, such as when the chat begins, is transferred, or ends.
- Click File > Save.
- In the Save Script As... window, enter a name for the script, and click Save.
Create a Point of Contact
Required permissions: Points of Contact Create
-
Click the app selector
and select ACD. -
Go to Contact Settings > Points of Contact.
- Click Create New and select Single Point of Contact.
- For the Media Type, select Chat.
- Enter a Name for the point of contact.
- From the Point of Contact drop-down, enter the email address contacts need to use to enter the skill assigned to the point of contact.
- Select the ACD Skill you created earlier.
- Select the Script you created in Studio.
- If you want calls to this number to track IVR press paths for reporting, select IVR Reporting Enabled.
- Click Create Point of Contact.
Customization Tasks
Depending on how your organization uses chat, you might also want to:
- Set up dispositions.
- Set up tagging.
- Set up quick replies.
- Set up a thank-you page to appear for contacts when a chat ends.
- Set the maximum number of chats per team, agent, or both.
- Enable typing indicators for the agent, the customer, or both.