This help page is for Desktop Studio. This information is also available for Studio.
インタラクションのシミュレーションにょって、スクリプトのパフォーマンスをテストすることができます。 シミュレートされたインタラクションとスクリプトのtracingを組み合わせることで、スクリプトが期待どおりの動作をしているかどうかを確認できます。 正しく動作しない場合は、スクリプトのトレースから原因を判断できます。
インタラクションのシミュレーション
必須の権限:Studio>>アプリケーションスクリプト>
このセクションでは、CXone Mpowerでインタラクションをシミュレートするための一般的な高レベルのプロセスについて説明します。 このプロセスは、ほとんどのチャネル![]() コンタクトセンターにおける顧客とのインタラクションを促進するさまざまな音声およびデジタルのコミュニケーション媒体。でのインタラクションに適用されます。 これらの手順に従って、電話インタラクションのシミュレーションを行えます。 ただし、Studioスクリプトから直接電話インタラクションをシミュレートする方が迅速です。
コンタクトセンターにおける顧客とのインタラクションを促進するさまざまな音声およびデジタルのコミュニケーション媒体。でのインタラクションに適用されます。 これらの手順に従って、電話インタラクションのシミュレーションを行えます。 ただし、Studioスクリプトから直接電話インタラクションをシミュレートする方が迅速です。
テストするCXone Mpowerの機能または製品によっては、シミュレーションセットアッププロセスの変更が必要になる場合があります。 インタラクションのシミュレーションで問題が発生した場合は、ご使用の製品または機能のオンラインヘルプを参照して、それらの設定に関する情報を確認してください。 このセクションで説明する一般的な手順には含まれていない、必須の手順がある可能性があります。
以下のステップでは、テストで使用するためのACDスキル![]() エージェントのスキル、能力、知識に基づいてインタラクションの配信を自動化するために使用されます。、キャンペーン、およびポイントオブコンタクト(PoC)
エージェントのスキル、能力、知識に基づいてインタラクションの配信を自動化するために使用されます。、キャンペーン、およびポイントオブコンタクト(PoC)![]() 電話番号やEメールアドレスなど、インバウンドコンタクトがインタラクションを開始するために使用するエントリーポイント。の作成について説明します。 すでに組織でこれらの設定が完了している場合は、再度作成する必要はありません。 必要に応じて、手順を省略してください。
電話番号やEメールアドレスなど、インバウンドコンタクトがインタラクションを開始するために使用するエントリーポイント。の作成について説明します。 すでに組織でこれらの設定が完了している場合は、再度作成する必要はありません。 必要に応じて、手順を省略してください。
このセクションで説明するタスクを実行するには、適切な権限が必要です。 そうでない場合は、担当のCXone Mpower管理者からの支援を得てタスクの一部を完了することもあります。 このセクションに含まれていない製品や機能をテストする場合は、上記に加えて他の権限が必要になる場合があります。
- In Studio, check the syntax of the script you're testing. Correct any issues.
- In Studio, enable the option to trace or capture the next instance of the script running. You can also have Studio continuously trace and capture all instances of the script running.
- CXone Mpowerで、テストに使用するキャンペーンを作成します。
- CXone Mpowerで、テストに使用するACDスキルを作成します。 スキルは次の条件を満たしている必要があります。
- テストするスクリプトのメディアタイプ
 コンタクトが意図する受信者とつながるための、音声、Eメール、チャットなどの手段。に一致すること。 例えば、Eメールスクリプトの場合、EメールのACDスキルが必要です。 ACDスキルの作成方法については、使用するチャネルのタイプのオンラインヘルプを参照してください。
 - アクセスできるユーザーアカウントに割り当てられていること。CXone Mpower
- テストするスクリプトのメディアタイプ
- CXone Mpowerで、テストで使用するポイントオブコンタクト(PoC)を作成します。 連絡先を設定するときに、テストするスクリプトと、使用するテストACDスキルを選択します。
- 完全なインタラクションをテストする場合は、以前にテストエージェントアプリケーションスキルを割り当てたアカウントを使用して、組織が使用するACDにサインインします。 使用するCXone Mpowerプロファイルでは、テストする機能や製品を使用するための権限や設定の有効化が必要となる場合があります。
- エージェントアプリケーションで、状態を利用可能に設定します。 たとえば、MAXではエージェントレッグを接続する必要があります。
- スクリプトで使用するチャネルが設定され、構成済みであることを確認します。 セットアップを完了する必要がある場合は、そのチャネルのオンラインヘルプを参照してください。
- インタラクションをシミュレートします。 これを行う方法は、使用するチャネルとスクリプトのタイプによって異なります。 次に例を示します。
- チャットチャネル:CXone Mpowerのポイントオブコンタクト(PoC)ページからブラウザにポイントオブコンタクト(PoC)URLをコピーします。 チャットウィンドウが開きます。 チャットウィンドウからメッセージを送信し、エージェントアプリケーションチャンネルで応答することができます。
- SMSチャネル:エージェントアプリケーションから、アクセス可能な携帯電話番号にテキストメッセージを送信します。 組織がインバウンドのSMSインタラクションをサポートしている場合、テストしているチャネルに関連付けられたSMS番号にテキストメッセージを送信します。
- 手動アウトバウンド電話:エージェントアプリケーションから電話をかけます。 応答可能な電話に接続されている番号をダイヤルします。
- インバウンド電話でボイスメールをテスト:チャネルに関連付けられているDNIS
 インバウンドまたはアウトバウンドの音声通話でダイヤルされた番号。に電話をかけ、プロンプトが表示されたらボイスメールを残します。 これは、simulating an inbound phone内からのインバウンド電話のインタラクションをシミュレートすることで行うこともできます。Studio どちらのテスト方法にも、ボイスメールオプションのあるスクリプトが必要です。
 - 電子メール:インバウンドEメールをテストするには、チャネルに関連付けられている電子メールアドレスに電子メールを送信します。 アウトバウンドEメールをテストするには、アクセス可能なアドレスにエージェントアプリケーションから電子メールを送信します。
- Use the Trace Output windowし、トレース出力ウィンドウを使用して、スクリプト内のアクションが起動するのを監視します。
Studioでのインバウンド電話インタラクションをシミュレートする
必須の権限:Studio>>アプリケーションスクリプト>
このタスクの手順では、スクリプトのアクションの前にある部分をテストできます。 スクリプトの以降の部分をテストするには、シミュレーションにエージェントアプリケーションを含める必要があります。 そのCXone Mpowerを使用する権限を持つアプリケーションユーザーアカウントが必要です。
電話のインタラクションをシミュレートするには、テストに使用するACDスキル![]() エージェントのスキル、能力、知識に基づいてインタラクションの配信を自動化するために使用されます。が必要です。 テスト専用のスキルを作成することもできます。 条件は次のとおりです。
エージェントのスキル、能力、知識に基づいてインタラクションの配信を自動化するために使用されます。が必要です。 テスト専用のスキルを作成することもできます。 条件は次のとおりです。
- インバウンド電話スキルであること。
- アクセスが可能なCXone Mpowerユーザーアカウントに割り当てられていること。
- Studioで、テストするスクリプトを開きます。
-
キャンバスの空白部分をクリックし、選択されているアクションがある場合はすべて選択を解除してから、Propertiesタブをクリックします。
- Skillドロップダウンからインバウンド電話のACDスキル
 エージェントのスキル、能力、知識に基づいてインタラクションの配信を自動化するために使用されます。を選択します。
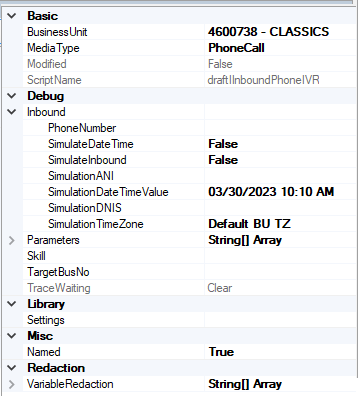
 - インバウンドの下に、スクリプトで呼び出すPhoneNumberを入力します。 これは、テスト中に応答できる電話の番号でなければなりません。
- Simulate Inboundフィールドをダブルクリックして、値をTrueに変更します。
- テストが特定の日付または時刻に依存する場合:
- SimulateDateTimeフィールドをダブルクリックして、値をTrueに変更します。
- SimulationDateTimeValueフィールドでテストに使用する日時を選択します。
- このテストに必要であれば、SimulationTimeZoneを変更します。
- ANIまたはDNISをテストに指定できます。
- StudioツールバーでStart with Traceをクリックします。
- 電話が鳴ったら応答し、スクリプトのテストに必要なアクションを実行します。 たとえば、IVRをテストする場合は、この手順を各メニューオプションのテストに必要な回数繰り返します。
- トレース出力ウィンドウを使用して、スクリプトのアクションが起動されるのを確認します。
MAXでのインバウンド電話インタラクションをシミュレートする
必須の権限:Studio>>アプリケーションスクリプト>
エージェントアプリケーションを使用して、インバウンド電話のインタラクションをシミュレートできます。 これにより、スクリプトでOnanswerがトリガーされた後の部分をテストできます。
サポートされているエージェントアプリケーションはすべて使用できます。 次のタスクでは、MAXを使用する方法について説明します。
- シミュレートされたインバウンドの電話インタラクションを設定する手順に従って、手順7まで完了します。 このタスクの残りの手順を完了するまでは、StudioでStart with Traceをクリックしないでください。
- MAXを起動します。
- 今すぐ使用できる電話番号を入力します。 可能であれば、スクリプトで設定した電話番号とは別の電話番号を使用してください。 Integrated Softphoneまたはステーションが設定されている場合は、代わりにこれらのオプションを使用できます。
- 接続をクリックします。
- 状態を利用可能に設定し、接続をクリックしてエージェントレッグを接続します。
- 電話が鳴ったら、応答します。 これは、インタラクションのエージェント側の電話です。
- Studioで、Start with Traceをクリックします。
- 電話が鳴ったら、応答します。 これは、会話のコンタクト側の電話です。
- コンタクトの電話を使用して、プロンプトに従い、必要なテストを完了します。
- Use the Trace Output window、スクリプト内のアクションが起動するのを観察します。


