

This page guides you, step-by-step, in setting up authentication for your NiCE CXone system using the built-in identity provider.
Complete each of these tasks in the order given.
Before You Begin
- Gain a basic understanding of authentication and authorization ideas and terminology if you've never set up a process like this before.
- Review the NiCE CXone-specific process if this is the first time you've worked with authentication in NiCE CXone.
- Consider your human users and the levels of access they need. Decide whether people with greater access should have greater levels of security.
- Decide whether you will use custom password requirements, multi-factor authentication (MFA), or both to enforce.
- Make a list of the login authenticators you'll need based on your decisions. The list should include the password requirements and MFA status you want to use for each login authenticator.
- Consider whether you need to include authentication and authorization for applications like bots or intelligent virtual assistants (IVAs). If so, you will need to create access keys.
Your NiCE CXone team can support and guide you in this planning process. Good planning makes for a smoother implementation. Implementing authentication and authorization as immediate needs come up is more likely to lead to issues.
Create Login Authenticators
Required permissions: Login Authenticator Create
The built-in NiCE CXone IdP authenticates users with usernames and passwords. Password criteria are managed using login authenticators. You can create different login authenticators for different
- Click the app selector
 and select Admin.
 - Go to Login Authenticator.
-
Click Create New.
-
Enter a unique Name for the login authenticator.
-
Enter an optional Description. Use plain text only. URLs or markup such as HTML will not be saved.
-
Select System as the Authentication Type.
 Learn more about authentication types
Field
Details
System The login authenticator uses the built-in login process of NiCE CXone. It doesn't authenticate using an external single sign-on (SSO) identity provider. SAML SAML 2.0 allows you to set up single sign-on through an external identity provider. NiCE CXone supports multiple instances of SAML 2.0. You can assign different instances to different users. - Set up your password complexity.
Each user's password is checked against a repository of commonly used passwords. If their password matches one of the commonly used passwords, the system requires them to create a new password. Some of the passwords that are rejected include:
Any password that includes the word "password." For example, Password@1234.
Any password that includes the user's email address, username, first name, last name, or system name.
Passwords are checked against this repository whenever:
A new user is activated.
A user's password expires.
A user resets their password.
Learn more about fields in this stepField Details Require Lower Case (a-z) Requires users to use at least one lower-case letter in their passwords. Require Upper Case (A-Z) Requires users to use at least one upper-case letter in their passwords. Require Numeric (0-9) Requires users to use at least one number in their passwords. Require Non-alphanumeric (!,@,#,etc.) Requires users to use at least one non-alphanumeric character in their passwords. -
If you want to enable multi-factor authentication, select Require Multi-Factor Authentication. Set your MFA Type as HOTP and TOTP.
Learn more about the MFA settings
Field Details Require Multi-factor Authentication Requires users to enter a multi-factor authentication (MFA) token in addition to their password to log in to NiCE CXone. An MFA token is a one-time password generated by a hardware token or virtual MFA device (for example, an app like Google Authenticator) that you provide. When you enable MFA, users with the affected profile must configure an MFA secret key the next time they log in.
You should not enable MFA for the master administrator in your organization. If the device or secret is lost, the only way to reset the MFA secret is to file a ticket with NiCE CXone Support.
MFA Type Specifies whether you want to enable TOTP or HOTP MFA. -
Set your password policy.
Learn more about fields in this step
Field Details Password Length Enter the minimum number of total characters users must include in their passwords. For example, if you enter12, users must include at least 12 total characters in every password. The characters required in the Password Complexity settings count towards the total character count. You can set the password length to any number between 12 and 24. Enable Password Age Enables a text box where you can enter the maximum number of days a user can keep a password. After the specified number of days, the user must change their password. You can set the password age anywhere from 14 to 365 days. Enable Password History Enter the number of unique passwords a user must set before they can reuse an old one. You can set the password history anywhere from 4 to 50. For example, if you enter 10, users assigned to the login authenticator cannot use any of their last 10 passwords as their new password. Password Attempts Enter the maximum number of times a user can enter an incorrect password before the system locks them out of their account. The range is three to ten attempts and the default is six. -
Click Create Login Authenticator.
Create Security Profiles
Required permissions: Security Profile Create
-
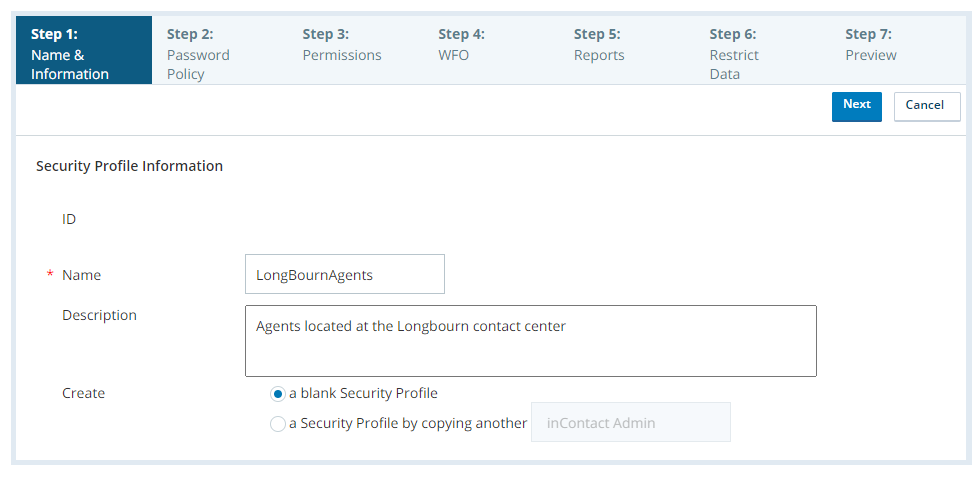
Use one of the following methods to create the security profile and give it a name:
-
To create a new blank security profile:
- Click the app selector and select Admin.
- Go to Security Profiles.
-
Click Create New.
-
Enter a unique Name for the security profile.
-
Enter a Description if you want one.
-
For Create, select a blank Security Profile.
- Click the app selector
-
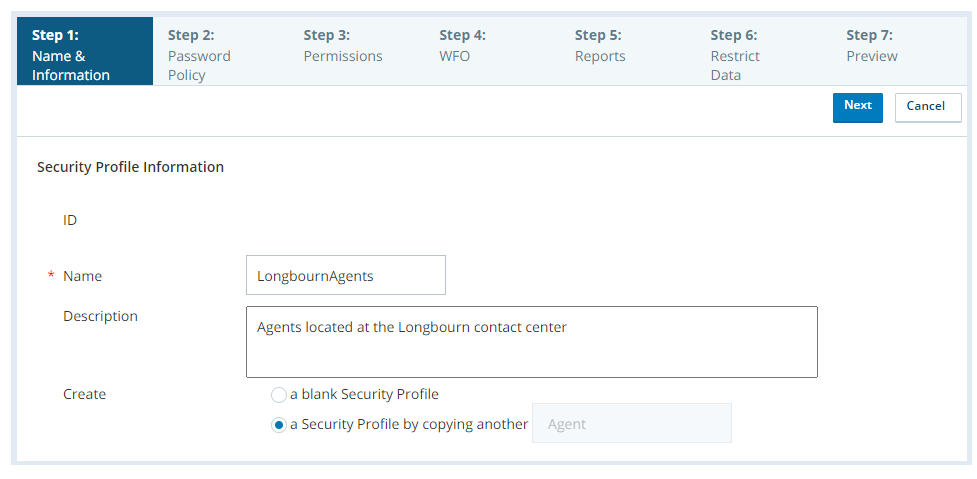
To quickly create a new security profile that copies an existing one:
- Click the app selector and select Admin.
- Go to Security Profiles.
-
Open the security profile you want to copy.
-
Click Copy.
-
Enter a unique Name for the security profile.
-
Enter a Description if you want one.
- Click the app selector
-
-
Click Next.
-
Enable permissions for each product and feature you want users to have. Some permissions, like User Settings and Security, are grouped. To see the permissions inside the groups, click Individual next to the group name.
-
Click Next.
-
Enable permissions for each report you want users to have.
-
Click Next.
-
Restrict data access by Campaigns
A grouping of skills used to run reports., Teams, Assignable Profiles, Groups, and Business Units High-level organizational grouping used to manage technical support, billing, and global settings for your NiCE CXone system.. For each data type, select whether you want users to access All & Future data of that type, None, or Custom. -
If you chose Custom for a data type, use the pop-up window to specify which entities of that data type the users can access. Click Done.
New campaigns, teams, security profiles, groups, and business units aren't automatically added to custom lists when they're created. You must update the custom list if you want users to access the new data.
- Click Next.
- Click Create Security Profile.
Create Users
Required permissions: Users Create
When you create new users, you have the option to create new individual users or to upload multiple new user accounts at the same time. These instructions are for creating single users in the Admin application. See Manage Multiple Users at Once for instructions on creating or editing multiple users at the same time.
NiCE CXone offers many options and settings so you can customize your users. It's a good idea to read through this entire task and make sure you know which settings you need to configure before you begin.
- Click the app selector and select Admin.
-
Click Users.
-
Open the new user creation form in one of the following ways:
- If you want to create a new user with a blank form, click Create New and select Single User.
- If you want to create a new user based on an existing user's profile, open that user's profile and click Copy.
-
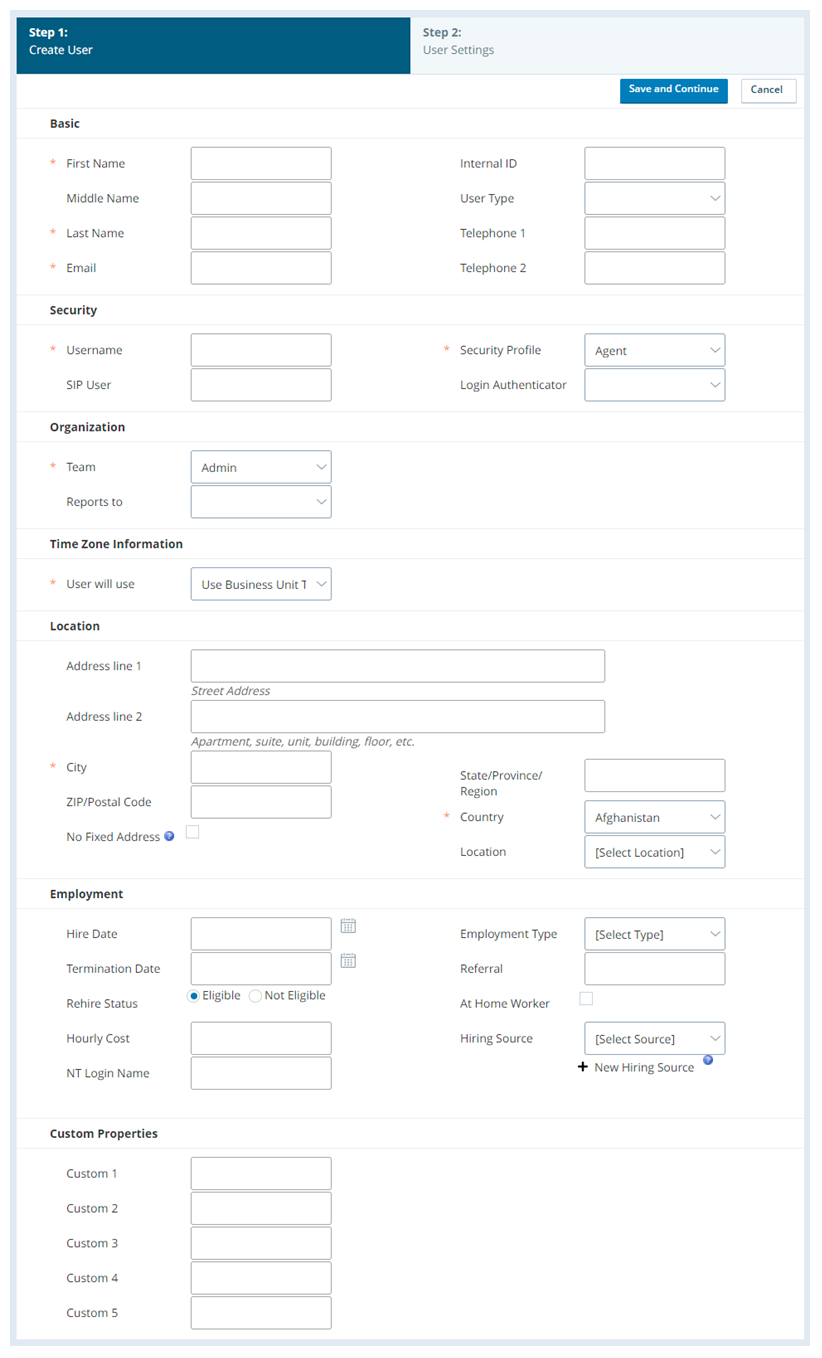
Enter the user's First Name, Last Name, Email, Username (in the form of an email address), Security Profile, Team, User will use (timezone), City, and Country. If the fields are available, set the password using the Password and Confirm Password fields. Enter any other information you want to add to the user profile.
Learn more about fields in this step
Field
Details
Internal ID The internal ID assigned to the user. This is not a system-assigned ID and can be any number you choose. User Type Visible and required only if your system includes NiCE CXone WFO or NiCE CXone WFMv2 and if the user has been assigned to a team that is NiCE CXone WFO- or NiCE CXone WFM-enabled. Both applications treat agents differently from other users. While you can designate users as Supervisor or Admin if appropriate for your organization’s needs, it is critical to correctly select Agent for all users who should be treated as agents in the NiCE CXone WFO and WFMv2 applications. Telephone 1
Visible only if your system includes NiCE CXone WFMv2 and if the user is assigned to an NiCE CXone WFM-enabled team. It allows you to add a telephone number to the user record, other than their NiCE CXone PBX
Internal telephone network that manages an enterprise's incoming, outgoing, and internal voice calls.-associated number. The field is informational, and the value is not used by the NiCE CXone WFMv2 application itself.Telephone 2 Visible only if your system includes NiCE CXone WFMv2 and the user is assigned to an NiCE CXone WFM-enabled team. It allows you to add a second telephone number to the user record, other than their NiCE CXone PBX-associated number. The field is informational, and the value is not used by the NiCE CXone WFMv2 application itself. External Identity Type Visible only if you have SAML 2.0 or OpenID Connect enabled in your business unit High-level organizational grouping used to manage technical support, billing, and global settings for your NiCE CXone system.. Use it to specify whether this user's credentials are managed by SAML2 or OpenID Connect. Federated Identity The unique value that is passed to your IdP as part of the authentication assertion. The value is tied to the user requesting authentication to NiCE CXone.
When your IdP makes an authentication assertion to the NiCE CXone platform, it must contain an LDAP claim with the same Federated Identity value configured for the user. The claim value is:
- Name ID (required) — Exactly matches the user's configured Federated Identity. Name ID is case-sensitive.
To configure the signing message, sign only the message ("response") and not the claim.
SIP User If you have configured SIP Protocol used for signaling and controlling multimedia communication sessions such as voice and video calls. in your environment, the SIP username of this user in the format sip:user@domain.com.Subject Visible only if you use an external IdP and OpenID Connect. It's the name of this user's IdP account. Address line 1
Address line 2
State/Province/Region
ZIP/Postal Code
Optional full address details for the user. These fields are used to set up emergency dialing.
No Fixed Address Indicates that the user's address is not permanent and should not be used in emergency dialing. Location Customizable location of the user. This can be the building where the user works, the floor of the building, or any other location you choose. This value does not impact emergency calls. Hire Date The date the user was hired. Termination Date The date the user was terminated. Rehire Status Whether the user is Eligible or Not Eligible for rehire in the future. Hourly Cost The user's hourly salary. NT Login Name The user's NT login name. Employment Type The user's current employment type. It can be Full-Time, Part-Time, Temporary, Outsourced, or Other. Referral Referral information about the user. At Home Worker When selected, indicates that the user works remotely. Hiring Source How the user was hired. Click New Hiring Source to add custom options for the drop-down. Example could be Internal Hire, Employee Referral, Recruiter. Custom Properties These five fields are called Custom 1, Custom 2, Custom 3, Custom 4, and Custom 5 by default. However, you can customize the names of the fields in your business unit High-level organizational grouping used to manage technical support, billing, and global settings for your NiCE CXone system. settings. You can use these properties to meet the needs of your specific organization, such as listing your agents' favorite flavor of ice cream or favorite super hero. Because the fields vary by organization, contact your contact center manager to find out how to use these fields in your business unit. All five fields have a character limit of 40. -
Select a login authenticator (LA).
All users must be assigned to a login authenticator, or they won't be able to log in to NiCE CXone.
The type of LA will determine how the user will log in to NiCE CXone. You can set up two types of login authenticators.
System LAs: Users assigned to a system LA will log in using credentials managed by NiCE CXone.
External LAs: Users assigned to an external LA will complete their log in through an external identity provider (IdP). External LAs are configured with either SAML 2.0 or OpenID Connect.
-
If you have Integrated Softphone (WebRTC) custom URLs enabled, configure the Integrated Softphone URLs and URL Weights as needed.
Learn more about fields in this step
Field
Details
Integrated Softphone URL 1-2 Visible only when custom Integrated Softphone (WebRTC) URLs are enabled for your business unit. Specifies which Integrated Softphone URL to apply to the user profile. Custom URLs override the default URLs. For some agents operating under certain conditions, the default URLs can lead to call quality issues. For more information or to enable this feature, contact your account representative. URL 1-2 Weight Visible only when custom Integrated Softphone (WebRTC) URLs are enabled for your business unit. If you specified two Integrated Softphone (WebRTC) URLs for the user profile, the URL weights specify the priority of the URLs compared to each other. The higher-weighted URL will be attempted before the lower-weighted URL. If a URL is set to Default, the corresponding field is disabled and has a blank value. The following table details the results of each configuration option:
Integrated Softphone URL 1
Integrated Softphone URL 2
URL 1 Weight
URL 2 Weight
Resulting Behavior
Default Default Blank Blank Default URLs are used. Active URL A Active URL B Higher Lower Custom URLs are used. URL A is attempted first, and then URL B. Active URL A Active URL B Lower Higher Custom URLs are used. URL B is attempted first, and then URL A. Active URL A Active URL B Equal Equal Custom URLs are used. Either URL A or URL B is randomly attempted first, and then the other is attempted. Active URL A Active URL A Any Any Invalid configuration. Inactive URL A Inactive URL B Any Any Default URLs are used. Inactive URL A Inactive URL A Any Any Invalid configuration. Active URL A Inactive URL B Any Any Custom URLs are used. URL A is attempted first, then the default URLs at equal weights. Inactive URL A Active URL B Any Any Custom URLs are used. URL B is attempted first, and then the default URLs at equal weights. Default Active URL B Any Any Invalid configuration. Active URL A Default Any Any Custom URLs are used. URL A is attempted first, and then the default URLs at equal weights. Default Inactive URL B Any Any Invalid configuration. Inactive URL A Default Any Any Default URLs are used. - Click Save and Continue.
-
Set the user's Refusal Timeouts for each channel, default Dialing Pattern, and Agent Voice Threshold. If you want to, select Suppress Ringing - Personal Connection.
Learn more about fields in this step
Field
Details
Phone, Voicemail, Chat, SMS, Email, Work Item The number of seconds the agent can have a request in the personal queue without responding. When the time limit has been reached, the interaction transfers to another agent. If you leave the field blank, the system uses the business unit default value, which is usually 45 seconds. Values for refusal timeouts must be between 15 and 300 seconds.
The hardcoded value for WebRTC is 30 seconds, which cannot be changed at the user or station level.
Dialing Pattern
The default dialing pattern assigned to the user. A dialing pattern specifies the way each call is dialed. For instance, a dialing pattern can specify that each call must begin with '1'. Agents don't need to dial a '1' before every call, because the system prepends it to the number dialed.
Phone # Timeout The amount of time an agent's voice path stays connected. This field is set to Default which uses the value specified in the business unit settings. Changing this value overrides the business unit level setting for this user. Agent Voice Threshold The volume level of the agent's voice. This setting helps to accurately distinguish the agent's voice from background noise. The threshold range is based on a custom volume unit computed by the frequency analyzer.
Users with proper permissions can change this value themselves through the Voice Threshold tuning setting in MAX.
Suppress Ringing - Personal Connection When the agent uses a Personal Connection ACD skill, this setting prevents them from hearing a ringing sound before the system answers the call. Instead, the agent first hears audio when they receive the answered call from the network. This setting overrides the Treat Progress as Ringing skill setting. -
If your environment enabled for static delivery, set the default number of Concurrent Chats and Auto-Parked Emails. Specify whether the user can Request Contact.
Learn more about fields in this step
Field
Details
Concurrent Chats The maximum number of chats the user may engage in simultaneously. It's either the Team Default, or the maximum number of chats allowed for the team to which the user belongs, or a number between 1 and 12. Auto-Parked Emails
The maximum number of emails the user may contain in the inbox at one time. It's either the Team Default, or the maximum number of emails allowed for the team to which the user belongs, or a number between 1 and 25.
Request Contact When selected, allows the agent to request the next available contact instead of having it routed automatically. -
If your environment is enabled for dynamic delivery, set the maximum number of simultaneous contacts the user can handle per channel. If you have granular dynamic delivery settings enabled, set the Total Contact Count for the user.
Learn more about fields in this step
Field
Details
Voice, Chats, Emails, SMS, Work Items The maximum number of simultaneous contacts the user can handle. Voice includes both phone calls and voicemails. Setting Voice to Off disables voice for the user. SMS applies to SMS Messaging. Request Contact Available only in a dynamic delivery environment, enables the user to manually request an additional digital (non-voice) contact, if the current state is Working. Channel Lock Temporarily locks an agent to the channel
Various voice and digital communication mediums that facilitate customer interactions in a contact center. they're currently handling. For example, if the agent is configured to handle 2 chat interactions and 1 voice interaction and has a Total Contact Count of 3, they can receive one voice or two chat interactions, but not both at the same time. When the agent's interactions end, the lock ends. The agent can then receive interactions from any configured channel.Contact Auto-Focus Available only in a dynamic delivery, forces MAX to set the active focus to the newest contact after the contact is connected in the interface. Total Contact Count
Available only when your NiCE CXone account representative enables granular dynamic delivery settings, specifies the maximum number of total contacts the agent can handle at a time. For example, if you set Chats to 5, Emails to 5, and Total Contact Count to 7, the agent would receive a maximum of seven contacts at any given time. Up to five of those seven contacts could be chat contacts and up to five of them could be email contacts. See Manage Contact Delivery Settings for Dynamic Delivery for more information.
-
If you have a WFO integration enabled other than NiCE CXone WFO (such as Uptivity WFO) and want to set up recording, enter the System Domain, System Username, and Phones.
Learn more about fields in this step
Field
Details
System Domain The domain associated with the System Username. System Username
Adds a Windows username to the user account (that is, the name with which the user logs in to your network). This field is mandatory if your organization uses NiCE CXone Screen Recording. NiCE CXone WFO uses it to locate the user's desktop via the screen recording client. Each user must have a unique system username, regardless of Windows domain, and they must log in to their desktop PC with that system username. For example, if your organization has two Elizabeth Bennets, they cannot both have "ebennet" as their Windows username even if they are on separate Windows domains.
Phones The NiCE CXone phone ID associated with the user that will be recorded. Consider the following when you add information to the Phones field:
- You cannot assign an extension to more than one user. For example, extension 1234 cannot be assigned to Elizabeth Bennet and Charlotte Lucas, even if they sit at the same extension on different shifts.
- You can assign multiple extensions to the same user. For example, Elizabeth Bennet may take incoming calls on extension 1234 and make outbound calls on extension 4321.
- In the MAX Version section, you can determine which version of MAX you want this user to use.
Learn more about options in this step
Field
Details
Default The user will use the version defined in the business unit settings. Previous This option is only available if the Permit MAX Per-Agent Versioning setting is enabled in the business unit settings.
When selected, the user will use the MAX version prior to the current release. For example, if the current release version is Spring 2021, the user will use the Fall 2020 MAX version with this option selected. This option is typically only useful if the default business unit version is set to Current.
Current This option is only available if the Permit MAX Per-Agent Versioning setting is enabled in the business unit settings.
When selected, the user will use the up-to-date MAX version according to the current major release, such as Fall 2020 or Spring 2021. This option is typically only useful if the default business unit version is set to Previous.
-
If you have WFM enabled, configure the agent's notification settings.
Learn more about fields in this step
Field
Details
WFM Notifications minutes The number of minutes before an event in the agent schedule occurs that the agent receives a reminder. This setting applies only to systems that include NiCE CXone WFM. -
If you have NiCE CXone WFO and you want to integrate with a CRM, enter the agent's CRM Username to associate it with the user.
- Click Save.
Authenticate Applications
Users and applications are authenticated in very similar ways. The main difference is that applications are authenticated with an access key while users are authenticated with a username and password. Unlike users, applications are not required to interact through a browser. Applications typically are either back-office functionality or intelligent virtual agents![]() Chatbot or similar application that interacts with a user based on artificial intelligence. (IVAs).
Chatbot or similar application that interacts with a user based on artificial intelligence. (IVAs).
To set up an application to interact with NiCE CXone, create
Authorization in NiCE CXone
Authorization is the process of verifying what resources a user is allowed to access. Resources can include applications, files, and data. You can define users' access to resources with role-based access control. NiCE CXone manages authorization automatically during authentication. When a user is authenticated they are given access only to the resources they're authorized for.
A user's authentication method doesn't impact authorization. NiCE CXone uses the same authorization process for all users. It doesn't matter whether they are authenticated with access keys or passwords.