

Required permissions: Users Create
You can conveniently create or edit multiple NiCE CXone user accounts through a spreadsheet, which you upload directly into NiCE CXone. If you want to create new users, NiCE CXone provides a downloadable template CSV file to get you started. This bulk upload tool in NiCE CXone supports CSV or XLSX file types.
To edit multiple users at once, download the existing users spreadsheet, make your desired changes, then upload the changed file. Be sure to enter a Y in the Row Changed column for each user that you modified. You can leave this column blank, but NiCE CXone will upload the entire list new instead of only updating the specific users that you indicated. This likely increases the upload time, as NiCE CXone processes the entire list. When uploading the file, you can select the Changed Rows Only setting, which instructs NiCE CXone to only accept rows that you indicated with a Y.
If you want to create or edit a single user in the NiCE CXone interface, see Create a User.
Key Items When Uploading Files:
- Do not modify column names or change the format of the template.
- Duplicate email addresses, agent numbers, or extensions are not allowed.
Processing bulk record creation or change requests can impact the performance of your system. To reduce the impact, it is recommended that you:
-
Make your bulk upload updates outside of your normal business hours.
-
Reduce the amount of data to process by marking the rows that need processing in the Row Changed column in the CSV file. When you upload the file, select Changed Rows Only for Rows to Include.
-
Limit your uploads to 1000 or fewer records per request. If this means uploading in batches, wait for one batch to finish processing before uploading the next.
-
Only click the submission button once, even if it takes time to respond.
Sherlock Holmes is setting up a new contact center for Intriguing Mysteries, a division of Classics, Inc. He employs three different teams. Each handles crime tips regarding infamous villains, such as Professor Moriarty. Holmes decides to bulk upload users in the following manner:
- First, he manually creates an individual user account in NiCE CXone for his three team leads. He makes sure all skills and settings are assigned appropriately. He plans to use these accounts as templates for other users on each corresponding team.
- Second, he downloads the existing user list from NiCE CXone. So far, the list only contains four accounts: his own administrator account and the three team lead accounts.
- Third, he adds new rows for each agent on each team. Since Holmes wants the agents to have the same settings as the team lead, he quickly copies and pastes those settings from the team lead to the team agents.
- Fourth, he uploads the revised user list into NiCE CXone.
- Click the app selector
 and select Admin.
 -
Click Users.
-
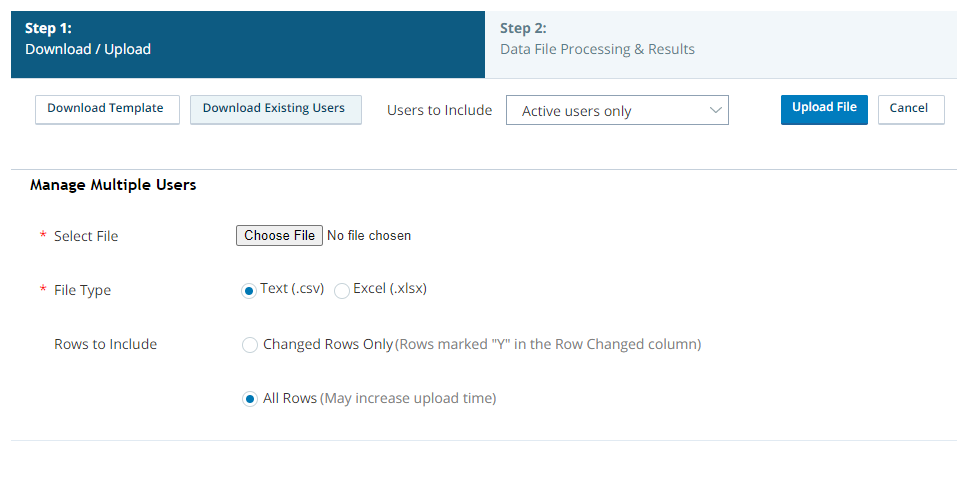
Click Create New > Manage Multiple Users.
-
If you want to download active users only, instead of all the users in your environment, select Active users only for Users to Include.
- Click Download Existing Users. If you are creating a completely new user list, click Download Template.
-
Open the file in a program that can manage CSV files, such as Excel or Notepad.
-
Enter information about each user in the rows below the header and explanation rows. Don't modify the column names, order, or data format. The columns mostly match the same fields that are available when you create a new user.
 Learn more about fields in this step
The following table provides an alphabetical listing of the fields for each
Field
Details
Address line 1
Address line 2
State/Province/Region
ZIP/Postal Code
Tab: General
Optional full address details for the user.
In the United States, if NiCE CXone is able to verify the address, these fields are combined to provide the address used during a 911 call to determine the local Public-Safety Answering Point (PSAP) and deliver the call there. If NiCE CXone is unable to verify the address, 911 calls are sent to a national or regional calling center instead.
Agent ID
ID
Tab: General
Description: The internal ID assigned to the user. This is a system-assigned value and should not be changed. In the template, this field is labeled Agent ID.
Agent Phone # Timeout
Tab: Contact Settings
Allows you to specify the number of seconds before a voice call times out based on agent silence. You can set this time frame by assigning the user to a station profile. The station profile specifies the length of time a user can be inactive before timing out. If you do not assign a station profile, then the Business Unit-Wide Phone # Timeout applies. Agent phone timeout allows you to configure the timeout for specific agents.
Enter the station profile ID, not the timeout value.
Agent Voice Threshold Tab: ACD User > Contact Settings
Template: This field cannot be updated by bulk upload.
The volume level of the agent's voice. This setting helps to accurately distinguish the agent's voice from background noise. The threshold range is based on a custom volume unit computed by the frequency analyzer.
Users with proper permissions can change this value themselves through the Voice Threshold tuning setting in MAX.
Allow Voicemail Web Access Tab: Attendant
Available only when you use Attendant. Specifies whether the user is allowed to access voicemail via using NiCE CXone, or only from a phone. Acceptable values are True to grant web access or False to limit the user to phone access.
Assigned Groups
Tab:
Template:
Allows you to assign the
Assigned to Team, Team Name, Team, Team ID
Tab: General
The team the
In the User UI, select a team from the Team drop-down. In the bulk upload template, enter a valid Team ID exactly as it appears in the Teams list in NiCE CXone.
At Home Worker Tab:General
Used to identify employees who work from home or remotely. In the UI, selecting the checkbox indicates the user works remotely. In the template, enter True, if the employee works from home, or False, if the employee does not work from home. The default value is False.
Attendant User Type Tab:Attendant
Available only when you use Attendant. Allows you to specify the type of user. On the Attendant tab of the user profile, select from a drop-down. In the bulk upload template, enter one of these acceptable values: agent, business-user, rollover, or general-voicemail.
City Tab:General
The city where the user works.
Channel Lock Tab: Contact Settings
Temporarily locks an agent to the channel
Various voice and digital communication mediums that facilitate customer interactions in a contact center. they're currently handling. For example, if the agent is configured to handle 2 chat interactions and 1 voice interaction and has a Total Contact Count of 3, they can receive one voice or two chat interactions, but not both at the same time. When the agent's interactions end, the lock ends. The agent can then receive interactions from any configured channel.In the ACD Users bulk upload template, enter True or False.
Contact Auto-Focus Tab:Contact Settings
Available only in a dynamic delivery.
Shifts the agent's view to the new interaction when it is first connected to the interface.
In the ACD Users bulk upload template, enter True or False.
Contact Handling: Voice, Chats, SMS, Emails, Work Items Tab:Contact Settings
Available only in a dynamic delivery environment,
Voice:
Whether agents can handle 1 voice interaction at a time or voice interactions are turned Off. Voice interactions include inbound calls, manual outbound calls, Personal Connection dialer calls, and voicemails.
Digital channels:
The number of interactions an agent can handle at the same time per channel
Various voice and digital communication mediums that facilitate customer interactions in a contact center.. The maximums are:- Chat: 12
- Emails: 25
- Work items: 25
In the bulk upload template, these fields have "omnichannel" prepended to each name (for example, Omnichannel Voice).
Contact Refusal Timeout: Phone, Voicemail, Chat, SMS, Email, Work Item Tab:Contact Settings
The number of seconds the agent can be idle in an active interaction before the interaction times out and transfers to another agent. If you leave any of these blank, the profile inherits the default system value of 45 seconds. Values for refusal timeouts must be between 15 and 300 seconds.
Country Tab:General
The country where the user is working.
CRM Username Tab: This field does not appear in the NiCE CXone UI.
This field can be used by an API call to your CRM system to tag call recordings with metadata for the NiCE CXone legacy call recording.
Custom 1-5 Tab:General
These five fields are called Custom 1, Custom 2, Custom 3, Custom 4, and Custom 5
High-level organizational grouping used to manage technical support, billing, and global settings for your NiCE CXone system. settings. Attendant Tab: Attendant
Available only when you use Attendant. Allows you to specify the Access Type for each Attendant user. On the Attendant tab of the user profile, select from a drop-down. In the bulk upload template, enter one of these acceptable values: AttendantOnly, AttendantWithACD, or None.
Dialing Pattern
Agent Pattern ID
Tab: Contact Settings
The default dialing pattern assigned to the user. A dialing pattern specifies the way each call is dialed. For instance, a dialing pattern can specify that each call must begin with 1. Agents do not need to a dial a 1 before every call, because the system automatically prepends it to the number dialed.
On the Contact Settings tab of the user profile, select from a drop-down list of agent dialing patters in your system. In the bulk upload template, enter the ID for the dialing pattern. You can see these IDs on the ACD > Agent Patterns page.
DID Tab:Attendant
Available only when you use Attendant. Contains the direct dial-in number for the user.
Email Tab:General
A valid email address associated with the
Employment Type Tab:General
The user's current employment type. It can be Full-Time, Part-Time, Temporary, Outsourced, or Other.
Extension Tab:Attendant
Available only when you use Attendant. Contains the user's extension.
External Identity If you want to authenticate the employee using a SAML-based login authenticator, enter the email ID that is used as the external identity (IDP) of the user. Federated Identity Visible only if you have federated identity or OpenID Connect enabled in your business unit. For more information, contact your account representative. It's the unique value that is passed as part of the federated identity authentication assertion. The value is tied to the user requesting access to NiCE CXone in your Identity Provider (IdP) system. First Name Tab:General
The
Hire Date Tab:General
The date you hired the employee, for your records only. NiCE CXone doesn't use this information.
Hiring Source Tab:General
Free-text field to describe how the user learned about the job and came to work at your company. The field accepts a maximum of 30 characters. Click New Hiring Source to add custom options for the drop-down, such as Internal Hire, Employee Referral, Recruiter and so on.
Hourly Cost Tab:General
The amount the user is paid per hour.
Company Directory Tab:Attendant
Available only when you use Attendant. Specifies whether the user is included in the company directory. Acceptable values are True or False.
Integrated Softphone URL 1-2 Tab:General
Visible only when custom softphone (WebRTC) URLs are enabled for your tenant. Specifies which custom softphone URL to apply to the ACD user profile.
Internal ID
Tab:General
Description: Allows you to specify an optional identifier for this user (such as the user's employee ID from your HR systems). The field accepts a maximum of 50 characters.
Last Name Tab:General
The
Location Tab:General
The location assigned to the user in NiCE CXone. In the UI, select the value from the drop-down of locations in your system. In the template, enter a valid location name from the locations in your system.
In the United States, this setting does not impact 911 calls.
Login Authenticator ID Tab:General
An optional field used to assign a particular login authenticator to a user. The default value is blank. For more information about obtaining the login authenticator ID, reach out to your account representative.
MAX Version Tab:Contact Settings
Determines the version of MAX for the agent in the
- Default—The agent will use the version defined in the
- Previous—The agent will use the MAX version prior to the current release. For example, if the current release version is Spring 2023, the agent will the MAX version from the previous Fall release. This option is typically only useful if the default
- Current—The user will use the MAX version for the current major release. This option is typically only useful if the default
For related information, see Configuration Tasks.
Maximum Concurrent Chats Tab:Contact Settings
Available only in a single-contact handling environment. Specifies the maximum number of chats the agent may engage in simultaneously. You can enter a number between 1 and 12. If you don't enter a value here, the agent will default to either the Team Default, or the configured maximum number of chats allowed for the team to which the user belongs.
Maximum Email Auto-Parking Limit Tab:Contact Settings
Available only in a single-contact handling environment. Specifies the maximum number of emails the agent may contain in the inbox at one time. You can enter a number between 1 and 25. If you don't enter a value here, the agent will default to either the Team Default, or the configured maximum number of parked emails allowed for the team to which the user belongs.
MFA Secret This field is part of the user record but cannot be viewed by anyone other than the user.
If you want to configure a standard secret for
Pairs the employee account in NiCE CXone with an MFA device that employees use to generate a one-time password (OTP). NiCE CXone allows users to generate an MFA secret either manually or automatically.
Middle Name Tab:General
The
No Fixed Address Tab:General
In the United States, indicates the user's address is not permanent and should not be used for dispatching 911 calls.
NT Login Name
OS Login Name
Tab:General
The name the user logs in to their workstation with.
Notes Tab:Notes
Allows you to enter notes about the user. In the bulk upload template, you can enter up to 1,000 characters and specify line breaks with three pipes (|||).
Notification Type Tab:Attendant
Available only when you use Attendant. Specifies the way in which users are notified about a phone call received through Attendant. Acceptable values are email-only, email-with-attachment, web-only, or via-my-agent.
Personal Phone Tab:Attendant
Available only when you use Attendant. Contains the user's personal phone number. For non-US numbers, add + followed by the country code and the phone number, for example, +16145551212.
Phone # Timeout Tab:General
The amount of time an inactive agent's voice path stays connected. You can set the timeout period with station profiles. Station profiles specify the time in seconds that an inactive agent stays connected to the call. If a station profile isn't assigned, then the default applies. Phone # timeout applies to all agents that don't have an Agent Phone Timeout set.
Phones The NiCE CXone phone ID associated with the user that will be recorded using NiCE CXone legacy recording. Consider the following when you add information to the Phones field:
- You cannot assign an extension to more than one user. For example, extension 1234 cannot be assigned to Elizabeth Bennet and Charlotte Lucas, even if they sit at the same extension on different shifts.
- You can assign multiple extensions to the same user. For example, Elizabeth Bennet may take incoming calls on extension 1234 and make outbound calls on extension 4321. In the users bulk upload template, separate multiple values with semicolons.
PIN Tab:Attendant
Available only when you use Attendant. Contains the Personal ID Number (PIN) the user created to access voicemails.
Referral Tab:General
Referral information about the user. This is a free-text field that accepts a maximum of 30 characters.
Rehire Status Tab:General
Whether the user is Eligible or Not Eligible for rehire in the future. The default value is Eligible.
Reports to Tab:General
You can specify the immediate manager or supervisor of this user by entering that person's Agent ID. This field is optional and is not used by NiCE CXone.
Request Contact Tab:Contact Settings
Available only in a dynamic delivery environment.
Disables automatic routing of non-voice, or digital, interactions
The full conversation with an agent through a channel. For example, an interaction can be a voice call, email, chat, or social media conversation.. Instead, the agent clicks a +1 Contact button in the agent application to add more interactions. They cannot request the type of interaction they receive. The ACDskill Used to automate delivery of interactions based on agent skills, abilities, and knowledge.priority Skill-based designation of the importance of contacts that determines delivery order. and acceleration rules determine what they receive. The agent can continue to request interactions until they meet the maximum or the queue is empty.When this isn't selected, interactions route automatically to the agent. This occurs until the agent is handling their maximum interactions or the queue is empty. This is true even when the agent refuses an interaction.
In the ACD Users template, enter either True or False.
Row Changed Tab: This field appears only in the bulk upload template.
Allows you to identify whether the row has changed. Typically used when a list of current users is downloaded, edited, and then uploaded. Enter Y if the NiCE CXone should update the record for this ACD user, or N if the user should not be changed.
Security Profile
Security Profile ID
Tab: Users > General
Identifies the security profile assigned to the user. On the General tab of the User record, this field is named Security Profile. Select from a drop-down of existing security profiles.
In the bulk upload template, this field is named Security Profile ID. Enter a valid ID for an existing security profile. You can see the ID for each profile in the security profiles list.
Shift Times to User's Time Zone
Tab: Users > WFO
This field is used by the Uptivity Workforce Optimization products to display reports in the user's timezone. Enter True or False to indicate the preferred option for each user.
SIP User Tab:General
Assigned Skills
Tab: Users > Skills
Identifies the skills to which the user is assigned. In the ACD app, you can either add skills to a user or add users to a skill.
This field includes three parts: the skill IDs assigned to this user, the proficiency that the user has in that skill, and whether the skill is assigned as active or inactive.
Proficiency is represented by a number between 1 and 20 with 1 representing the highest proficiency and 20 representing the lowest proficiency. Separate the skill ID and proficiency with a colon as seen in the example below.
To assign the skill as active, enter TRUE after the proficiency. To assign the skill as inactive, enter FALSE after the proficiency.
To add multiple skill IDs, separate them by a semi-colon. For example: 11111:1:TRUE;22222:3:FALSE;33333:12:TRUE;. In this example, the user can use skills 11111 and 33333 at a proficiency level of 1 and 12 respectively. The user cannot use 22222 at a proficiency of 3, however, because the skill is assigned as inactive.
You can also assign user skills by only including the Skill IDs separated by semicolons. For example: 197642;197648;391021. If you only include the Skill ID, the default proficiency and active/inactive values will be applied. The default proficiency value is 3. The default active/inactive value is TRUE or active.
You can see the ID for each skill in the list on the Skills page in NiCE CXone.
Status Tab: General
Identifies whether the user is Active or Inactive. This field is informational only and cannot be edited manually or by bulk upload.
Suppress Ringing - Personal Connection Tab:General
When the agent uses a Personal Connection ACD skill, this setting prevents them from hearing a ringing sound before the system answers the call. Instead, the agent first hears audio when they receive the answered call from the network. This setting overrides the Treat Progress as Ringing skill setting.
System Domain Visible only if you use NiCE CXone screen recording and is required in that case. The domain associated with the System Username.
System Username
Visible only if you use NiCE CXone screen recording and is required in that case. Adds a Windows username to the user account (that is, the name with which the user logs in to your network). NiCE CXone WFO uses it to locate the user's desktop via the screen recording client. Each user must have a unique system username, regardless of Windows domain, and they must log in to their desktop PC with that system username. For example, if your organization has two employees named Elizabeth Bennet, they cannot both have elizabeth.bennet as their Windows username even if they are on separate Windows domains.
Team Default
Tab: Contact Settings
Visible only if your system uses dynamic delivery.
Specifies whether the user should use the default contact handling settings for the assigned team. On the Contact Settings tab of theuser profile, this field is a checkbox. In the bulk upload template, enter True if you want the agent to use the default team settings. Enter False if you want the agent to use the default
Telephone 1
Telephone 2
Tab: General
Visible only if your system includes NICE Uptivity WFMv2 and if the user is assigned to an NICE Uptivity WFMv2-enabled team. It allows you to add up to two telephone number to the user record, other than their NiCE CXonePBX
Internal telephone network that manages an enterprise's incoming, outgoing, and internal voice calls.-associated number. The field is informational, and the value is not used by the NiCE CXone WFMv2 application itself.Termination Date Tab:General
If applicable, the date the user's employment was terminated in the format mm/dd/yyyy.
Time Display Format
Tab: WFO
This field is used by the NICE Uptivity Workforce Optimization products to display reports in either 12-hour or 24-hour format. Enter either 12 and 24.
Time Zone Tab:General
Time zone to apply to the employee. Unless you change it, the employee is automatically assigned to the
Title Tab:Attendant
Available only when you use Attendant. Allows you to specify the title of the user.
Total Contact Count
Tab:Contact Settings
Available only when your account representative enables granular dynamic delivery settings.
Voice:
Whether agents can handle 1 voice interaction at a time or voice interactions are turned Off. Voice interactions include inbound calls, manual outbound calls, Personal Connection dialer calls, and voicemails.
Digital contacts:
The number of interactions an agent can handle at the same time per channel
Various voice and digital communication mediums that facilitate customer interactions in a contact center.. The maximums are:- Chat: 12
- Emails: 25
- Work items: 25
URL 1-2 Weight Tab:General
Visible only when custom softphone (WebRTC) URLs are enabled for your tenant. If you specified two custom softphone URLs for the ACD user profile, the URL weights specify the importance of the URLs compared to each other. The higher-weighted URL will be attempted before the lower-weighted URL.
Username
Tab:General
The username associated with the employee. While the username must be in the format of an email address, it doesn't have to be an actual email account.
User Type
Tab:General
Visible and required only if your system includes NICE Uptivity Hosted WFO or NiCE CXone WFMv2 and if the user has been assigned to a team that is NICE Uptivity Hosted WFO- or WFMv2-enabled. Both applications treat agents differently from other users. While you can designate users as Supervisor or Admin if appropriate for your organization’s needs, it is critical to correctly select Agent for all users who should be treated as agents in the NICE Uptivity Hosted WFO and WFMv2 applications.
WFM Schedule Notification Interval
Tab: My Account > Details
Visible only if you have an integrated WFM application in your NiCE CXone system. On the My Account page, agents can specify how often they want to receive notifications about their schedule in WFM. In the bulk upload template, you can specify a value on behalf of the user.
-
Save the file as Text (CSV) or Excel (XLSX).
-
On the Manage Multiple Users page in NiCE CXone, click Browse next to Select File.
-
Browse for the file you created. Select it and click Open.
-
Select the File Type corresponding to the file you chose.
-
If you're creating new users, or if you are modifying existing users and chose not to use the Row Changed column in the bulk upload template, select All Rows for Rows to Include.
-
If you're modifying existing users and chose to use the Row Changed column in the bulk upload template, select Changed Rows Only for Rows to Include.
-
Click Upload File.
-
Check your email for an error report. Resolve any errors that appear. To do so, fix the issue in the file you uploaded, click Back in NiCE CXone, and re-upload the file. If you have no errors, click Close.