

Manage General MAX Settings
Required permissions: External Business Unit Edit
You can modify the maximum number of people allowed in a single call and change whether agents are able to delete commitments.
- Click the app selector
 and select ACD.
 - Go to ACD Configuration > Business Units.
- Locate the business unit you want to modify and click to open it.
- In the Details tab, click Edit.
- Scroll down to the Agent Settings section.
- If you need to change your Maximum Number of Conference Parties (including Agent), select a number from the drop-down.
- If you want to change whether your agents can delete callback commitments and whether notes are required if they can, set the Delete Commitments field to Can't Remove, Can Remove - With Notes, or Can Remove - Without Notes.
- Click Done.
Enable the Previous MAX Version
Required permissions: External Business Unit Edit
Several settings are available for administrators to determine which version of MAX agents use. The Current version corresponds with the most recent major release while Previous is the version that preceded it. If a Summer release was recently deployed, Current will be Summer and Previous will typically be Spring.
Administrators determine the default MAX version for the entire business unit![]() High-level organizational grouping used to manage technical support, billing, and global settings for your NiCE CXone system. (either current or previous), then have the option to select individual agents to use a different version. This approach allows the administrator to default all agents to Previous, and assign selected agents to experiment with Current. After the administrator is satisfied with Current, they can update the
High-level organizational grouping used to manage technical support, billing, and global settings for your NiCE CXone system. (either current or previous), then have the option to select individual agents to use a different version. This approach allows the administrator to default all agents to Previous, and assign selected agents to experiment with Current. After the administrator is satisfied with Current, they can update the
For the convenience of the administrator, the Set MAX Default MAX to Previous with Major Release setting determines if a major release will immediately impact the agents’ version of MAX. When a major release is deployed, the mappings for Previous and Current change. For example, before a major release, Current might be Summer and Previous might be Spring. With the major release, Current would be redefined as Fall and Previous becomes Summer. This setting allows the administrator to continue using the exact same MAX version after a major update by automatically moving the Previous, and assign selected agents to experiment with Current. After the administrator is satisfied with Current, they can update the
|
Setting |
Details |
|---|---|
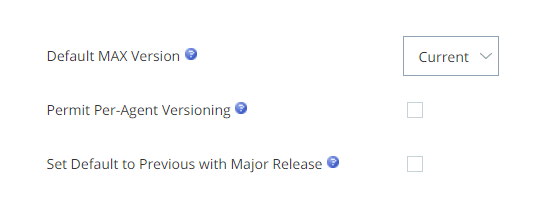
| Default MAX Version | Determines the default version that will be applied across the |
|
Permit MAX Per-Agent Versioning |
Enables agents to be assigned a version that is different from the business unit default. The most common use-case would be a |
| Set MAX Default to Previous with Major Release | Enables a |
Intriguing Mysteries, a department in the Classics subsidiary Holmes Enterprises, handles incoming reports of mysterious activities. The department has its own
Calls to Intriguing Mysteries increase in warmer weather. Holmes Enterprises does not want agent performance disrupted by new MAX features during that time. The department wants to wait to use the Spring version of MAX until after their high-volume season. That way, agents can continue to use the Fall version they already know.
The Intriguing Mysteries administrator first selects the
Enable the Previous MAX Version for Business Units
- Click the app selector and select ACD.
- Go to ACD Configuration > Business Units.
- Locate the business unit you want to modify and click to open it.
- In the Details tab, click Edit.
- In the MAX section, expand the Default MAX Version drop-down and select Previous.
- Click Done.
Enable the Previous MAX Version for Individual Agents
Required permissions: Users Edit.
- Click the app selector and select ACD.
- Go to ACD Configuration > Business Units.
- Locate the business unit you want to modify and click to open it.
- In the Details tab, click Edit.
- In the MAX section, enable Permit MAX Per-Agent Versioning.
-
In the Admin application, click Users.
- Locate the profile of the agent you want to use the previous version of MAX and click to open it.
- On the Contact Settings tab, click Edit.
- In the MAX section, select Previous for the MAX Version. If you select Default, the agent's version will default to the business unit setting.
- Click Done.
Set Up Custom Workspaces in MAX
Custom workspaces display websites inside MAX. They help agents complete their work inside of MAX, instead of having to manage multiple browser tabs or windows. MAX uses inline frames to manage custom workspaces so the URL you supply must support being embedded in an HTML inline frame element (iframe). Agents control if they want panels enabled or not in their MAX settings. Off displays screen pops as an external browser page. On displays screen pops inside MAX next to the contact. Note that popped webpages must support being displayed within an iframe in order to be displayed properly inside MAX.
Set Up Custom Workspaces by Business Unit
Custom workspaces display websites inside NiCE CXone MAX. They help agents complete their work inside of MAX, instead of having to manage multiple browser tabs or windows.
- Click the app selector and select ACD.
- Go to ACD Configuration > Business Units.
- In the Details tab, click Edit. Scroll down to the Agent Settings section and locate the Custom Workspaces (up to 3) field.
- Click Add Custom Workspace URL.
- In the Label field, enter a display name for the link that you want agents to see in Agent Workspace (Embedded) (Agent Embedded)MAX.
- In the URL field, enter or paste the address you want the workspace to open.
- Click Preview
 to test the URL.
 - Scroll to the top and click Done.
Set Up Custom Workspaces by Team
You can configure custom workspaces by business unit or by team. Custom workspaces configured at the team level override those configured on the business unit.
- Click the app selector and select Admin.
- Click Teams.
- Click the team you want to edit to open it.
- In the Details tab, click Edit.
- In Custom Workspaces (up to 3), click Add Custom Workspace URL.
- In the Label field, enter a display name for the link that you want agents to see in MAX.
- In the URL field, enter or paste the address you want the workspace to open.
- Click the Preview button to test the URL.