

Login authenticators control how users log in to NiCE CXone. NiCE CXone supports both internal and external authentication. You can create custom login authenticators according to the needs of your organization and assign them to each employee profile.
For more information about authentication and authorization in NiCE CXone, click here.
Create a Custom System Login Authenticator
Required permissions: Can manage passwords, On.
Custom login authenticators allow you to customize authentication requirements for NiCE CXone users. You can create more than one custom login authenticator if you want different sets of requirements for certain users.
- Click the app selector
 and select Admin.
 - Go to Login Authenticator.
-
Click Create New.
-
Enter a unique Name for the login authenticator.
-
Enter an optional Description. Use plain text only. URLs or markup such as HTML will not be saved.
-
Select System as the Authentication Type.
 Learn more about authentication types
Field
Details
System The login authenticator uses the built-in login process of NiCE CXone. It doesn't authenticate using an external single sign-on (SSO) identity provider. SAML SAML 2.0 allows you to set up single sign-on through an external identity provider. NiCE CXone supports multiple instances of SAML 2.0. You can assign different instances to different users. - Set up your password complexity.
Each user's password is checked against a repository of commonly used passwords. If their password matches one of the commonly used passwords, the system requires them to create a new password. Some of the passwords that are rejected include:
Any password that includes the word "password." For example, Password@1234.
Any password that includes the user's email address, username, first name, last name, or system name.
Passwords are checked against this repository whenever:
A new user is activated.
A user's password expires.
A user resets their password.
Learn more about fields in this stepField Details Require Lower Case (a-z) Requires users to use at least one lower-case letter in their passwords. Require Upper Case (A-Z) Requires users to use at least one upper-case letter in their passwords. Require Numeric (0-9) Requires users to use at least one number in their passwords. Require Non-alphanumeric (!,@,#,etc.) Requires users to use at least one non-alphanumeric character in their passwords. -
If you want to enable multi-factor authentication, select Require Multi-Factor Authentication. Set your MFA Type as HOTP and TOTP.
Learn more about the MFA settings
Field Details Require Multi-factor Authentication Requires users to enter a multi-factor authentication (MFA) token in addition to their password to log in to NiCE CXone. An MFA token is a one-time password generated by a hardware token or virtual MFA device (for example, an app like Google Authenticator) that you provide. When you enable MFA, users with the affected profile must configure an MFA secret key the next time they log in.
You should not enable MFA for the master administrator in your organization. If the device or secret is lost, the only way to reset the MFA secret is to file a ticket with NiCE CXone Support.
MFA Type Specifies whether you want to enable TOTP or HOTP MFA. -
Set your password policy.
Learn more about fields in this step
Field Details Password Length Enter the minimum number of total characters users must include in their passwords. For example, if you enter12, users must include at least 12 total characters in every password. The characters required in the Password Complexity settings count towards the total character count. You can set the password length to any number between 12 and 24. Enable Password Age Enables a text box where you can enter the maximum number of days a user can keep a password. After the specified number of days, the user must change their password. You can set the password age anywhere from 14 to 365 days. Enable Password History Enter the number of unique passwords a user must set before they can reuse an old one. You can set the password history anywhere from 4 to 50. For example, if you enter 10, users assigned to the login authenticator cannot use any of their last 10 passwords as their new password. Password Attempts Enter the maximum number of times a user can enter an incorrect password before the system locks them out of their account. The range is three to ten attempts and the default is six. -
Click Create Login Authenticator.
Set Up an External Login Authenticator with SAML 2.0
You can use external authentication when you want a user's password to be managed by another system or identity provider. NiCE CXone currently supports SAML 2.0 and OpenID Connect federation protocols.
You can set up IdP-initiated authentication or SP-initiated authentication with the steps in this section.
IdP-Initiated Authentication: IdP stands for identity provider. IdP-initiated authentication means that the external identity provider starts the login process.
SP-Initiated Authentication: SP stands for service provider. SP-initiated authentication means that NiCE CXone starts the login process.
If you are using Salesforce Agent, then the external identity provider (IdP) must be configured for SP-initiated authentication.
- Ensure that you have access to the external identity provider. You will need to create an integration specific to NiCE CXone.
- Create the integration in the external identity provider. Different systems use different names for these integrations, see specific instructions for Okta or Azure.
- You will need to provide an Entity ID which you don't know at this point. Use https://need_to_change as a placeholder.
- You will need to provide an ACS URL which you don't know at this point. Use https://need_to_change as a placeholder.
- The identity provider will generate a specific URL where SAML requests must be sent. Copy and save this URL to a place where you can find it. You will need to enter this value in later steps.
- The identity provider will generate a public signing certificate for the integration. Download the certificate. You will need to use it in later steps.
- Create an external login authenticator in NiCE CXone.
- Click the app selector and select Admin.
- Click Security > Login Authenticator.
- Enter the Name and Description of the login authenticator.
- Select SAML as the Authentication Type.
- If you select FICAM, the SAML response must have a single AuthnContextClassRef entry. Also, the NamespaceURI of the assertion subject must be: urn:oasis:names:tc:SAML:2.0:assertion. The AuthnContextClassRef and NamespaceURI fields are controlled by the identity provider.
- Enter the SAML request Endpoint you received from your provider above as the Endpoint URL.
- Click Choose File and select the public signing certificate you received from your provider. This file must be a PEM file. It will be a text file and the first line will contain BEGIN CERTIFICATE with some other text.
- Click Save and Activate.
- Open the login authenticator.
Note the Entity ID and ACS URL. You will need them when updating your IdP settings.
- Click the app selector
-
Update your identity provider settings, replacing the placeholders used above with the values you just noted.
-
Ensure that the External Identity for each user that uses the login authenticator is set to the correct value.
Your identity provider determines the value that must be used. The value must match exactly what you put in the External Identity field in NiCE CXone.
-
Have the user log in. They must use the latest login URL. After entering their username they will be directed to the external identity provider if needed.
Create External Login Authenticators with OpenID Connect
Required permissions: Login Authenticator Create
You can use external authentication when you want a user's password to be managed by another system or identity provider. NiCE CXone currently supports SAML 2.0 and OpenID Connect federation protocols.
You can set up SP-initiated authentication with the steps in this section. SP-initiated authentication means that NiCE CXone (the service provider) starts the login process.
If you are using Salesforce Agent, then the external identity provider (IdP) must be configured for SP-initiated authentication.
Front-End Authentication with Client Secret or PKCE
OpenID Connect offers two options for front-end authentication:
- Client secret: A client secret is included in the token exchange. This presents a security risk, as it requires coding the secret into the web application.
- PKCE (Proof Key for Code Exchange): Creates a unique, temporary secret for every login request. This increases the security of the authentication flow because attackers won't be able to obtain the one-time key that the application creates.
NiCE CXone supports both options. The end-user experience is the same no matter which option you use. However, PKCE is more secure. Using a PKCE authorization flow requires a custom API integration. The client secret-based authorization flow is the default.
Linking New Users with Claim-based OpenID Connect
NiCE CXone can use a different claim value, like an email address, to establish the user's identity at their first login. NiCE CXone then automatically switches to the unique OpenID Connect subject identifier. This allows you to pre-configure a user's federated identity.
Create an External Login Authenticator
- Ensure that you have access to the external identity provider. You will need to create an integration specific to NiCE CXone.
- Create the integration in the external identity provider.
- You will need to provide a Sign-in Redirect URI which you don't know at this point. Use https://cxone.niceincontact.com/need_to_change as a placeholder.
- You may need to provide a Sign-out Redirect URI which you don't know at this point. Use https://cxone.niceincontact.com/need_to_change as a placeholder.
- The identity provider will generate a Client ID and a Client Secret. Copy and save these values where you can find them. You will need to enter them in later steps.
- Create an external login authenticator in NiCE CXone.
Click the app selector
and select Admin.Click Login Authenticator.
- Click
- Enter the Name and a Description of the login authenticator.
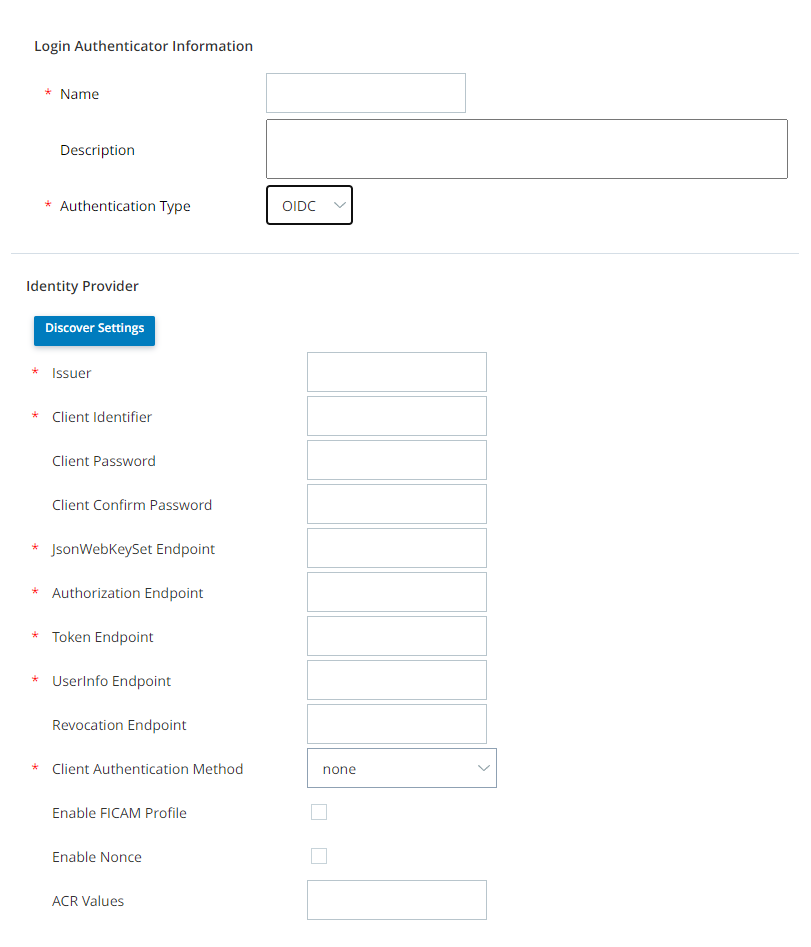
- Select OIDC as the Authentication Type.
- If you have a discovery endpoint for your IdP, click Discover Settings. Enter your discovery endpoint and click Discover. The remaining fields are populated for you. Discover Settings does not work with Salesforce discovery endpoints.
- Enter your Client Identifier and Client Password. Re-type the password in Client Confirm Password. The Client Identifier is the login ID assigned to your account by your IdP.
If you don't have a discovery endpoint for your IdP, enter your IdP-provided Issuer, JsonWebKeySet Endpoint, Authorization Endpoint, Token Endpoint, UserInfo Endpoint, Revocation Endpoint, and End Session Endpoint.
Learn more about fields in this stepField
Details
Issuer The URL of your IdP without any parameter.
JsonWebKeySet Endpoint The URL of your IdP's JWK Set. Authorization Endpoint The URL of your IdP's OAuth 2.0 Authorization Endpoint. Token Endpoint The URL of your IdP's OAuth 2.0 Token Endpoint. UserInfo Endpoint The URL of your IdP's UserInfo Endpoint. Revocation Endpoint The URL of your IdP's Revocation Endpoint. End Session Endpoint The URL of your IdP's End Session Endpoint. This field allows you to create a single logout experience for your users. If configured, when they log out of NiCE CXone, they will also be logged out of their IdP account. For single logout to work, you must whitelist the Sign-out Redirect URI in your IdP. - Select a Client Authentication Method. The method you select must be an authentication method that your IdP supports. If you select private_key_jwt, you must
- You can select Enable FICAM Profile to turn on U.S. government-specific settings.
- Click
- Open the login authenticator.
Note the Sign-in Redirect URI and Sign-out Redirect URI. You will need them when updating your IdP settings.
-
Update your identity provider settings, replacing the placeholders used above with the values you just noted.
-
Ensure that the External Identity for each user that uses the login authenticator is set to the correct value.
Your identity provider determines the value that must be used. The value must match exactly what you put in the External Identity field in NiCE CXone. The value for this field must be in this format: claim(email):{email configured by your IdP}. For example, if the user's email in the IdP is nick.carraway@classics.com, you would enter claim(email):nickcarraway@classics.com.
-
Have the user log in. They must use the latest login URL. After entering their username they will be directed to the external identity provider, if needed.
- When your IdP asks you to authenticate, do so as the user on the IdP you want associated with your currently logged in NiCE CXone account.
- If your OpenID Connect settings in NiCE CXone don't show as validated, use your IdP logs to diagnose the problem.
Assign Users to the Login Authenticator
- Click the app selector and select Admin.
-
Click Users.
-
Select the user that you want to assign to the login authenticator, or click Create New to create a new user.
-
On the General tab, click Edit.
-
In the Security section, select the login authenticator you made previously from the Login Authenticator drop-down.
-
Click Done.