Some scripts require more complexity than Studio actions alone can provide. Studio allows you to add custom code to your scripts. This allows you to customize your scripts to meet your organization's needs.
Custom coding requires some scripting or programming knowledge. Studio uses a custom programming language called Snippet, developed for use in Studio. A complete technical reference guide is available in the online help so you can learn to use this language.
Key Facts About Snippets
- Code snippets can help improve the organization and efficiency of your scripts. They increase your control over the processes that execute, as well as when and how they execute. You can create your own variables and objects and add programming logic using statements such as
- Some products and features require snippets, but you can use them in your scripts even when they're not required.
- When a product or feature requires code snippets, the online help provides detailed information about the snippets you need to include. Examples of scripts are provided to show how to use the code snippets in scripts. Additional scripting may be required to implement the products or features.
- The Snippet scripting language is built on the .NET framework. It executes server-side and compiles into MSIL (Microsoft Intermediate Language) just as C# and Visual Basic .NET do.
Snippet Action
To add custom code to your scripts, you need a
Placement of a Snippet action matters. If a Snippet assigns a value to a variable, it must be placed before the action that needs the value. On the other hand, if a Snippet contains decision-making code that acts based on a value passed to it, the Snippet must be placed after the action that provides the value.
Snippets Compared to Actions
Some of what you can do in snippets can also be done using Studio actions. For example, there are actions for
By placing code in snippets, your script is cleaner, more organized, and easier to navigate. This makes your job as a script developer easier and more efficient. If you make it a habit to always declare variables in snippets, then in the future if you need to locate a particular declaration, you have fewer places to look.
Add Custom Code to a Script
The Snippet action allows you to add custom code to your scripts. This action is located in the Advanced section of the default palette on the Tools tab.
- In Studio, open your script.
- Place a Snippet action in your script wherever you need the code and connect it to the other actions.
- Double-click the action to open the editor window. This is where you can add your code.
-
Click the tab you want to use to add your code. Each tab provides a different method of adding code. The tabs are:
-
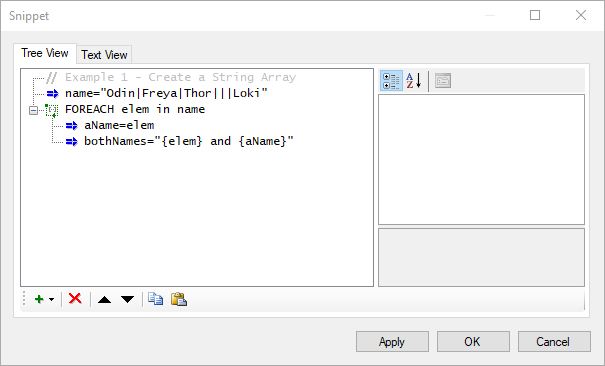
Tree View: Allows you to create custom code using commands from a list provided in the application. You can select the command and provide the necessary details to configure it.
-
Text View: Allows you to enter custom code by hand. This option requires proficiency in basic scripting.
-
-
Debug your code, if you want to.
- Click Apply at any time to save your changes without closing the editor window.
- Click OK when you're finished editing the code.
Code with Text View
- In Studio, open your script.
-
- On the left side of the Tree View tab, enter your code. You can type the code in or copy and paste it from another source, such as this help site or another script.
- Click the Tree View tab at any time to add code from the predefined keywords. You can use the up and down arrow buttons to move code related to a keyword to a different spot in the script.
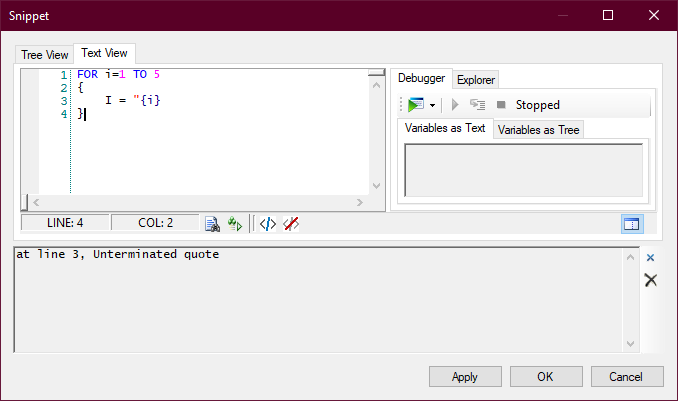
- Click the Check Syntax icon
 to verify that your syntax for the current code is correct. The status field in the toolbar at the bottom of the Text View tab displays the status Okay if there are no errors. If there are errors, a pop-up message about the error appears and the status field in the toolbar displays a message. For example, the message might read Error at line 4.
 - Click the Comment icon
 to convert the line where the cursor currently sites into a comment.
 - Click the Uncomment icon
 to remove the comment characters from the line where the cursor currently sits.
 - Click Apply at any time to save your changes without closing the editor window.
- Click OK when you're finished editing the code.
Code with Tree View
The Tree View tab in the Snippet Properties window guides you through the process of creating custom code. A predefined set of keywords is available for you to choose from.
- In Studio, open your script.
- Add the Snippet action to your script and double-click on it to open the Snippet window.
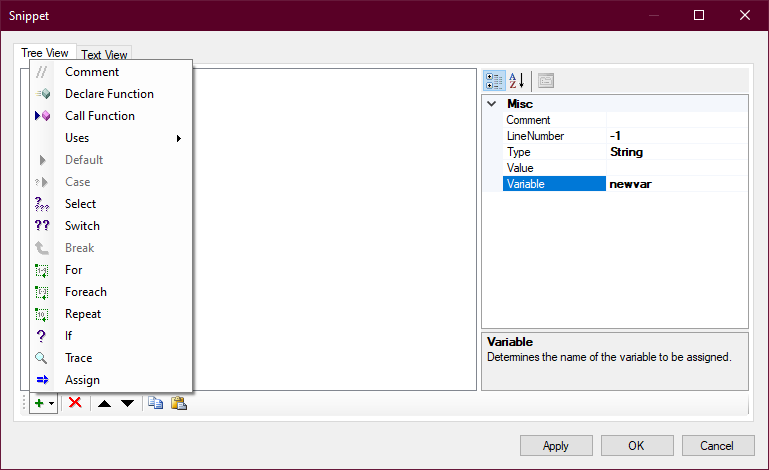
- Click the plus icon
 at the bottom of the Tree View tab.
 - Select the keyword you want to add to your code.
- Click the keyword that appears in the list on the left side of the window to view its properties.
-
Configure the keyword's properties in the list on the right side of the window. You can:
- Select each property to view a definition of the property in the space below the right pane.
- Add more keywords as needed.
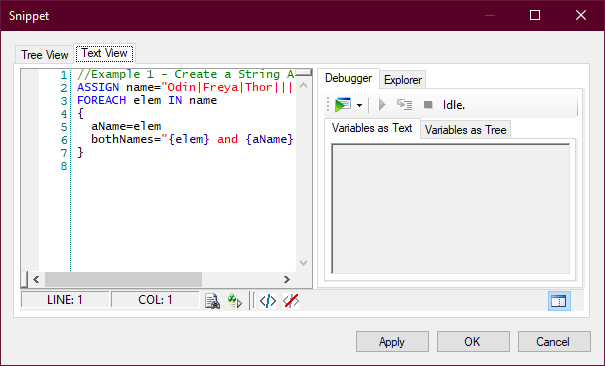
- Click the Text View tab at any time to view the code written out in traditional coding format.
- Click Apply at any time to save your changes without closing the editor window.
- Click OK when you're finished editing the code.
Debug Snippet Code
The Snippet action has its own debugger that you can use to check the code. You can only debug code from the Text View tab.
If you created your code on the Tree View tab, you can use the debugger if you switch to the Text View tab. If the debugger finds any issues, use the specified line number to determine which part of the code contains the issue. You can then return to the Tree View tab to correct the problem.
More debugging options are available, including stepping through the code line by line and using breakpoints. You can also use
- In Studio, open a script containing a Snippet action.
- Double-click on the Snippet action.
- Add Snippet code on the
- On the right side of the
- Click the down-arrow button on the right side of the Debug icon
 and select Start
 .
. -
If there are any syntax errors in the code, the
- Correct the errors.
- When the errors have been corrected, click the Close or Clear Trace Output icons
 to close the error pane.
 - Start the debugger again.
- View the contents of the
- You can select one or more lines in the snippet code and click the Comment out selected lines icon
 . This is helpful if you want to remove some code to see how the outcome of the debugging changes.
 - You can select one or more lines of commented-out code and click the Uncomment the selected lines icon
 to add those lines back into the snippet.