

Content on this page is for a product or feature in controlled release (CR). If you are not part of the CR group and would like more information, contact your Account Representative.
![]() Interactive Voice Response. Automated phone menu contacts use via voice or key inputs to obtain information, route an inbound voice call, or both. and all supported virtual agents
Interactive Voice Response. Automated phone menu contacts use via voice or key inputs to obtain information, route an inbound voice call, or both. and all supported virtual agents![]() A software application that handles customer interactions in place of a live human agent. except CXone Mpower Autopilot. Voice biometric authentication is set up in a different way for Autopilot.
A software application that handles customer interactions in place of a live human agent. except CXone Mpower Autopilot. Voice biometric authentication is set up in a different way for Autopilot.
If you use an Omilia (DEVone) or Autopilot voice virtual agent, the information on this page does not apply. You can add voice biometric authentication by enabling a miniapp in the Omilia or Autopilot management console. Talk to your Account Representative for more information.
Add a Voice Biometrics Profile in Voice Biometrics Hub
You need to add a profile app to Voice Biometrics Hub . This establishes a connection between CXone Mpower and the voice biometrics service. You can test this connection after adding the profile app.
-
Click Add Voice Biometric App.
-
Enter a Voice Biometrics Hub Config Name and click
-
Click Next.
-
Complete the Configuration page using the information in the following drop-down.
 Learn more about the fields in this step
Field Details Integration Version Select the version of Voice Biometrics Hub that you want to use. Currently, version 1.0.0 is the only available version.
Base URL Enter the base URL for your instance of Voice Biometrics. This is provided by the CXone Mpower team during implementation.
The CXone Mpower ACD connects to Voice Biometrics via this WebSocket URL. CXone Mpower sends the audio of the customer's voice over the WebSocket so Voice Biometrics can access it.
VB Profile Enter the ID of the Voice Biometrics voice biometrics profile you want to use. This is provided by the CXone Mpower team during implementation.
This field is case-sensitive.
API Bearer Token Enter the API bearer token that's used to authenticate communication with Voice Biometrics. This is provided by the CXone Mpower team during implementation.
Participants Voice Biometrics only verifies contact voices. The only option that's available for this setting is Patron Only and it cannot be changed.
Integration Type Indicates the type of voice biometric integration you're setting up.
- Click Create.
Add Voice Biometrics to Your Studio Scripts
The script for using voice biometric authentication with IVRs![]() Interactive Voice Response. Automated phone menu contacts use via voice or key inputs to obtain information, route an inbound voice call, or both. and virtual agents
Interactive Voice Response. Automated phone menu contacts use via voice or key inputs to obtain information, route an inbound voice call, or both. and virtual agents![]() A software application that handles customer interactions in place of a live human agent. must include the voice biometric Studio actions:
A software application that handles customer interactions in place of a live human agent. must include the voice biometric Studio actions:
- GET VOICE BIO STATUS
- VOICE BIO ENROLLMENT
- VOICE BIO AUTHENTICATION
- GET VOICE BIO RESULTS
Depending on your use case, you also need one of the following:
- One or more Voicebot Exchange Studio actions. This is required only for virtual agent scripts.
- The actions to set up an IVR. This is required if you're using an IVR to complete the voice biometric authentication. If a virtual agent is handling the voice biometric authentication, your script may include an IVR as well, but it's not required. A simple IVR script is described in the Develop a Basic Script Studio tutorial.
Example Script for IVR
Use this example as a foundation to create your script to use Voice Biometrics. You can download a ZIP file that contains an XML version of the script that you can import into Desktop Studio and a JSON version that you can import into Studio.
The following image shows the example script for Studio.
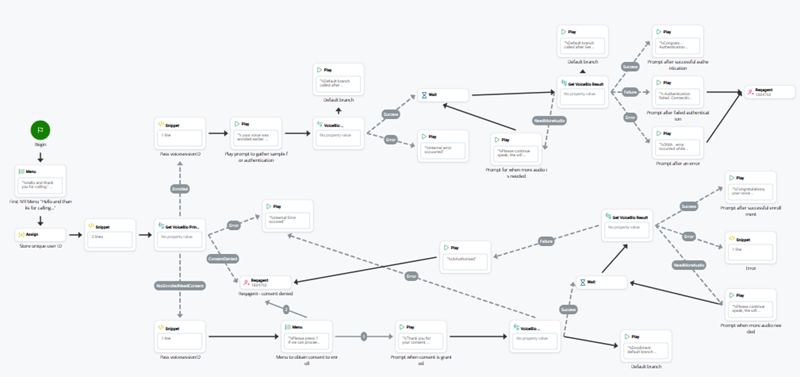
You can see an image of the script in Desktop Studio in the following drop-down.
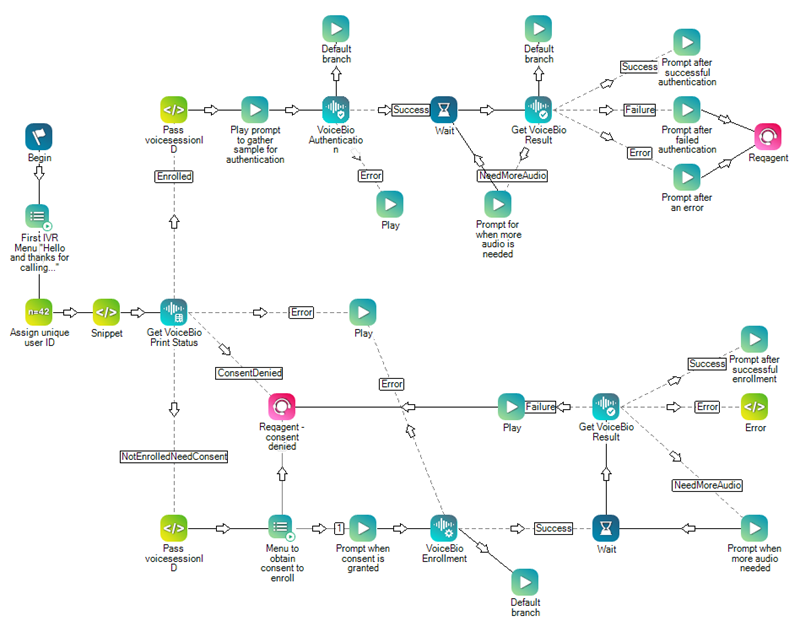
The example script shows the essential flow required to have an IVR handle the voice biometric authentication. This flow shows the IVR enrolling new contacts![]() The person interacting with an agent, IVR, or bot in your contact center. and authenticating previously-enrolled contacts.
The person interacting with an agent, IVR, or bot in your contact center. and authenticating previously-enrolled contacts.
Assign the Voice Biometrics Profile to an Action
- In Studio, open the script you want to use.
-
Ensure that your script includes all four voice biometrics actions and add them if necessary. The actions are:
-
If you use Desktop Studio, double-click any of the Voice Biometrics Hub actions to open Voice Biometrics Hub.
- If you use Studio, select any of the Voice Biometrics Hub actions and click Open Editor in the action properties to open Voice Biometrics Hub.
-
In the left column, click the checkmark
 next to the profile you want to assign to this action.
An alternative to using the checkmark is to create a variable in your Studio script. Use the variable to pass the voice biometric profile name into the VoiceBioProfileId property of each Voice Biometrics Hub action. This ensures that all Voice Biometrics Hub actions in your script always use the same voice biometrics profile.
- Click Yes to confirm your choice, then click Close.
- Repeat steps 3-5 for each voice biometric action in your script.
Test the Connection to Voice Biometrics
You can test the connection between CXone Mpower and Voice Biometrics. This allows you to verify that the Voice Biometrics Hub profile is correctly set up. You can also use it during troubleshooting. It can help you when your voice biometric provider and CXone Mpower aren't connecting.
When you run a test, Voice Biometrics Hub checks to see if the text you enter is a customer ID enrolled with the provider. You can use a real customer ID or random text. The test does not perform any authentication. It only checks for the enrollment status of the text you entered. The Test page displays the JSON response from the provider. If you see JSON, the connection is properly set up.
{
"branchName": "Success",
"personID": "12345",
"result": {
  "enrollmentResult": null,
  "authDecisionResult": null,
  "personResult": "NotEnrolled",
  "optOutInfo": null,
  "optOutresult": null,
  "requestType": 2,
  "message": null
  }
}>
The test can fail due to incorrect credentials in the Voice Biometrics Hub profile or because the voice biometric provider's service is experiencing a problem. If the connection doesn't work for either reason, a toast![]() Small, temporary pop-up messages on the bottom of the screen indicating things like errors and successes. message appears in the lower right corner of the page indicating a failure.
Small, temporary pop-up messages on the bottom of the screen indicating things like errors and successes. message appears in the lower right corner of the page indicating a failure.
- Click the app selector
 and select Other > Automation & AI and then click Voice Biometrics Hub.
 - Select the Voice Biometrics Hub profile you want to test.
- Click Test on the top right of the profile page.
-
On the Test page, enter a customer ID into the Type CustomerId field and press Enter. Voice Biometrics Hub sends the request to the voice biometric provider, then displays the results.