

Required permissions: Scripts Create/Edit
The tutorials on this page lead you through the process of creating a simple inbound phone script. This script creates a basic IVR![]() Interactive Voice Response. Automated phone menu contacts use via voice or key inputs to obtain information, route an inbound voice call, or both. menu. The script does the following things:
Interactive Voice Response. Automated phone menu contacts use via voice or key inputs to obtain information, route an inbound voice call, or both. menu. The script does the following things:
- Verifies that at least one agent is available to handle the call.
- Presents a menu to the caller.
- Requests an agent to handle the caller after their menu selection is made.
- Plays hold music until an agent answers the call.
- Open Studio and log in.
- Click File > New and select Phone.
- Click OK.
- On the
-
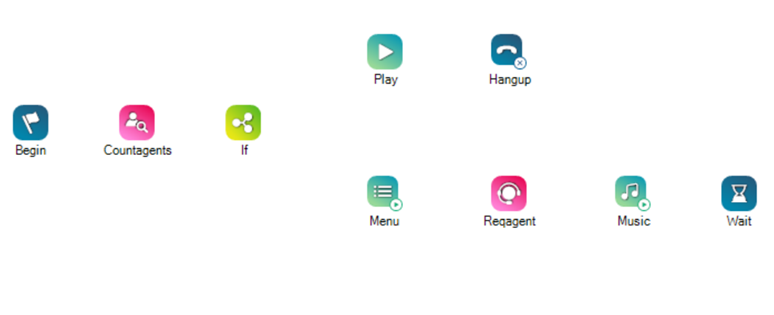
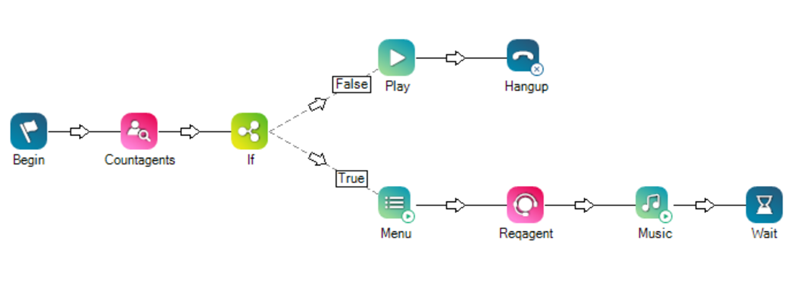
Arrange the actions to match the following image. If you cannot view the image, the sequence is provided in the drop-down below the image.
 View image
Place the actions in this order:
If splits into two branches. The first branch contains:
The second branch contains:
- Connect the actions:
- Hover the cursor over the bottom right corner of the action until you see an arrow.
- Click and hold the arrow and drag it to the action to the right and release.
- Choose the Default branch for all actions except
- Add the connectors for
- Configure the
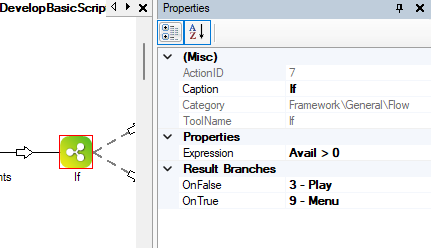
Right-click the
- Click in the Expression property field and enter AVAIL>0.
- Click in the Caption property field and enter Check if agents available. This changes the label that appears on the script canvas.
Click the white space of the canvas workspace to close the
Now If will send the caller to the menu if there are agents available, or to an automated message if there aren't any agents.
- Configure Play to play an automated message for times when there aren't any agents logged in and available:
Right-click on Play to open the
Click in the Caption property field and enter When no agents available. This changes the label that appears on the script canvas.
Click on the script canvas to close the
- Double-click the Play action to open the
- Click Synthesize Text.
- In the Sequence Value field, enter the message you want callers to hear when no agents are available. For example, you could use this message: We're currently experiencing technical difficulties. Please call back later. Another option is to use this sequence of actions as your after-hours message. In that case, you could use this message: Our office is currently closed. Please call back tomorrow morning after 8:00 a.m.
- Copy the message from Sequence Value and paste it into the Phrase field. This is for your information only and makes it easy to know what the prompt sequence says.
Click OK.
- Configure the audio prompts for the Menu action to play when there are agents logged in and available to handle contacts:
Right-click on Menu to open the
Click in the Caption property field and enter When agents are available. This changes the label that appears on the script canvas.
Click on the script canvas to close the
- Double-click Menu to open the
- Click Synthesize Text.
- In the Sequence Value field, enter a message that tells callers they'll be connected with an agent. Because this script only has one branch from the Menu action, all contacts would be automatically connected to the same queue of agents. For example, you could use this message: Please hold for the next available agent.
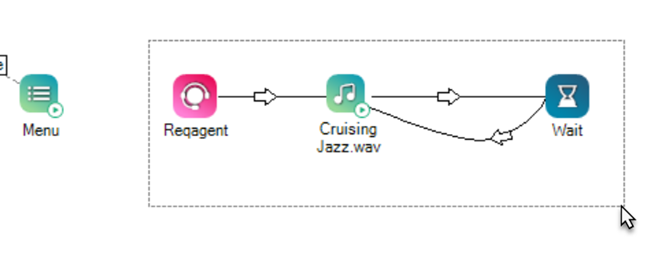
- Configure the Music action to play on-hold music while contacts wait for an agent:
Right-click on Menu to open the
In the MusicFile property field. click the drop-down arrow and select the music file you want to use as hold music.
Click in the Caption property field and enter the name of the music file you selected. This changes the label that appears on the script canvas. You can click on the MusicFile property label and press CTRL + C, then click on the Caption label and press CTRL + V to paste in the name of the file.
Click on the script canvas to close the
- Configure the
- Right-click on Wait and change Seconds to .5.
- Click on the script canvas to close the
- To finish the configuration of Wait, you need to connect it back to Music so it creates a loop that can repeat until an agent answers the call. Hover the cursor over the bottom right corner of the Waiticon until you see an arrow, then click and hold the arrow. Drag the connector to Music and release.
- You can bend one of the connectors between Wait and Music so they can both be seen. Press CTRL + SHIFT and hover the cursor over the connectors between the two actions. When the line turns blue, right-click. This creates an anchor. You can click and drag the anchor to bend the connector. You can learn more about this step on the Work with Scripts help page.
- Save and name the script (File > Save).
- You can test your script by simulating an interaction in Studio.
Add More Menu Choices
You can expand this script to offer more than one menu option. Before you complete this part of the tutorial, you need to make sure that your business unit![]() High-level organizational grouping used to manage technical support, billing, and global settings for your NiCE CXone system. has three ACD skills
High-level organizational grouping used to manage technical support, billing, and global settings for your NiCE CXone system. has three ACD skills![]() Used to automate delivery of interactions based on agent skills, abilities, and knowledge. you can use in this script. In the first part of the tutorial, no ACD skill was assigned to the
Used to automate delivery of interactions based on agent skills, abilities, and knowledge. you can use in this script. In the first part of the tutorial, no ACD skill was assigned to the ![]() High-level organizational grouping used to manage technical support, billing, and global settings for your NiCE CXone system., which is the default configuration for the Skill property of
High-level organizational grouping used to manage technical support, billing, and global settings for your NiCE CXone system., which is the default configuration for the Skill property of
If you need to, you can create three example skills to use in the tutorial. Be sure to follow any policies your organization has about creating test entities in NiCE CXone.
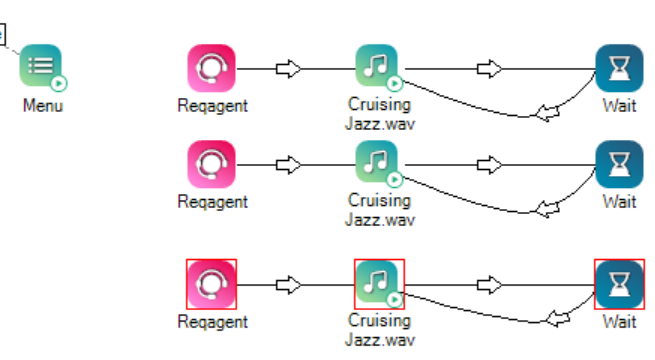
- In your script, select the connector between
-
Click in the white space near the upper left corner of the
- Press CTRL + C on your keyboard.
- Click on the script canvas and press CTRL + V on your keyboard. Duplicates of the selected actions appear over the selected actions.
- Click on the pasted copies and drag them into the white space under the original set of actions.
-
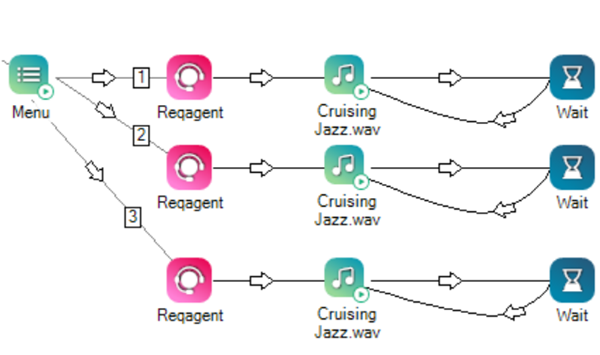
Repeat steps 2–5 to create a third set of actions. When you're finished your script should look like this:
- Create custom branch conditions to connect
Drag a connector from
- On the
- Select the condition you just added and click OK.
Repeat these steps to add conditions 2 and 3 and connect them to the remaining two
- Create a new audio prompt for the Menu action to play:
- Double-click Menu to open the
- Click Synthesize Text.
- In the Sequence Value field, enter a message that lets callers know what their options are. For example, Thanks for calling Classics, Incorporated. For Sales, press 1. For Support, press 2. For Billing, press 3.
- Double-click Menu to open the
- For each set of
- Right-click on
- In the Used to automate delivery of interactions based on agent skills, abilities, and knowledge. to assign to this action. The script will request agents with this ACD skill to handle the contacts who choose this option. In a script intended for production, you would need to choose a skill that matches the destination of the menu option. For example, on the Support branch of the script, the skill would need to be assigned to agents who handle Support calls.
- Right-click on
- Update the
- Right-click on
- Save your script and test it with another simulated interaction.

Learn More
You can learn more about the script you just created on the following online help pages:
- Online help for each action in this script is available:
- You can use Play and
- The If action creates a decision-making statement in your script. You can learn more about this kind of statement in the Technical Guide section of the Studio online help.
- You can learn more basic script skills in the Script Basics help page.
- You can learn more about using actions in the Action Basics help page.