

Content on this page is for a product or feature in controlled release (CR). If you are not part of the CR group and would like more information, contact your account representative.
Microsoft is retiring LUIS on October 1, 2025. As of April 1, 2023, no new LUIS resources can be created. Microsoft recommends migrating your LUIS resources ![]() to conversational language understanding (CLU).
to conversational language understanding (CLU).
Prerequisites
To use Microsoft Azure virtual agents![]() A software application that handles customer interactions in place of a live human agent. with NiCE CXone, you need:
A software application that handles customer interactions in place of a live human agent. with NiCE CXone, you need:
- A Microsoft Azure Account with the Bot service using Direct Line channel. In the Direct Line channel configuration settings, disable Enhanced authentication options for the site you're using with NiCE CXone. This option is currently not supported.
- A Microsoft Azure virtual agent configured and trained to provide responses that fulfill your contacts' requests.
- A LUIS account. LUIS is a conversational AI service. This is only needed if you want to use LUIS intent
 The meaning or purpose behind what a contact says/types; what the contact wants to communicate or accomplish. prediction with this virtual agent.
 - Services for text-to-speech (TTS Allows users to enter recorded prompts as text and use a computer-generated voice to speak the content.) and transcription (speech-to-text Also called STT, this process converts spoken language to text.).
- A knowledge base complete with the information, questions and answers, and other resources for training your virtual agent.
Create a Script
Required permissions : View Scripts, Create/Edit Scripts
You need at least one Studio script to route interactions to your virtual agent. Follow the script guidelines. ![]() A medium, such as voice, email, and chat, through which a contact connects with an intended recipient..
A medium, such as voice, email, and chat, through which a contact connects with an intended recipient..
If you're setting up a voice virtual agent and using a NiCE CXoneText-to-Speech (Cloud TTS Hub) service, include the CLOUD TTS action in your script.
You can learn more about Studio scripting in the Fundamentals and Technical Reference Guide sections of the online help.
Add an App to Virtual Agent Hub
Required permissions : View Scripts, Create/Edit Scripts
Adding a configuration app to Virtual Agent Hub establishes the connection between NiCE CXone and your virtual agent provider.
- In Studio, open or create a script and add a virtual agent action, if it doesn't contain one already.
- Double-click the virtual agent action to open Virtual Agent Hub.
- Click Add Bot.
-
Enter a Virtual Agent (Bot) Name and click Microsoft Azure Bot in the list of virtual agent providers.
-
Click Next.
-
Complete the fields in the configuration form and click Next. You can find details about this form in the Configuration Page Details section on this page.
-
Click Next.
-
If you're setting up a text virtual agent, select Text Only (No Voice Support) on the Voice page. If you're setting up a voice virtual agent, contact your account representative.
-
On the Transcript page, select the option for whether you want the conversation transcript and intent information captured. If this tab is not available, the feature is not enabled for your tenant
High-level organizational grouping used to manage technical support, billing, and global settings for your NiCE CXone system.. Contact your account representative for more information about this feature. Learn more about fields in this step
Option Details Intent information only Select this option if you want to want to capture intent information only. Captured data is stored only for the duration of the interaction by default.
This option requires custom scripting.
Nothing Select this option if you don't want to capture conversation transcriptions or intent The meaning or purpose behind what a contact says/types; what the contact wants to communicate or accomplish. information. Transcript and intent information Select this option if you want to capture both transcript and intent data. Captured data is only stored for the duration of the interaction by default.
This option requires custom scripting.
Transcript only Select this option if you want to capture transcript information only. Captured data is stored only for the duration of the interaction by default. This option requires custom scripting.
-
Click Next.
-
On the Test + Add page, you can test your bot's connection by sending voice or text prompts. If your test messages don't work, click Back to return to the Configuration page and verify the settings.
-
Click Add.
Microsoft Azure Configuration Page Details
Use the information in the following table when completing the Configuration page. You see this page when adding an app in Virtual Agent Hub
|
Field |
Details |
|---|---|
| Integration Version |
Select the version of Virtual Agent Hub that you want to use. This option allows you to use a previous version of Virtual Agent Hub until you're ready to switch to a newly-released version. The available versions are:
|
| Direct Line Secret | Enter your Direct Line authentication secret. A Direct Line secret allows NiCE CXone to access any conversation that takes place with your Microsoft Azure virtual agent. You can find the secret in the Microsoft Azure portal. |
| Use Your Own Account for Azure Text-to-Speech Invocation (Instead of NiCE CXone TTS Cloud |
If you want to use the Microsoft Azure Text-to-Speech service and have your own account set up, click the slider to On. If you don't want to use the Azure TTS service, leave this field set to Off. You can use a NiCE CXoneText-to-Speech (Cloud TTS Hub) service. |
| Speech Service Key |
Enter your Speech service key. You can find this key in the Azure portal. Complete this field only if you enabled using Azure Text-to-Speech service. |
| Speech Service Region |
Enter the region identifier for the region that your Speech service key was created for. Complete this field only if you enabled using Azure Text-to-Speech service. |
| TTS Voice Name |
Select the text-to-speech Complete this field only if you enabled using Azure Text-to-Speech service. |
| Timeout Message | Enter the message that you want the Azure virtual agent to use when a contact times out. The default message is Are you still there? |
| DTMF Breakout Pattern |
Enter the characters that, when pressed during a call, cause the virtual agent to take the DTMFBreakout branch of the Studio script. Complete this field only if this is a voice virtual agent. |
| Welcome Intent | Enter the ID of the Azure welcome intent |
| Timeout Intent | Enter the ID of the Azure timeout intent you want this virtual agent to use. |
| If you want LUIS Prediction Intent, use your own LUIS app account |
Click the slider to On if you have a LUIS app account and want to use LUIS intent If you don't want to use LUIS intent prediction with this Azure virtual agent, leave this field set to Off. LUIS is part of Microsoft Azure Cognitive Service for Language and provides natural language functions for your conversational virtual agents. For more information, refer to the online help for Microsoft Azure Cognitive Service for Language. |
| LUIS App ID |
Enter the ID for your LUIS app. This field is visible only if you set the If you want LUIS Prediction Intent field to On, |
| LUIS Prediction Key |
Enter the key for the LUIS app you're using with this Microsoft Azure virtual agent. This field is only visible if you set the If you want LUIS Prediction Intent field to On, |
| LUIS Prediction Endpoint |
Enter the endpoint for the LUIS app you're using with this Microsoft Azure bot. This field is visible only if you set the If you want LUIS Prediction Intent field to On, |
Configure Azure TTS
Required permissions : View Scripts, Create/Edit Scripts
If you're using the Azure text-to-speech with this virtual agent, you must have your own account with Microsoft already set up.
- In Virtual Agent Hub, add a new configuration app and configure it according to the steps in Add an App to Virtual Agent Hub on this page.
- Click Use Your Own Account for Azure Text-to-Speech Invocation to On to enable it.
- Enter your Speech Service Key. You can find this key in the Azure portal.
- Enter the region identifier for the region that your Speech service key was created for in the Speech Service Region field.
- Select the voice and language you want this virtual agent to use from the TTS Voice Name drop-down.
- Return to Add an App to Virtual Agent Hub on this page to finish adding the configuration app.
Configure Voice Integration Options
Required permissions : View Scripts, Create/Edit Scripts
For Azure virtual agents, you can use either the Azure text-to-speech service or NiCE CXone Text-to-Speech (Cloud TTS Hub).
If you're setting up a text virtual agent, you can skip this section.
- In Virtual Agent Hub, add a new configuration app and configure it according to the steps in the Add an App to Virtual Agent Hub section on this page.
-
Click Next on the Configuration page.
-
On the Voice page under Voice Integration Options, select the option for the kind of voice connection you're using with your virtual agent.
Learn more about fields in this step
Field Details Voice Integration Options Select the kind of voice integration you're using with this virtual agent:
- Text Only (No Voice Support): Select this option if you're setting up a text virtual agent.
- Turn by turn Control (
- Custom Telephony (gRPC, DirectLine Voice, etc): Select this option if you're using another telephony option to connect to your virtual agent. Contact your account representative for setup assistance.
-
Under Transcription Options, select the option for the transcription service you want to use.
Learn more about fields in this step
Field Details Transcription Options Select the service you want to use for transcription:
- Use bot account transcription: Select this if you want to use your virtual agent provider's transcription service. Audio from the contact's utterances is sent to the provider before being transcribed.
- Use Turn-by-Turn Transcription profile: Select this if you want to use a NiCE CXone transcription profile. You can learn more about this option on the NiCE CXone Turn-by-Turn Transcription help page.
- If you choose to use a Turn-by-Turn Transcription profile, click Turn-by-Turn Transcription Profile to select the one you want to use. Click Add New Turn by Turn Transcription Profile to create a new profile.
- Click Next.
- Return to the Add an App to Virtual Agent Hub section on this page to finish adding the configuration app.
Assign the Microsoft Azure App to an Action
Required permissions : View Scripts, Create/Edit Scripts
When the virtual agent![]() The meaning or purpose behind what a contact says/types; what the contact wants to communicate or accomplish. app is set up and configured in Virtual Agent Hub, you need to assign it to the virtual agent action in your script. This connects the action and the script to your virtual agent provider.
The meaning or purpose behind what a contact says/types; what the contact wants to communicate or accomplish. app is set up and configured in Virtual Agent Hub, you need to assign it to the virtual agent action in your script. This connects the action and the script to your virtual agent provider.
- In Studio, open the script you want to modify.
-
If you haven't done so already, click the Tools tab, expand the Automation and AI category, and add the virtual agent action you want to use. Be sure to put it in the correct location in your script. If you don't see the action you expect, verify that your script media type is correct. For example, if you're creating a script for a voice virtual agent, the script must be a phone script.
-
-
In the left column, locate the virtual agent profile that you want to assign to the action and click the checkmark
 next to it.
An alternative to using the checkmark is to create a variable in your Studio script. Use the variable to pass the virtual agent app name into the Virtual Agent ID property of the Virtual Agent Hub action you're using.
- Click Close.
Change the Transcription Profile
Required permissions : View Scripts, Create/Edit Scripts
A transcription profile allows you to use a different transcription service from the one the virtual agent provider offers. Each virtual agent can have one transcription profile. You only need to follow the steps in this section if you are working with a voice virtual agent and need to change the transcription profile.
- In Studio, open or create a script and add a virtual agent action, if it doesn't contain one already.
- Double-click the virtual agent action to open Virtual Agent Hub.
- In the list of virtual agent configuration apps on the left side of the Virtual Agent Hub page, click the one you want to modify.
- In the center of the virtual agent app properties page, click the Voice tab.
-
Under Transcription Options, select Use Turn-by-Turn Transcription Profile if it isn't already selected.
-
Select the Turn by Turn Transcription Profile you want this virtual agent integration to use. If the option you want to use isn't there, you can add it.
- Click Save.
- Test your transcription service by using the microphone option in the Test section of your virtual agent app properties page.
Test Your Virtual Agent
Required permissions : View Scripts, Create/Edit Scripts
You can test many aspects of your virtual agent to make sure everything works as intended. You can run tests from the virtual agent app's properties page in Virtual Agent Hub. When testing, you can:
- Verify that the virtual agent app is correctly configured to communicate with the virtual agent provider.
- Add custom payload JSON to test the virtual agent's handling of custom payload data.
- Trigger a welcome intent event to test how the virtual agent begins a conversation.
- Trigger a custom intent event to test any custom events you've created for your virtual agent.
- Trigger a timeout event to test how the virtual agent responds when the contact times out.
- Test how the virtual agent handles DTMF Signaling tones that are generated when a contact presses a key on the telephone keypad. input.
The following image is an example of the properties page for a virtual agent app in Virtual Agent Hub (not Microsoft Azure). It shows the Configuration and Voice tabs and the Test pane.
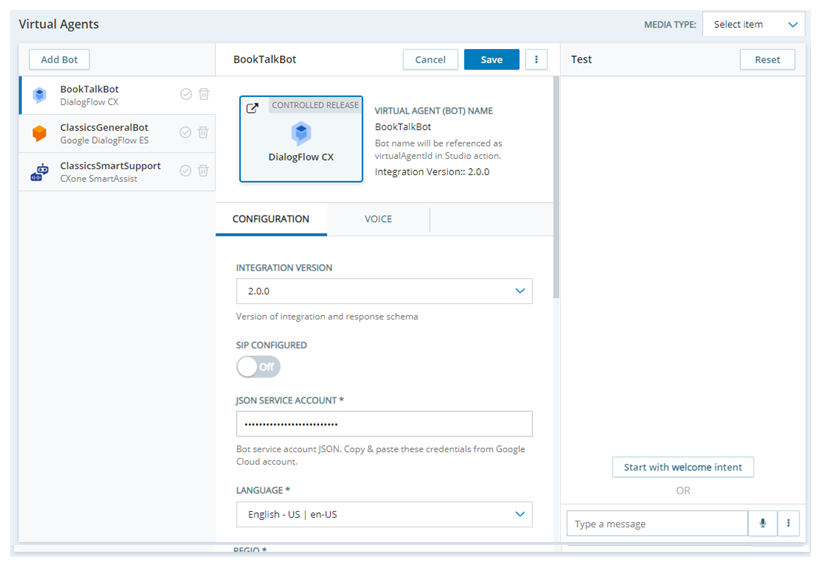
- In Studio, open or create a script and add a virtual agent action, if it doesn't contain one already.
- Double-click the virtual agent action to open Virtual Agent Hub.
- Click to select the configuration app for the virtual agent you want to test from the list on the left.
-
In the Test pane, enter a test message in the Type a message field and press Enter to send it. You can also click Microphone
 and speak into your computer's microphone.
 - Click Start with welcome intent to start a test conversation from the beginning. The virtual agent responds with its default welcome message. You can enter test messages.
-
Click More Options
 to test other aspects of your virtual agent.Learn more about fields in this step
Field Details Add Custom Payload JSON Select to test sending custom payload JSON to your virtual agent.
Enter the custom payload in the Add Custom Payload JSON text box that appears on the Test + Add page. Press Enter after each line.
Send a test message when you're ready to test the custom payload. When you're finished testing custom payload, click Close on the Add Custom Payload JSON pane.
Trigger Welcome Intent Event Select to test the default Welcome intent The meaning or purpose behind what a contact says/types; what the contact wants to communicate or accomplish.. The virtual agent sends the welcome message. Enter a message to respond. Trigger Custom Intent Event Select to test a custom intent event. Enter the Event Name in the pop-up that appears and click Trigger. The virtual agent sends the message for the intent you entered. Send a response to test the intent. Trigger Timeout Event Select to view the default timeout intent. The virtual agent sends the timeout response message that it's configured with. DTMF Input Select to test your voice virtual agent's response to DTMF Signaling tones that are generated when a contact presses a key on the telephone keypad. tones. Enter DTMF Characters and click Input to see the virtual agent's response to those characters. - Click Reset to start your test again.
-
If you need to make changes based on the results of your testing, you can:
- Modify the Studio scripts for the virtual agent.
- Modify the configuration settings in the virtual agent's app in Virtual Agent Hub.
- Modify the virtual agent's configuration settings in the provider's console. Click the large square button on the app properties page in Virtual Agent Hub. The example at the beginning of this section shows the Google Dialogflow CX app with the provider button. It has the
 icon on it to indicate that the link opens an external site.
- Test the virtual agent thoroughly after each change to your scripts or any configuration settings.
- When you're finished testing, click Close.