Verify the Agent Assist Application
Before beginning the implementation of the custom agent assist integration, verify that your agent assist application is set up and configured. Make sure it has access to the information it needs and that it works as expected.
Set Up the Proxy Tunnel Endpoint
To complete this task, you must put the proxy tunnel code in place. Initiate and expose the endpoint as required. The exact steps and commands required to perform this step will be different for every integration.
Complete Configuration in NiCE CXone
Required permissions: Contact Handling > ACD > Points of Contact > Edit, Create; Global > User Settings > Skills > Edit, Create; Global > User Settings > Campaigns > Edit, Create; Global > User Settings > Users > Edit, Create;
If you determined during the planning phase that your integration requires new ACD skills![]() Used to automate delivery of interactions based on agent skills, abilities, and knowledge. or points of contact
Used to automate delivery of interactions based on agent skills, abilities, and knowledge. or points of contact![]() The entry point that an inbound contact uses to initiate an interaction, such as a phone number or email address., you need to create them now. You may need to:
The entry point that an inbound contact uses to initiate an interaction, such as a phone number or email address., you need to create them now. You may need to:
- Create a campaign or choose an existing campaign to use.
- Create an ACD skill for voice or ACD chat.
- Assign agents to the ACD skill. The agent assist application provides assistance for all agents assigned to the skill.
- Create or modify a point of contact. Choose the ACD skill and the script you created for your custom agent assist integration.
If you use a naming convention as version control with your Studio scripts, be sure to save your script with its production name before assigning it to the point of contact.
Set Up Required Studio Scripts
Required permissions: Applications > Studio > Scripts > Create/Edit, Import/Export Debug, Lock Override; Applications > Studio > Prompts > Record; Applications > Studio > File Browser > Edit, Create
Ensure that all required Studio scripts are in your production environment. You may need to:
- Export the scripts from one environment and import them into another. You may want to create a folder specifically for scripts related to your custom integration.
- Save the scripts with new names. If you use naming conventions for version management, you need to change the scripts' names to move them from test to production. Studio doesn't support changing script names. To rename them, you must use the File > Save As option.
Ensure that every instance of the Agent Assist action in your scripts is correctly set up. This means that:
- The Custom Agent Assist Endpoint app has been created in Agent Assist Hub.
- Every instance of the Agent Assist action in your scripts has the Custom Agent Assist Endpoint app assigned to it.
- The connection between the script and the agent assist application works as expected after you move the script into production. Perform some testing to verify the connection.
Configure the Connection to the Agent Assist Application
Required permissions: Applications > Studio > Scripts > Create/Edit
The connection between your agent assist application and NiCE CXone is the Agent Assist action in your Studio script. You configure the action![]() Performs a process within a Studio script, such as collecting customer data or playing music. with the information needed so that the two systems can communicate.
Performs a process within a Studio script, such as collecting customer data or playing music. with the information needed so that the two systems can communicate.
You can include more than one Agent Assist action in your script, if needed. Each Agent Assist action creates a connection to the WebSocket and sends the conversation data.
You only need to complete this task once, even if you have more than one Agent Assist action in your scripts. If you have multiple Agent Assist actions, you must assign the Custom Agent Assist Endpoint app to each one. You can use the same app for more than one action. The following steps describe how to add a Custom Agent Assist Endpoint app.
- In Studio, open the script that contains the Agent Assist action.
- Double-click the action to open Agent Assist Hub, then click Add Agent Assist App.
- Enter an Agent Assist App Name and select Custom Agent Assist Endpoints as the App Type.
- Click Next.
-
Use the information in the following drop-down to complete the Configuration page of the Create New Agent Assistant wizard:
 Learn more about fields in this step
Field
Details
Agent UI Option Select the option for how you want to display information to the agent:
- No Assist Panel shown to Agent: the agent application doesn't display an agent assist panel. Instead, you can have information from the agent assist application sent to another location. For example, you might have it displayed in a third-party CRM Third-party systems that manage such things as contacts, sales information, support details, and case histories. application. If you choose this option, you are responsible for setting up the alternate method of displaying information. This might include modifying Studio scripts and configuring the agent assist provider itself.
- Use custom URL for Agent Assist Panel: The agent assist panel in the agent application displays content from the URL you provide. Enter the App URL and the App Title. If you choose this option, you are responsible for configuring the system to display information at this URL. This might include modifying Studio scripts and configuring the agent assist provider itself. Currently, this option is only available in MAX.
App URL The URL for the agent assist application you want to integrate with. You must use a complete, valid URL that includes HTTP or HTTPS. This field is not visible if you choose No Assist Panel shown to Agent as the Agent UI Option. App Title The name of the agent assist application. Participants Select which side of the conversation you want the agent assistant application to listen to:
- Patron Only: Only the contact The person interacting with an agent, IVR, or bot in your contact center..
- Agent Only: Only the agent.
- Both: Both the agent and the contact. Uses two WebSocket connections.
- Multiplex: Both the agent and the contact. Uses one WebSocket connection.
The option you choose determines the information that the agent assistant application uses to perform its tasks. For example, if your agent assist application provides knowledge base articles to the agent and you select Patron Only, the application only uses the contact's side of the conversation when determining which articles to show the agent.
Text Relay Endpoint If you want your script to handle chat interactions, enter the text relay endpoint for your agent assist provider.
Text Relay Endpoint Authorization Header Enter the authorization header for the Text Relay Endpoint, if you want to include one. Leave this field blank if you don't want to use an authorization header. Audio Relay Endpoint If you want your script to handle voice interactions, enter the audio relay endpoint for your agent assist provider. Audio Relay Endpoint Authorization Header Enter an authorization header for the Audio Relay Endpoint, if you want to include one. Leave this field blank if you don't want to use an authorization header. Configuration Parameters If you want to include other configuration parameters, click Add Configuration Parameters, then enter the parameter Name and Value. You can add as many configuration parameters as you want.
These parameters can be included in each request that is exchanged with the agent assist provider. For example, you could include JSON web tokens (JWT), encrypted data, or unique IDs that you want to pass to your agent assist provider.
CTI Event Enable CTI Event to receive CTI events when the audio stream for the custom agent assist integration stops. CTI events include:
-
Call disconnected
-
Call held
-
Call transferred
These CTI events appear in WebSocket payloads. They provide the reason for audio interruptions.
- No Assist Panel shown to Agent: the agent application doesn't display an agent assist panel. Instead, you can have information from the agent assist application sent to another location. For example, you might have it displayed in a third-party CRM
- Click Create.
- On the Agent Assist Hub page, click the selection icon
 next to the app you just added.
 - Click Yes when prompted to confirm that you want to assign the selected app to the selected action in your script.
Assign the Custom Endpoint to a Studio Action
Required permissions: Applications > Studio > Scripts > Create/Edit
If you haven't done so already, you need to assign the ![]() Performs a process within a Studio script, such as collecting customer data or playing music. in your Studio script.
Performs a process within a Studio script, such as collecting customer data or playing music. in your Studio script.
- In Studio, open the script you want to use.
-
If you haven't done so already, add the Agent Assist action to the correct location in your script.
-
-
In the left column, click the checkmark
next to the agent assist application or profile you want to assign to this script.An alternative to using the checkmark is to create a variable in your Studio script. Use the variable to pass the app or profile name into the Assign Launch Config Name property of the AGENT ASSIST action.
- Click Close.
Test the Script from the Point of Contact
Required permissions: Contact Handling > ACD > Points of Contact > View, Edit
When the point of contact![]() The entry point that an inbound contact uses to initiate an interaction, such as a phone number or email address. is set up, you need to test your script starting from the point of contact. You can use script tracing in Studio to check on the effectiveness of your script and identify any issues that arise. To resolve issues, you may need NiCE CXone log files. Ask your account representative for more information.
The entry point that an inbound contact uses to initiate an interaction, such as a phone number or email address. is set up, you need to test your script starting from the point of contact. You can use script tracing in Studio to check on the effectiveness of your script and identify any issues that arise. To resolve issues, you may need NiCE CXone log files. Ask your account representative for more information.
- In Studio, open the script that the point of contact calls.
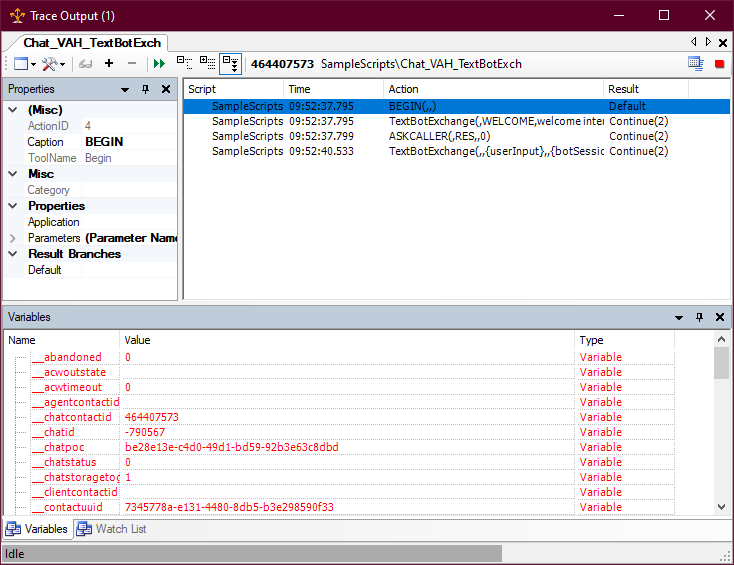
- Click Debug > Capture Script > Next Instance Only. In Studio, the Trace Output window opens. It displays the progress of the script as you simulate an interaction.
- Open a supported agent application and set your agent state to Available. If testing a voice integration, connect the application to NiCE CXone. For example, in MAX, click Connect Agent Leg.
-
Initiate an interaction. How you initiate it will vary by channel
Various voice and digital communication mediums that facilitate customer interactions in a contact center.. For example:- For a voice channel, call the phone number assigned to the point of contact.
- For an ACD chat channel, visit the web page with the chat option and start a chat. You can also open the page in NiCE CXone for the point of contact you're testing and copy the URL from the Point of Contact URL field. Paste the URL into a browser window and press ENTER, then send a message using the chat interface that appears.
- Create an imaginary conversation, supplying both sides of the dialogue. Use keywords and phrases you know will trigger the agent assist application to respond. To simulate a voice conversation, you may need help from a second person.
-
In Studio, click an action in the main pane in the Trace Output window.
- The Variables tab shows all of the variables that exist in the script when the selected action has completed. It also shows the value that each variable holds at that point in the script.
- The Properties tab shows you the properties for the selected action. You can use this to verify the action's current configuration.
- Return to the script and make changes, if necessary.
- Select an action and press F1 on your keyboard to access online help for that action. The online help page for each action describes the properties and other information about using the action in a script.
- If you want to start over, click End Chat, refresh the browser window, and repeat this process, starting with step 2.