

Setting up call suppression requires the following steps:
-
Create a call suppression Studio script.
-
Determine which information about the contact
 The person interacting with an agent, IVR, or bot in your contact center. the system will check.
 -
Assign the script to an ACD skill
Used to automate delivery of interactions based on agent skills, abilities, and knowledge.. -
Create and upload the call suppression records.
Call suppression is supported in outbound phone ACD skills, including Proactive Voice or Proactive SMS skills and manual outbound phone skills. The setup requirements for call suppression are the same for all supported ACD skills.
Complete each of these tasks in the order given.
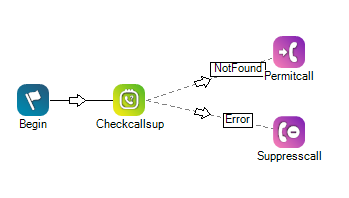
Create Call Suppression Script
You can create a call suppression script in Studio or in the settings of an outbound phone or SMS ACD skill. Studio has a template for suppression scripts. When you create a suppression script using either method, the script is automatically populated with the required actions. A script developer must configure the script to ensure it works as you intend.
The template suppression script instructs NiCE CXone to check a specific column in the calling list to determine whether the interaction should be suppressed. You specify the value you want suppressed in the call suppression record, explained in the next section.
Create a Suppression Script in Studio
Required permissions: Applications > Studio > Scripts >
- In Desktop Studio, click File > New to create a new script.
- Click Specialized Scripts > Call Suppression > OK.
- Edit the properties of the Assign action, called Assign dataValue.
- For Value, replace the SuppressionField placeholder property with {_phonenum} if you want the script to check the phone number from the call suppression record. Alternatively, you can enter other values to check other types of information.
- Click File > Save As. Enter a descriptive name for the script and click Save.
- Return to NiCE CXone to assign this script to an ACD skill.
Create a Suppression Script via an ACD Skill
Required permissions: Skills Edit
These steps only create the template-based script file. Additional configuration is required to complete the script.
Your Studio script developers may have requirements for script naming. Check with them before completing this task.
- Click the app selector
 and select ACD.
 -
Go to Contact Settings > ACD Skills.
- Click the outbound phone or SMS skill you want to edit.
- Click the Call Suppression tab and click Edit.
- Click Create a new script.
- Enter a descriptive Script Name. Follow the naming conventions your organization's script developers use, if required. Scripts cannot be renamed later.
- Click Create.
- Have a script developer configure the script you created in Studio following the steps in the preceding task.
Assign the Script to the ACD Skill
Required permissions: Skills Edit
-
Click the app selector
and select ACD. -
Go to Contact Settings > ACD Skills.
- Click the outbound ACD phone or SMS skill you want to edit.
- Click the Call Suppression tab and click Edit.
- Select a suppression script from the Script drop-down.
- Click Save.
Create Call Suppression Records
You can suppress one phone number as a single call suppression record, or you can suppress multiple phone numbers by bulk uploading records.
Create a Single Call Suppression Record
Required permissions: Call Suppression Create
If you want to bulk upload multiple records for call suppression, skip this step.
-
Click the app selector
and select ACD. -
Go to Lists > Call Suppression.
-
Click Create New > Single Record.
-
In the Value field, enter the phone number you want to suspend outbound calls to or the value you want records to match in the column you specified for your call suppression script. Don't include any formatting.
-
Specify the range of time that you want calls to the number to be suppressed in the Start Date/Time and End Date/Time fields.
-
Click Next.
- If you want to suppress calls from all ACD skills Used to automate delivery of interactions based on agent skills, abilities, and knowledge. in the business unit High-level organizational grouping used to manage technical support, billing, and global settings for your NiCE CXone system., don't add any ACD skills to the call suppression record.
-
If you want only specific skills to suppress calls or messages to the chosen records, select those skills in the Add Skills table. Click Add Skills.
-
Click Create.
Bulk Upload Call Suppression Records
Required permissions: Call Suppression Create
If you created your call suppression records individually, skip this step.
-
Click the app selector
and select ACD. -
Go to Lists > Call Suppression.
-
Click Create New > Manage Multiple Records.
-
Click Download Template. Leave this page open to use again later.
-
Open the template in a spreadsheet or text editor.
-
Below the header and explanation rows, enter the information about each new call suppression record in its own row.
Learn more about fields in this step
Field
Details
Call Suppression ID Skip this column. NiCE CXone generates the ID of new call suppression records as you create them, and you cannot modify the ID of an existing record. Value
The phone number you want to temporarily suppress outbound calls to. Don't include formatting.
Start Date/Time The date and time you want to start suppressing calls to the phone number from the selected ACD skills Used to automate delivery of interactions based on agent skills, abilities, and knowledge..End Date/Time The date and time you want to stop suppressing calls to the phone number from the selected ACD skills. Skill ID The numeric IDs of the ACD skills you want to suppress calls or messages to matching records. For multiple ACD skills, delimit each ID with a semi-colon. For example, 23843;23930;94755. -
Save the file to your machine as CSV or XLSX.
-
Return to the Manage Multiple Records page in NiCE CXone. Click Choose File. Find and select the file you just created.
-
Select the File Type corresponding with the file extension you used to save the file.
-
Select All Rows for Rows to Include.
-
Click Upload File.
-
If you see errors on the Data File Results page, resolve them. For example, the ACD skill IDs for the records might be invalid. To resolve that, fix the skill IDs in the file, click Back, and re-upload the file.
- If no errors appear, click Close.
