

The setup is performed in Salesforce, therefore the following sections give general instructions. If you need more detailed step-by-step information, visit the Salesforce help center. After adding the agent user accounts to the contact center, the agents can access the Phone tab in the Omni-Channel widget. In this tab they can log in and start handling calls. When you install Agent Workspace for Salesforce Voice (Agent for Service Cloud Voice), you are given a trial license with 25 seats that will expire after 30 days. To avoid this expiration, you must talk to your account representative to update your license to an active license. The account representative must create a work order to update your license.
Before You Begin
Your Salesforce setup must include (Agent Workspace for Salesforce Voice (Agent for SCV) with Partner Telephony licenses. You must obtain these licenses through Salesforce.
- You must have a Salesforce account with permissions to access and configure the Feature Settings page. Use this account to perform the steps on this page.
- Ensure you have multiparty licenses enabled for your Salesforce org. Open a case with Salesforce to enable these licenses. If you do not have multiparty licenses, Agent Workspace for Salesforce Voice (Agent for SCV) may experience call control issues.
- Acquire the contact center definition file from your account representative. This file must be in XML format.
- Ensure you are installing and using Agent Workspace for Salesforce Voice (Agent for SCV) on a supported platform and in a supported browser.
- Confirm that you do not have a namespace defined in your Salesforce org. You typically define a namespace when you use a developer org to create a managed package for distribution. Agent Workspace for Salesforce Voice (Agent for SCV) has its own namespace and will not run in an org that has already defined one. If you have one already defined, refer to Salesforce help.
-
If you already have a contact center definition named
Install the Salesforce Package
-
Navigate to http://appexchange.salesforce.com and search for NiCE CXone.
-
Select NICE CXone Agent for Service Cloud Voice (BYOT).
-
Click Get It Now.
-
Click Install in production. If prompted, log in first by clicking Log in to the AppExchange.
- Agree to the terms and conditions, and then click Confirm and Install.
- If prompted, select a username and log in.
-
Choose whether to Install for Admins Only, Install for All Users, or Install for Specific Profiles..., then click Install.
If you choose Install for Specific Profiles..., you have the option to choose which profiles have access to the package. You can set a global policy by using the Set access level for all profiles to setting, and then modify profiles from there.
-
Grant access to api.incontact.com and click Continue.
- When the installation has completed, click Done.
You should now see
Partner Telephony Set Up
Enable Agent Workspace for Salesforce Voice (Agent for Service Cloud Voice) with Partner Telephony
- Log in to the Salesforce org where you want to install Agent Workspace for Salesforce Voice (Agent for SCV).
- Click Setup
 in the top right corner in Salesforce. Launch the Setup application.
 - Search for Partner Telephony Setup. Select the Partner Telephony Setup search result. It will not appear if you don't have Partner Telephony licenses.
- Follow the prompts on the
Create an Available Presence Status
So your agents can handle calls, apply the phone channel to at least one presence status. This gives your phone agents the ability to set their status to available and accept calls. You can create a new status or you can apply a phone channel to an existing status. Agent Workspace for Salesforce Voice (Agent for SCV) currently only supports Salesforce statuses, not NiCE CXone unavailable codes.
- In Salesforce, click Setup in the top right corner. Launch the Setup application.
- Search for Presence Statuses and select the Presence Statuses search result.
- Set an available status:
- If you want to create a new status:
- Click Add.
- Name the new status.
- If you want to edit an existing status, click the status that you want agents to use for phone calls.
- If you want to create a new status:
- Click to highlight Phone in the list of channels.
- Click >> to add Phone to the status.
- Click Save.
Create Contact Center
-
Save the NiCE CXone Call Center XML file to your desktop.
-
Right-click on the link above
-
Click Save link as
-
Save as an XML file to your desktop in a location you choose
-
-
Navigate back to the
-
Under step 3, next to Create Your Contact Center, click New.
-
In the window that appears, select NiCE CXone.
-
Upload the NiCE CXone Call Center XML file that you saved in step one.
After you upload the file, the new contact center will appear on the Partner Telephony Contact Centers page.
Create a Certificate in Salesforce
- In Salesforce, click Setup in the top right corner. Launch the Setup application.
- In the Setup navigation pane, search for Certificate and Key Management and select the Certificate and Key Management search result.
- Click Create Self-Signed Certificate.
- In the Label and Unique fields, enter NICE_Cxone_Service_Cloud_Voice.
- Select Exportable Private Key if you want to export your keys to a keystore for safekeeping.
- Select Key Size from the drop-down.
- Click Save.
- Click Download Certificate.
- Navigate to the downloaded NICE_Cxone_Service_Cloud_Voice.crt file on your computer.
- Right-click and select Open with > Notepad.
- Copy the public key and place it in the uploaded contact center that you created earlier in the set up process.
Add Agents to the Contact Center
- In the Setup navigation pane, search for Partner Telephony Contact Center and select Partner Telephony Contact Center.
- Select the NICE CXone for Service Cloud Voice contact center.
- Add agent user accounts.
- Scroll down to Contact Center Users. Click Add.
- Select the users you want to add, then click Done. The users then appear under Contact Center Users.
Apply Permissions
After you enable Voice, Salesforce automatically creates two permission sets:
- Contact Center Admin (Partner Telephony): Allow users to create and manage Voice contact centers.
- Contact Center Agent (Partner Telephony): Allow users to make and receive calls in Voice.
Assign both permission sets to your account and add agents to continue the Agent Workspace for Salesforce Voice (Agent for SCV) setup.
- In the Setup navigation pane, search for Permission Sets and select the Permission Sets search result.
- Select the Contact Center Admin (Partner Telephony) permissions set, then click Manage Assignments.
- Click Add Assignment.
- Check the box next to your name, then click Next.
- Click Assign.
- Click Permission Sets in the Setup navigation pane again and repeat the process for the Contact Center Agent (Partner Telephony) permissions set.
- Click Permission Sets in the Setup navigation pane again and select the Contact Center Agent (Partner Telephony) permissions set.
- Click Manage Assignment > Add Assignment.
- Check the box next each user each agent you want to add and click Next.
- Review the list of users and click Assign.
- Assign Presence Sync status to Role:
- In the Setup navigation pane, search for Profiles and select the Profiles search result.
- Under Enabled Service Presence Status Access, click Edit.
- Add from the Available Services Presence Statuses column to the Enabled Service Presence Statuses column.
- Click Save.
Remote Site Settings
-
Retrieve your domain URL.
-
In the Setup navigation pane, search for Domain and select the My Domain search result.
-
Copy the URL from the Current My Domain URL field. This will be used to construct the required Remote Site URLs based on your org type.
-
-
Construct Remote Site URLs:
-
Production:
-
https://{domain}--nice-cxone.vf.force.com
-
https://{domain}.my.salesforce-scrt.com
-
-
Sandbox:
-
https://{domain}.sandbox.my.salesforce-scrt.com
-
https://{domain}--nice-cxone.sandbox.vf.force.com
-
If the SCRT remote site setting is not added using the above URL formats, you may experience voice call record update issues.
-
-
In the Setup navigation pane, search for Remote Site Settings and select it.
- Click New Remote Site.
- Enter a Remote Site Name.
-
In the Remote Site URL field, enter the constructed domain URLs, as listed above.
- Repeat the steps to create all required remote site entries.
Add the Omni-Channel Widget to the Application
-
In the Setup navigation pane, search for App Manager and select the App Manager search result.
-
Find the app you want the Omni-Channel Widget to appear in. Click the drop-down arrow for that application and click Edit.
-
Click App Options and set Navigation Style to Console Navigation.
-
Click Utility Items (Desktop Only) and search for Omni-Channel. Click the search result to add it.
-
Click Navigation Items and search for Voice Calls. Click the search result to add it.
-
Click User Profiles to add profiles.
-
Click the arrow in the top left corner to leave the Lightning App Builder.
Enable Lightning Web Security
You must enable this Salesforce session setting so that:
-
Agents can save dispositions
 Result assigned by the agent or system at the end of a voice (disposition) or digital (status) interaction..
 -
You can enable launch indicators
Custom menu items configured by an administrator.. The remaining steps to enable launch indicators are found below.
-
In the Setup navigation pane, search for Session Settings and select Session Settings.
-
In the Lightning Web Security section, select the checkbox for Use Lightning Web Security for Lightning web components and Aura components.
-
Click Save at the bottom. Salesforce may take a few minutes to apply the change. If the issue continues:
-
Open Salesforce in an incognito browser window.
-
Log out of Salesforce.
-
Log back in.
-
Enable Launch Indicators
You can enable launch indicators from Studio in Agent Workspace for Salesforce Voice (Agent for SCV). If you have questions about Studio scripting, contact your account representative.
-
In the Setup navigation pane, search for Lightning App Builder and select Lightning App Builder.
-
Click New > Voice Extension > Next.
-
Use the Label field to name your new app and click Next > Finish.
-
In the left pane, under the Custom heading, you will see the app you just created. Click and drag it into the Lightning App Builder pane to the right.
-
Click Save > Activate.
- In the Setup navigation pane, search for Partner Telephony Contact Center and select Partner Telephony Contact Centers.
- Open your existing contact center and click Edit.
- In the Voice Extension drop-down, select the activated app.
- Click Save.
Enable Click2Jack
Clickjacking happens when attackers add malicious elements, such as buttons, to your site. When users click these elements, they are directed to the attacker's site.
Enabling Click2Jack helps protect you from clickjack attacks. It also prevents issues from Google third-party cookie deprecation.
-
In Salesforce, click Setup
 in the top right.
 -
Use the Quick Find box to search for Session Settings, then click Session Settings.
-
In the Trusted Domains for Inline Frames section, click Add Domain.
-
In the Domain field, enter https://mydomain.lightning.force.com. Replace mydomain with your Salesforce domain name. Click Save & New.
-
In the Domain field, enter https://mydomain.my.salesforce.com. Replace mydomain with your Salesforce domain name. Click Save.
Enabling Click2Jack may cause issues for non-agent Salesforce users. They may not be able to open lighting components or Visualforce pages if any of the following are assigned to them:
-
A NiCE CXone call center.
-
The NiCE CXone Softphone utility bar item.
-
A lightning app with NiCE CXone components.
-
A Visualforce page with NiCE CXone components.
Configure Screen Pops with INDICATE Studio Action
To enable the Show Custom Form Indication Action Types for the Legacy Salesforce Agent, you'll need to configure them in Desktop Studio.
- Log in to Desktop Studio and open the script you want to add screen pops to. For more information on INDICATE in Studio, please visit the NiCE CXone Help Center Studio Page.
- Arrange these actions so that Begin is linked to Reqagent. Connect Onanswer to Indicate using the same method.
- Double-click on the Indicate icon to open the configuration wizard. Complete the following to configure the Indicate settings:
- On the first screen of the prompt, select An agent handling a contact in the Select Recipient Category. Click Next.
- Verify that {ContactID} is inside the input field (in curly brackets). Click Next.
- Enter a unique identifier into the field. Select On. Click Next.
- Browse for an image to display as the icon using the dropdown menu. Click Next.
- In the input field, enter what you'd like to appear as the tooltip text when the user hovers over the indicator icon. Click Next.
- Under the Action Type, click Prompt the user with a web page like form (advanced). Click Next.
- In the white space, enter your desired HTML tags. You can click Preview to see what it looks like in real time. Once you like how it looks, click Next.
- On the final screen, review the settings you've selected, then click Finish.
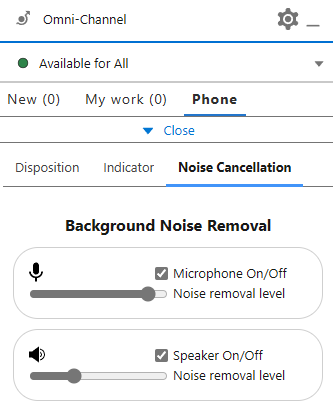
Enable Disposition, Indicator, and Noise Cancellation Tabs
You can configure three tabs to appear when agents click More at the bottom of Agent Workspace for Salesforce Voice (Agent for Service Cloud Voice):
-
Disposition: This tab allows agents to assign a Disposition, Tags, and Disposition Notes to a call.
-
Indicator: This tab displays configured indicators
Custom menu items configured by an administrator. to agents. -
Noise Cancellation: This tab allows agents to control AI Noise Cancellation features.
To enable this for your agents, follow these steps.