

Virtual Agent Hub allows you to manage the configuration apps for all of the virtual agents or bots your organization uses with NiCE CXone. This page describes how to manage virtual agent profile apps in Virtual Agent Hub. It does not provide details about how to set up and configure specific virtual agent providers.
Some configurations are different for every virtual agent provider. See the online help for the virtual agent you're using for details. The following links take you to the online help pages for each supported integration:
-
Online help for NiCE CXone native virtual agents:
- Cognigy
- NiCE CXone Autopilot Amelia or Omilia
-
Online help for natively-supported third-party virtual agents:
Add a Configuration App
Each virtual agent or bot you use with NiCE CXone must have a configuration app in Virtual Agent Hub. The app contains all of the configuration settings required for the virtual agent provider and NiCE CXone to communicate.
Some configurations are different for every virtual agent provider. When the steps below instruct you to refer to the NiCE CXone online help for the provider you're integrating with, refer to the appropriate online help page. See the list of links at the top of this page.
- In Studio, open or create a script and add a virtual agent action, if it doesn't contain one already.
- Double-click the virtual agent action to open Virtual Agent Hub.
-
Click Add Bot.
-
Enter a unique name to identify this virtual agent's configuration app in the Virtual Agent (Bot) Name field. You cannot change this name after you save the configuration app.
-
Under Select Bot Provider, click the provider for the virtual agent you're using with NiCE CXone. The options available depend on the licenses your organization has purchased. Unlicensed providers do not appear on the page.
-
Click Next.
-
Complete the fields on the Configuration page. The fields are different for each virtual agent provider. Refer to the NiCE CXone online help for the provider you're integrating with for details.
-
Click Next.
-
On the Voice page, select Text Only under Voice Integration Options if you're setting up a text virtual agent. If you're setting up a voice virtual agent, select the appropriate option for your integration. Some integrations have only one option, Turn by Turn Control. Other integrations have additional options. Refer to the NiCE CXone online help for the provider you're integrating with for details. See the list at the top of this section for more information.
-
Click Next when the Voice page options are configured.
-
On the Transcript page, select the option for whether you want transcript or intent information saved from conversations with this virtual agent. If you save this information, custom scripting is required to complete the setup of the feature.
 Learn more about fields in this step
Option Details Intent information only Select this option if you want to want to capture intent information only. Captured data is stored only for the duration of the interaction by default.
This option requires custom scripting.
Nothing Select this option if you don't want to capture conversation transcriptions or intent The meaning or purpose behind what a contact says/types; what the contact wants to communicate or accomplish. information. Transcript and intent information Select this option if you want to capture both transcript and intent data. Captured data is only stored for the duration of the interaction by default.
This option requires custom scripting.
Transcript only Select this option if you want to capture transcript information only. Captured data is stored only for the duration of the interaction by default. This option requires custom scripting.
-
Click Next.
-
Test the connection with the virtual agent provider.
-
Click Add. This saves the configuration settings. You can modify the settings later if needed.
Delete a Configuration App
When you delete a configuration app from Virtual Agent Hub, it does not affect the virtual agent configured with your virtual agent provider. However, any Studio scripts that are configured to use the app you're deleting will no longer work.
- In Studio, open or create a script and add a virtual agent action, if it doesn't contain one already.
- Double-click the virtual agent action to open Virtual Agent Hub.
-
Click the trash can
 next to the configuration app you want to remove.
 -
Click Yes to confirm removal of the selected app
Modify a Configuration App
You cannot modify a configuration app's name. To change the name you must delete the app and add a new one with a different name.
- In Studio, open or create a script and add a virtual agent action, if it doesn't contain one already.
- Double-click the virtual agent action to open Virtual Agent Hub.
-
Click the configuration app you want to modify on the left side of the page. To filter the list of apps, select the Media Type of the app you want to modify.
-
Change the settings on the Configuration, Voice, and Transcript pages as needed. Refer to the NiCE CXone online help for integrating with your virtual agent provider for information about completing these pages. See the list of links at the top of this page.
-
On the right side of the page, test the updated settings.
-
Click Save.
Clone a Configuration App
If you have multiple virtual agents that are similar, you can clone a configuration app and modify it.
- In Studio, open or create a script and add a virtual agent action, if it doesn't contain one already.
- Double-click the virtual agent action to open Virtual Agent Hub.
-
Click the configuration app that you want to clone.
-
On the properties page, select Clone from the more options
 drop-down list.
 -
Enter the New Virtual Agent (Bot) Name and click Clone. You cannot modify this name after you save the app. The properties page for the cloned configuration app appears.
-
Modify the details for the cloned app as needed. Refer to the NiCE CXone online help for integrating with your virtual agent provider for information about completing these pages. See the list of links at the top of this page.
- Click Save.
Test Your Virtual Agent
Required permissions : View Scripts, Create/Edit Scripts
You can test many aspects of your virtual agent to make sure everything works as intended. You can run tests from the virtual agent app's properties page in Virtual Agent Hub. When testing, you can:
- Verify that the virtual agent app is correctly configured to communicate with the virtual agent provider.
- Add custom payload JSON to test the virtual agent's handling of custom payload data.
- Trigger a welcome intent event to test how the virtual agent begins a conversation.
- Trigger a custom intent event to test any custom events you've created for your virtual agent.
- Trigger a timeout event to test how the virtual agent responds when the contact times out.
- Test how the virtual agent handles DTMF Signaling tones that are generated when a contact presses a key on the telephone keypad. input.
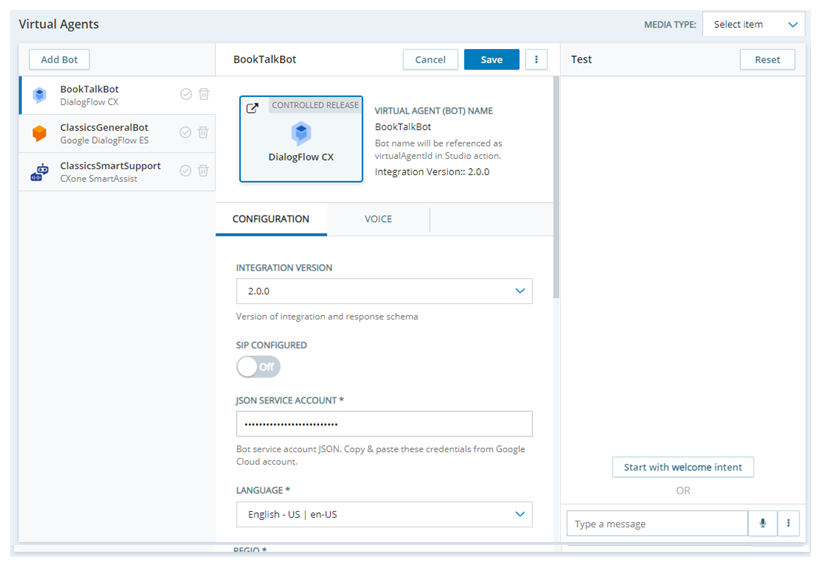
The following image is an example of the properties page for a virtual agent app in Virtual Agent Hub. It shows the Configuration and Voice tabs and the Test pane.
- In Studio, open or create a script and add a virtual agent action, if it doesn't contain one already.
- Double-click the virtual agent action to open Virtual Agent Hub.
- Click to select the configuration app for the virtual agent you want to test from the list on the left.
-
In the Test pane, enter a test message in the Type a message field and press Enter to send it. You can also click Microphone
 and speak into your computer's microphone.
 - Click Start with welcome intent to start a test conversation from the beginning. The virtual agent responds with its default welcome message. You can enter test messages.
-
Click More Options
to test other aspects of your virtual agent.Learn more about fields in this step
Field Details Add Custom Payload JSON Select to test sending custom payload JSON to your virtual agent.
Enter the custom payload in the Add Custom Payload JSON text box that appears on the Test + Add page. Press Enter after each line.
Send a test message when you're ready to test the custom payload. When you're finished testing custom payload, click Close on the Add Custom Payload JSON pane.
Trigger Welcome Intent Event Select to test the default Welcome intent The meaning or purpose behind what a contact says/types; what the contact wants to communicate or accomplish.. The virtual agent sends the welcome message. Enter a message to respond. Trigger Custom Intent Event Select to test a custom intent event. Enter the Event Name in the pop-up that appears and click Trigger. The virtual agent sends the message for the intent you entered. Send a response to test the intent. Trigger Timeout Event Select to view the default timeout intent. The virtual agent sends the timeout response message that it's configured with. DTMF Input Select to test your voice virtual agent's response to DTMF Signaling tones that are generated when a contact presses a key on the telephone keypad. tones. Enter DTMF Characters and click Input to see the virtual agent's response to those characters. - Click Reset to start your test again.
-
If you need to make changes based on the results of your testing, you can:
- Modify the Studio scripts for the virtual agent.
- Modify the configuration settings in the virtual agent's app in Virtual Agent Hub.
- Modify the virtual agent's configuration settings in the provider's console. Click the large square button on the app properties page in Virtual Agent Hub. The example at the beginning of this section shows the Google Dialogflow CX app with the provider button. It has the
 icon on it to indicate that the link opens an external site.
- Test the virtual agent thoroughly after each change to your scripts or any configuration settings.
- When you're finished testing, click Close.