

Prerequisites
To use Google Dialogflow CX virtual agents![]() A software application that handles customer interactions in place of a live human agent. with NiCE CXone, you need:
A software application that handles customer interactions in place of a live human agent. with NiCE CXone, you need:
-
A Google Cloud Platform account.
-
A Google Dialogflow CX virtual agent configured and trained to provide responses to your contacts' requests. To complete integration in NiCE CXone, you need the virtual agent name from the virtual agent's settings in the Google Dialogflow CX console.
Alpha Visibility in Google
Alpha visibility is a Google program that provides Google Cloud Projects access to features that aren't otherwise available. Alpha visibility is not required to use Dialogflow CX with NiCE CXone. However, there are some cases where you may need to have alpha visibility enabled. Alpha visibility is required if you want:
-
To have the last user utterance returned from the Dialogflow virtual agent along with the intent information. You can view this information in a script trace. If the
-
To have the current page returned as part of the response's custom payload.
-
To have the Dialogflow transcript field returned as part of the response payload.
Create a Script
Required permissions : View Scripts, Create/Edit Scripts
You need at least one Studio script to route interactions to your virtual agent. Follow the script guidelines. ![]() A medium, such as voice, email, and chat, through which a contact connects with an intended recipient..
A medium, such as voice, email, and chat, through which a contact connects with an intended recipient..
If you're setting up a voice virtual agent and using a NiCE CXoneText-to-Speech (Cloud TTS Hub) service, include the CLOUD TTS action in your script.
You can learn more about Studio scripting in the Fundamentals and Technical Reference Guide sections of the online help.
- Dialogflow CX doesn't use contexts to pass data to Dialogflow intents
 The meaning or purpose behind what a contact says/types; what the contact wants to communicate or accomplish. like Dialogflow ES does.
 -
You can pass custom data to Dialogflow CX using JSON key-value pairs. In a Snippet action in your script, create a dynamic customPayload object and add the key-value pairs to it. For example:
DYNAMIC customPayload customPayload.ani = ani customPayload.contactID = contactId customPayload.masterContactId = masterId customPayloadJSON = "{customPayload.asJSON()}" - In the
- Pass the customPayload JSON to the virtual agent using the
 for Google Dialogflow CX.
 - Data passed through
- Do not nest an object within the
- To pass custom data from your Dialogflow CX virtual agent back to the script, use the Custom Payload field in the Dialogflow CX console. Make sure you're in the console for the virtual agent you're using with NiCE CXone. Map this to your script using the customPayloadVarName (out) variable in the VOICEBOT EXCHANGE or TEXTBOT EXCHANGE Studio action in your script. For example, you can use this to set the next prompt's behaviors.
-
To pass custom data to Dialogflow CX from the script, use session_params in the customPayload object in a Snippet action. For example:
DYNAMIC customPayload
customPayload.session_params.name = "Winnie le Pooh"
customPayload.session_params.job = "Food critic"
customPayload.session_params.location = "Hundred Acre Wood"
Access the session parameters in the Dialogflow CX agent intent using the following syntax:
$session.params.name = Winnie Le Pooh
$session.params.job = Food critic
$session.params.location = 100 Acre Wood
Session parameters are only used with Dialogflow CX virtual agents. To achieve a similar result with Dialogflow ES, use contexts.
-
Configure speech context hints and a custom conversation ID to transfer the conversation to a different Dialogflow CX virtual agent in the Custom Payload snippet.
- To configure how long the virtual agent waits when the contact pauses while speaking, add the maxPostEnergySilenceMSparameter to the Next Prompt Behaviorsor Default Next Prompt BehaviorsSnippet action.
Add an App to Virtual Agent Hub
Required permissions : View Scripts, Create/Edit Scripts
Adding a configuration app to Virtual Agent Hub establishes the connection between NiCE CXone and your virtual agent provider.
- In Studio, open or create a script and add a virtual agent action, if it doesn't contain one already.
- Double-click the virtual agent action to open Virtual Agent Hub.
- Click Add Bot.
-
Enter a Virtual Agent (Bot) Name and click Dialogflow CX in the list of virtual agent providers.
-
Click Next.
-
Complete the fields in the configuration form and click Next. You can find details about this form in the Configuration Page Details section on this page.
-
Click Next.
-
If you're setting up a text virtual agent, select Text Only (No Voice Support) on the Voice page. If you're setting up a voice virtual agent, see the Configure Voice Integration Options section on this page.
-
On the Transcript page, select the option for whether you want the conversation transcript and intent information captured. If this tab is not available, the feature is not enabled for your tenant
High-level organizational grouping used to manage technical support, billing, and global settings for your NiCE CXone system.. Contact your account representative for more information about this feature. This option is only available for text virtual agents and utterance-based voice virtual agents. Learn more about fields in this step
Option Details Intent information only Select this option if you want to want to capture intent information only. Captured data is stored only for the duration of the interaction by default.
This option requires custom scripting.
Nothing Select this option if you don't want to capture conversation transcriptions or intent The meaning or purpose behind what a contact says/types; what the contact wants to communicate or accomplish. information. Transcript and intent information Select this option if you want to capture both transcript and intent data. Captured data is only stored for the duration of the interaction by default.
This option requires custom scripting.
Transcript only Select this option if you want to capture transcript information only. Captured data is stored only for the duration of the interaction by default. This option requires custom scripting.
-
Click Next.
-
On the Test + Add page, you can test your bot's connection by sending voice or text prompts. If your test messages don't work, click Back to return to the Configuration page and verify the settings.
-
Click Add.
Google Dialogflow CX Configuration Page Details
Use the information in the following table when completing the Configuration page. You see this page when adding an app in Virtual Agent Hub
|
Field |
Details |
|---|---|
| Integration Version |
Select the version of Virtual Agent Hub that you want to use. This option allows you to use a previous version of Virtual Agent Hub until you're ready to switch to a newly-released version. The available versions are:
|
| SIP Configured | Do not enable this option. NiCE CXone does not support a SIP backchannel configuration with Google Dialogflow CX. |
| JSON Service Account |
The service account key file you created and downloaded from your Google Cloud Console. Copy and paste the entire contents of the key file into this field, including the curly braces surrounding the key. This field is visible only if you're using your own Google Dialogflow CX account. If the field is not visible when it should be, ask your NiCE CXone account representative to review your system's settings. The service account key is a JSON object similar to the following example: { "type": "service_account", The JSON Service Account must have the Dialogflow API Admin role |
|
Language |
The language you want this virtual agent to use. This is the language that the virtual agent understands. This is a required field. |
| Region |
The region where the Google Dialogflow CX virtual agent you're adding to Virtual Agent Hub is located. This is a required field. |
| Agent |
The name of the Google Dialogflow CX virtual agent you want to add to Virtual Agent Hub. You can find the name in the virtual agent's Dialogflow CX console and click Copy Name to copy it to the clipboard. This is a required field. |
| Environment |
Enter the GUID of the environment you want this Dialogflow app to use. In Dialogflow CX, different versions of the same virtual agent are called environments. You can find the GUID for your environments in the Google Dialogflow CX console in the agent settings. |
| Perform Output TTS |
Click the slider to On if you want to use the Google Dialogflow CX text-to-speech (TTS If you don't want to use the Google Dialogflow CX TTS service, leave this field set to Off. You can use a NiCE CXoneText-to-Speech (Cloud TTS Hub) service. If this is a text virtual agent, leave this option disabled. |
| Timeout Event Handler | Name of the Google Dialogflow CX event you want to trigger on timeout. |
| DTMF Break Out Pattern | If the specified characters are pressed, the script skips straight to the OnDTMFBreakout branch. |
| Perform Sentiment Analysis |
Click the slider to On if you want to receive the sentiment analysis results from Google. This option requires that you have this option enabled in your Google Cloud project. You are responsible for configuring how the sentiment analysis data is used with your virtual agent. |
| External Provider Timeout |
Enter the number of seconds you want the script to wait for a response from |
| Conversation Profile |
Enter the ID of the Dialogflow CX conversation profile you want this Virtual Agent Hub profile to use. If you don't specify an ID, the system creates a new profile. You can find the conversation profile ID in your Google project management console. If you change the Agent or Environment fields, the Conversation Profile field clears. This is because conversation profiles are specific to the agent and environment. |
Configure Google Dialogflow CX TTS Output
Required permissions : View Scripts, Create/Edit Scripts
Complete the steps in this section if you want to use the Google TTS service. The fields in the following image appear when you enable the Perform Output TTS option on the Dialogflow CX Configuration page in Virtual Agent Hub.
- In Virtual Agent Hub, add a new configuration app and configure it according to the steps in Add an App to Virtual Agent Hub section on this page.
- EnablePerform Output TTS.
-
To use a custom voice model, enable Use Custom Voice and enter the name of the AutoML model you want to use in the Custom Voice Model field.
Learn more about the fields in this step
Field
Details
Use Custom Voice Allows you to use an AutoML (automated machine learning) model to synthesize a custom voice for your bot. Dialogflow uses this voice instead of a TTS voice. If you use this option, enter the name of the AutoML model that you want to use in the Custom Voice Model field that appears.
This field is only visible when Perform TTS Output is enabled.
-
If you want to use a Google voice model, select the TTS Voice Name from the drop-down.
-
Select the machine learning Model and Model Variant that you want the Google TTS services to use when synthesizing speech.
Learn more about the fields in this step
Field
Details
Model Select the machine learning model that you want the transcription service to use when transcribing the audio. These models have been trained to recognize speech from specific audio types and sources.
Available options are:
- Command and Search: Use when transcribing shorter audio clips, such as commands or voice search. Consider using Latest Short instead.
- Default: Use when the audio doesn't fit the other models. It can transcribe any type of audio, but results may be lower quality for some types.
- Latest Long: Use with long-form content such as spontaneous speech or conversations.
- Latest Short: Use when the utterances are a few seconds long, such as commands. Consider using this model instead of Command and Search.
- Medical Conversation: Use when transcribing a conversation between a medical professional and a patient.
- Medical Dictation: Use when transcribing notes dictated by a medical professional.
- Phone Call: Use for transcribing the audio from a phone call.
- Video: Use when transcribing audio that has multiple speakers, such as from video clips or podcasts. If Video isn't available in the language you need, use Latest Long instead.
Model Variant Select the variant of the selected Model you want the
Refer to the
For Phone Call models, the recommended variant is Enhanced.
Available options for this field are:
- Best Available: Select if you want Dialogflow to use the enhanced model if it's available for the selected model. If it's not, the standard model is used.
- Enhanced: Select to use the enhanced model. If an enhanced model isn't available for the selected Model, Dialogflow uses the standard model.
- Standard: Select to use the standard model even if an enhanced model is available.
- Unspecified: Select if you aren't sure which variant to use. Dialogflow defaults to the best available variant of the selected model.
-
To add silence to the start of the virtual agent's audio response, enter the number of milliseconds of silence to add in the Add Leading Silence field. The recommended amount of silence is 500 milliseconds.
-
Enter the Speaking Rate, Pitch, and Volume Gain to configure how you want the TTS voice to sound.
Learn more about the fields in this step
Field
Details
Speaking Rate Click + or – to change how fast the TTS voice speaks. The rate can be between 0.25 and 4.0. A normal speaking rate is 1.0. A rate of 2.0 is twice as fast as normal and 0.5 is half as fast as normal. The default is 0.
This field is only visible when Perform TTS Output is enabled.
Pitch Click + or – to change the pitch of the TTS voice. Pitch is the highness or lowness of the voice. The default is 0. The maximum is 20.0 and means the voice is 20 semitones higher than the default. The minimum is -20.0 and means that the voice is 20 semitones lower than the default.
This field is only visible when Perform TTS Output is On.
Volume Gain Click + or – to change the volume of the TTS voice measured in decibels (dB). The default is 0. The range is 16.0 to -96.0. A gain of +6.0 plays at approximately twice the volume of the default. Do not exceed +10 dB.
This field is only visible when Perform TTS Output is On.
- Return to the Add an App to Virtual Agent Hub section on this page to finish adding the configuration app.
Configure Voice Integration Options
Required permissions : View Scripts, Create/Edit Scripts
- In Virtual Agent Hub, add a new configuration app and configure it according to the steps in the Add an App to Virtual Agent Hub section on this page.
-
Click Next on the Configuration page.
- On the Voice page under Voice Integration Options, select Turn by Turn Control (
-
Under Transcription Options, select the option for the transcription service you want to use.
Learn more about fields in this step
Field Details Transcription Options Select the service you want to use for transcription:
- Use bot account transcription: Select this if you want to use your virtual agent provider's transcription service. Audio from the contact's utterances is sent to the provider before being transcribed.
- Use Turn-by-Turn Transcription profile: Select this if you want to use a NiCE CXone transcription profile. You can learn more about this option on the NiCE CXone Turn-by-Turn Transcription help page.
- If you choose to use a Turn-by-Turn Transcription profile, click Turn-by-Turn Transcription Profile to select the one you want to use. Click Add New Turn by Turn Transcription Profile to create a new profile.
- Under Transcription options, select a Transcription Profile or click Add New Turn by Turn Transcription Profile to create a new profile.
- Click Next.
- Return to the Add an App to Virtual Agent Hub section on this page to finish adding the configuration app.
Assign the Google Dialogflow CX App to an Action
Required permissions : View Scripts, Create/Edit Scripts
When the virtual agent![]() The meaning or purpose behind what a contact says/types; what the contact wants to communicate or accomplish. app is set up and configured in Virtual Agent Hub, you need to assign it to the virtual agent action in your script. This connects the action and the script to your virtual agent provider.
The meaning or purpose behind what a contact says/types; what the contact wants to communicate or accomplish. app is set up and configured in Virtual Agent Hub, you need to assign it to the virtual agent action in your script. This connects the action and the script to your virtual agent provider.
- In Studio, open the script you want to modify.
-
If you haven't done so already, click the Tools tab, expand the Automation and AI category, and add the virtual agent action you want to use. Be sure to put it in the correct location in your script. If you don't see the action you expect, verify that your script media type is correct. For example, if you're creating a script for a voice virtual agent, the script must be a phone script.
-
-
In the left column, locate the virtual agent profile that you want to assign to the action and click the checkmark
 next to it.
An alternative to using the checkmark is to create a variable in your Studio script. Use the variable to pass the virtual agent app name into the Virtual Agent ID property of the Virtual Agent Hub action you're using.
- Click Close.
Change the Transcription Profile
Required permissions : View Scripts, Create/Edit Scripts
A transcription profile allows you to use a different transcription service from the one the virtual agent provider offers. Each virtual agent can have one transcription profile. You only need to follow the steps in this section if you are working with a voice virtual agent and need to change the transcription profile.
- In Studio, open or create a script and add a virtual agent action, if it doesn't contain one already.
- Double-click the virtual agent action to open Virtual Agent Hub.
- In the list of virtual agent configuration apps on the left side of the Virtual Agent Hub page, click the one you want to modify.
- In the center of the virtual agent app properties page, click the Voice tab.
-
Under Transcription Options, select Use Turn-by-Turn Transcription Profile if it isn't already selected.
-
Select the Turn by Turn Transcription Profile you want this virtual agent integration to use. If the option you want to use isn't there, you can add it.
- Click Save.
- Test your transcription service by using the microphone option in the Test section of your virtual agent app properties page.
Test Your Virtual Agent
Required permissions : View Scripts, Create/Edit Scripts
You can test many aspects of your virtual agent to make sure everything works as intended. You can run tests from the virtual agent app's properties page in Virtual Agent Hub. When testing, you can:
- Verify that the virtual agent app is correctly configured to communicate with the virtual agent provider.
- Add custom payload JSON to test the virtual agent's handling of custom payload data.
- Trigger a welcome intent event to test how the virtual agent begins a conversation.
- Trigger a custom intent event to test any custom events you've created for your virtual agent.
- Trigger a timeout event to test how the virtual agent responds when the contact times out.
- Test how the virtual agent handles DTMF Signaling tones that are generated when a contact presses a key on the telephone keypad. input.
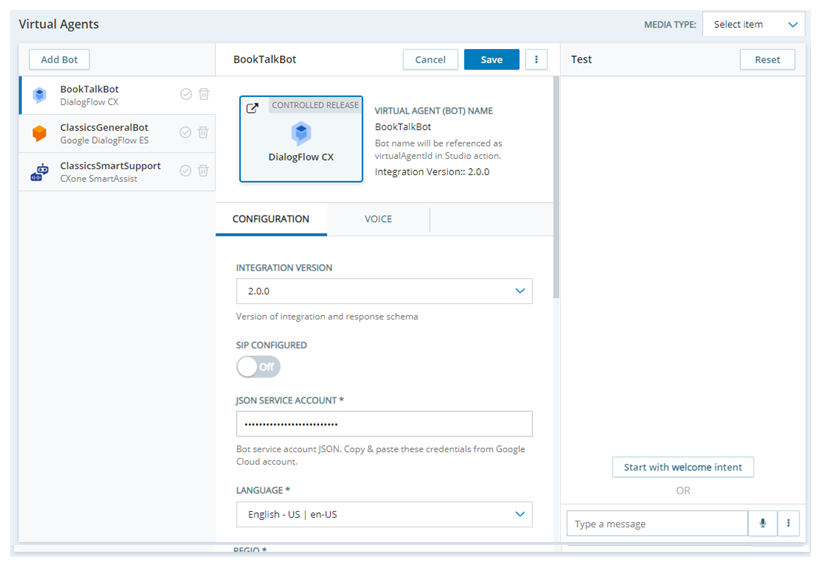
The following image is an example of the properties page for a virtual agent app in Virtual Agent Hub (not Dialogflow CX). It shows the Configuration and Voice tabs and the Test pane.
- In Studio, open or create a script and add a virtual agent action, if it doesn't contain one already.
- Double-click the virtual agent action to open Virtual Agent Hub.
- Click to select the configuration app for the virtual agent you want to test from the list on the left.
-
In the Test pane, enter a test message in the Type a message field and press Enter to send it. You can also click Microphone
 and speak into your computer's microphone.
 - Click Start with welcome intent to start a test conversation from the beginning. The virtual agent responds with its default welcome message. You can enter test messages.
-
Click More Options
 to test other aspects of your virtual agent.Learn more about fields in this step
Field Details Add Custom Payload JSON Select to test sending custom payload JSON to your virtual agent.
Enter the custom payload in the Add Custom Payload JSON text box that appears on the Test + Add page. Press Enter after each line.
Send a test message when you're ready to test the custom payload. When you're finished testing custom payload, click Close on the Add Custom Payload JSON pane.
Trigger Welcome Intent Event Select to test the default Welcome intent The meaning or purpose behind what a contact says/types; what the contact wants to communicate or accomplish.. The virtual agent sends the welcome message. Enter a message to respond. Trigger Custom Intent Event Select to test a custom intent event. Enter the Event Name in the pop-up that appears and click Trigger. The virtual agent sends the message for the intent you entered. Send a response to test the intent. Trigger Timeout Event Select to view the default timeout intent. The virtual agent sends the timeout response message that it's configured with. DTMF Input Select to test your voice virtual agent's response to DTMF Signaling tones that are generated when a contact presses a key on the telephone keypad. tones. Enter DTMF Characters and click Input to see the virtual agent's response to those characters. - Click Reset to start your test again.
-
If you need to make changes based on the results of your testing, you can:
- Modify the Studio scripts for the virtual agent.
- Modify the configuration settings in the virtual agent's app in Virtual Agent Hub.
- Modify the virtual agent's configuration settings in the provider's console. Click the large square button on the app properties page in Virtual Agent Hub. The example at the beginning of this section shows the Google Dialogflow CX app with the provider button. It has the icon on it to indicate that the link opens an external site.
- Test the virtual agent thoroughly after each change to your scripts or any configuration settings.
- When you're finished testing, click Close.