|
|
Loads a custom data row from a table defined by a worksheet in an Excel spreadsheet, then stores the values as individual script variables. You can upload a spreadsheet through the action and select the worksheet to be read from. The worksheet is stored as a Base 64-encoded string in the script. |

Dependencies
- The spreadsheet that you upload to use with this action is stored as a Base 64-encoded string in the script. It is not stored on a file server.
- You cannot edit the data after you upload the file. Instead, you must refresh the data by uploading a new version. This can only be done by the Studio user who originally uploaded the file. If the user is not available to update the file, you must delete the action from the script and upload a new version. See the Use the Action section on this page for details on how to refresh the data.
- The larger the spreadsheet, the greater the chances of this action causing issues on the NiCE CXone servers. The number of rows and columns the spreadsheet has impacts the overall size of the file. The maximum number of rows is in the range of 10,000-20,000, depending on the number of columns and the amount of data in the cells. Be cautious when using this action with spreadsheets with a number of rows in that range. You may want to consider using a different solution, such as a database.
- When reading from the spreadsheet,
- Column names cannot include spaces.
Supported Script Types
|
|
|
|
|
|
|
|
|
|
Generic |
Chat | Phone | Voicemail | Work Item | SMS |
|


Input Properties
These properties define data that the action uses when executing.
These properties are automatically completed when you use the wizard to load a spreadsheet.
|
Property |
Description |
|---|---|
|
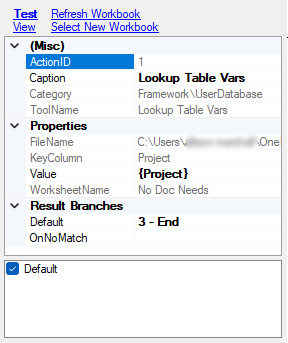
Caption |
Enter a short phrase that uniquely identifies this action in the script. The caption appears on the script canvas under the action icon. |
| Value | The value matched to the key column used in deciding which data row to retrieve. |
| File Name | The name of the spreadsheet file the worksheet was loaded from. Used by the Refresh option when re-loading the spreadsheet. |
| Worksheet Name | The name of the worksheet selected to use with the action. Used by the Refresh option when reloading the workbook. |
| Key Column | The name of the key column on the selected worksheet. Used by the Refresh option when re-loading the workbook. |
Result Branch Conditions
Result branch conditions allow you to create branches in your script to handle different outcomes when an action executes.
|
Condition |
Description |
|---|---|
|
Default |
Path taken unless the script meets a condition that requires it to take one of the other branches. It is also taken if the action's other branches are not defined. |
|
NoMatch |
Path taken when the action cannot identify the custom data row from the defined table. |
Use the Action
- Add the
- Double-click
- Click Next to accept the default option Private, Single-Use Look-up Table. The other option is not currently supported.
- Select the spreadsheet you want the action to use and click Open.
- If the spreadsheet contains multiple worksheets, select the worksheet you want the action to read from and click Next.
- Select the column name you want to use as the lookup key and click Next.
- Review your choices and click Next. The action encodes the selected worksheet and adds the encoded string to the script file.
- Click Finish.
Refresh the Data
If the data changes, you can refresh the data stored in the script. This must be done with the same user account and on the same computer that originally added the file.
-
Right-click on
- Click Refresh Workbook.