

This page is for Cloud Storage in AWS. If you use Cloud Storage Cloud Storage in Azure, see the Azure storage section of the Cloud Storage Services online help.
Instead of the S3 bucket that NiCE CXone provides by default, you can use your own Amazon S3 bucket to store and retrieve your files in Cloud Storage Services. You cannot use custom storage if you plan to use, or already use, a custom AWS KMS key.
Custom storage will not allow you to:
- Save or remove playable files in your storage. Calls are encrypted, have a GUID for a file name, and can only be played using NiCE CXone.
- Use your own long-term or glacier storage. That disables your ability to retrieve your files in NiCE CXone for playback.
- Use SEA or APIs to pull unencrypted files off the NiCE CXone platform.
See the custom storage overview page for more details about custom storage limitations,
You can either:
-
Create a new S3 bucket that's already configured for use with Cloud Storage Services.
-
Manually configure your existing S3 bucket to work with Cloud Storage Services.
The CloudFormation template is the preferred configuration method. For either method, you need contact your account representative to turn on custom storage for your system and to give you the CloudFormation template for your region.
Complete each of these tasks in the order given.
Automatically Configure Your S3 Bucket on Creation
Use the NiCE CXone CloudFormation template to create a new S3 bucket that's already configured for use with Cloud Storage Services. The CloudFormation template is a JSON file that specifies the resources that you want in your stack.
If you want to use an existing bucket, skip this task and manually configure it for use with Cloud Storage Services instead.
-
Contact your account representative to enable custom storage and to ask for the CloudFormation template for your region. Fill in the template.
You can set up custom storage in an AWS region that differs from your NiCE CXone hosted region. However, if you use FedRAMP, you should create your custom storage location in the same region as your NiCE CXone hosted region to comply with the regulatory requirements.
-
Log in to the Amazon S3 console at https://console.aws.amazon.com/s3/.
-
Click CloudFormation.
-
Select the region for the bucket.
-
Click Create Stack.
-
Under Choose a template, select Upload a template to Amazon S3. Click Browse. Select the CloudFormation template you received from your account representative.
-
Click Next.
-
Enter a Stack name and a CustomerBucketName. The CustomerBucketName can usually be anything you want. However, if you want to host your local storage in your AWS account, your bucket name must follow these conventions, with <BUID> being your business unit
 High-level organizational grouping used to manage technical support, billing, and global settings for your NiCE CXone system. or billing ID:
 Region Bucket Name US West (Oregon) ic-storageservices-cs-ao-<BUID> Europe (Frankfurt) ic-storageservices-cs-af-<BUID> Asia Pacific (Sydney) ic-storageservices-cs-aa-<BUID> Contact your account representative if you need help finding the correct regional code.
-
Save the bucket name somewhere so you can use it during the NiCE CXone setup steps.
-
Click Next. Click Next again.
-
Click Create. Stay on the page until the stack Status is CREATE_COMPLETE. If the stack deployment fails, follow these steps:
- Select the stack.
- Click Actions > Delete Stack.
- Restart the process to create a new stack.
If you need more help with this process, see the CloudFormation guide in the AWS documentation ![]() .
.
Manually Configure Your Own S3 Bucket for Cloud Storage Services
Use parts of the NiCE CXone CloudFormation template to configure your existing S3 storage bucket for use with Cloud Storage Services. The CloudFormation template is a JSON file that specifies the resources that you want in your stack.
If you set up a new S3 bucket with the CloudFormation template, skip the tasks in this section and move on to enabling custom storage for NiCE CXone.
Complete each of these tasks in the order given.
Apply S3 Policy on Custom Storage Bucket
-
Contact your account representative to enable custom storage and to ask for the CloudFormation template for your region. Fill in the template.
You can set up custom storage in an AWS region that differs from your NiCE CXone hosted region. However, if you use FedRAMP, you should create your custom storage location in the same region as your NiCE CXone hosted region to comply with the regulatory requirements.
- Sign in to the Amazon S3 console at https://console.aws.amazon.com/s3/.
- Click Services.
- In the Bucket name list, find the name of the bucket that you want to use for Cloud Storage Services. Click it.
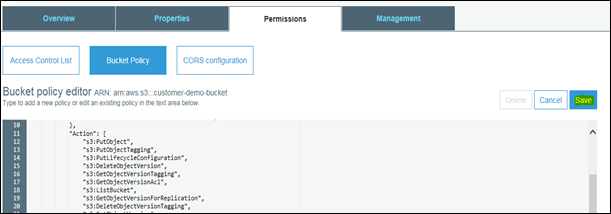
- Click the Permissions tab.
- Click Bucket Policy.
-
Using the policy contained in the CloudFormation template you received earlier, update the policy document in the Bucket policy editor:
-
If your custom storage bucket doesn't have an existing policy, copy the policy in as-is, replacing all references to the bucket ID with your unique bucket ID.
-
If your custom storage bucket has an existing policy, merge the policy in the existing policy, replacing all references to the bucket ID with your bucket ID.
-
-
Click Save.
Apply Tags to the S3 Bucket
Tags help you keep files organized in your S3 bucket. Use the following steps to create the tags that are required for use with Cloud Storage Services.
- Back on the Amazon S3 console home page, click Properties.
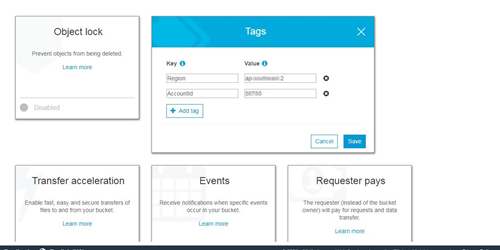
- Click Tags.
- Click Add tag. Create a key-value pair with Region as the Key and the appropriate region name as the Value; for example, us-west-2. The region should be the same as you specified when you created the S3 bucket.
- Click Add Tags again. Create a key value pair with AccountId as the Key and your AWS account ID as the Value; for example, 123456. You can find your account ID using these steps:
- On the Amazon S3 console home page, click Services.
- Search for iam. Open the first link.
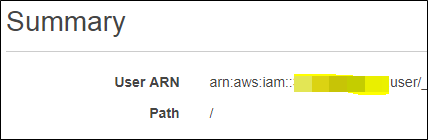
- Click Users.
Open any existing user. Copy the Account ID from the User ARN. See the highlighted area of the following image for guidance.
- Click Save.
Configure Custom Storage in NiCE CXone
Required permissions: Life Cycle Management Edit
When custom storage is enabled for your system, you must manage the lifespan of the files using AWS settings instead of NiCE CXone settings. Because of this, once you've enabled custom storage, the time to live (TTL) settings are no longer available on the LIfe Cycle Management page of NiCE CXone.
- In NiCE CXone, click the app selector
 and select Admin.
 - Go to Cloud Storage > Life Cycle Management.
- Click the Custom Storage Configuration tab.
- Select Enable Custom Storage.
-
For the
-
For the
-
Click
Maintain Your Custom Storage Setup
Use this section to manage your custom storage configuration after it's set up.
Edit Deployed Custom Storage CloudFormation Stack
-
Select the stack.
-
Click Actions > Update Stack.
-
Edit the parameters you need to update.
Disable Custom Storage in NiCE CXone
Required permissions: Life Cycle Management Edit
Once you choose AWS or Azure as your custom storage type, you cannot switch to the other. However, you can turn off custom storage.
- Click the app selector and select Admin.
- Go to Cloud Storage > Life Cycle Management.
- Click the Custom Storage Configuration tab.
- Clear the Enable Custom Storage checkbox.
-
Click