Adding a Metric Widget to a Dashboard
Overview
Metric widgets capture data from KPIs or metrics and present it in a variety of ways. You can use these widgets for a single value, or compare multiple values for two different metrics in a chart. Measures used in metrics are tagged with descriptive keywords (tags) in the system so you can find them.
For more information, see Metric Widgets.
Adding metric widgets to a dashboard:
- Click the lock icon above the numbered list to unlock the Dashboard page.
- Click Add Content.
- Click Add Metric Widget and drag onto the dashboard.
- Select Single data point or Multiple data points or compare data.

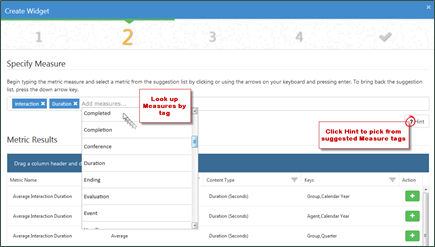
- Specify the metric(s) or measure(s) you want to include in the widget. You do not have to know the tags of measure beforehand (clicking in the field will reveal some suggested tags). For more guidance, you can click the Hint button to display suggestions.
- Click Next.
- Configure the keys for the specified metrics. This screen of the wizard looks different depending on the keys associated with the metric you are configuring. For more information, see Configuring Metric Keys.
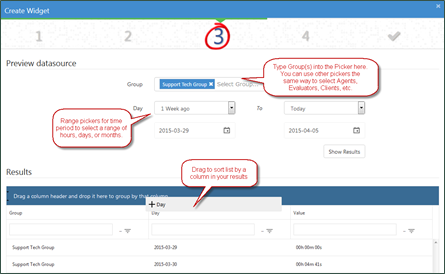
- Optional: To preview the data for your selection(s), click Preview Results.
- Click Next.
- Select the presentation options for the widget. For more information, see Metric Widget Presentation Options, the sections on configuring radial gauges, linear gauges, or charts, or any combination of these.
- Click Save.
If the metric has a defined goal or trend, you will see Show Available Goals and Show Trend options for the widget.