You can manage the recordings available to you in the Recorded Interactions list. For example, you can put recordings into categories and export them to email or by downloading them. There are additional tasks you can perform when you work with recordings.
Categorize Recordings
Categories allow you to organize recordings into relevant groupings for future reference. If there are not any subcategories in the parent categories you want to use for your recordings (Public, Private, and Shared), you must create some before you can categorize recordings.
If you intend to keep categorized recordings indefinitely, you may need to change the archive action for them so they aren't purged from Uptivity when the system performs the automated archival actions as configured by the Uptivity administrator.
Create a Category
- In the NICE Uptivity Web Portal, click Interactions List.
- Click Categories in the Quick Filters menu on the left side of the page.
-
Click the type of category you want to create.
Learn more about the fields in this step

Field
Description
Private Categories Can be seen only by their creator, and only the creator can add or remove recordings from a private category. Private categories are available on the Recorded Interactions page. Public Categories Can be seen by any user with access to the Recorded Interactions list. However, users can see only the calls within a public category for the QA Groups
A way to organize Agents, usually by department. and ACD Group(s)The group setting in your ACD/PBX (for example, hunt group, skill group, or labor group). to which they have access. Only the creator of a public category can add calls to or remove calls from a public category. Public categories are available on both the Recorded Interactions page.Shared Categories Can be seen by any user with access to the Recorded Interactions list, and any user can add calls to or remove calls from a shared category. However, users can see only the calls within each subcategory for the QA Groups and ACD Group(s) to which they have access. Shared categories are available only on the Recorded Interactions page. - Click New.
- You can change the Parent Category.
- Enter a name for the category in the Title field.
- Click OK.
Categorize a Recording
- In the NICE Uptivity Web Portal, click Interactions List.
- Click Categories in the Quick Filter menu.
- Click the arrow to expand the parent category that contains the category you want to put the recording into.
- In the Recorded Interactions list, click and drag the recording you want to categorize to the quick filter menu, and drop it in the desired category.
Delete Recording from Category
- In the NICE Uptivity Web Portal, click Interactions List.
- Click Categories in the quick filter menu.
- Click the name category that contains the recording you want to remove. The recordings in the selected category appear in the Recorded Interactions list.
- Locate the recording you want to delete.
-
Click and drag the recording from the Recorded Interactions list to the same category where's currently categorized. For example, if you want to remove a call from the Good Sale category, you would drag it from the Recorded Interactions list to the Good Sale category.
Export Recordings
You can export recordings if you have permission to do so. You can export by email or by downloading the file. When you export via download, files are exported to the browser's default downloads folder. If you only have the option to export using one method, you might not have permission for the other method or Uptivity is not configured for the method.
You can export multiple recordings at once, however once an export has started, you must wait until it completes before you can continue working in Uptivity. It is therefore a good idea to limit the number of files you export in a single batch to less than 200 (or even less if calls themselves are lengthy).
- Locate one or more call recordings that you want to export in the Recorded Interactions and select them.
- Right-click on one of the recordings and click Export Selected.
- Click the file format for the exported recording.
Learn more about the file types for exporting
Field
Description
WEBM An open-source audiovisual file format that can combine call audio and screen recording in a single file. Uses the VP8 codec for video compression and Vorbis or Opus codecs for audio compression. Audio-only WEBM The WEBM container, containing audio media only. Uses Vorbis or Opus codecs to compress audio media. MP3 Suitable for playback on most computer and portable media players. File sizes can be large depending on call length; this can cause issues when emailing the file. WAV Compatible with most computer media players. Uses GSM compression to achieve a very small file size. Ideal for transfer via email or other methods. - You can select Export to Email and enter an email address in the Address field.
- Click Next.
- You can select a file name mask from the list to make the recording file name more meaningful, or create a new one:
- Click New.
- Enter a name for the file name mask in the Name field.
- Enter the variables for the information you want in the new mask using the variables in the Mask Key on the dialog box. Mask variables are case-sensitive. You can also include plain text and any characters that Windows permits in file names (such as spaces, underscores ( _ ), and hyphens ( - ).Learn more about the fields in this step
Mask Variable
Description
%R The internal identifier generated by Uptivity for each individual recording. Corresponds to the the Record ID column in the Recorded Interactions. %I The device or "hardware" identifier in your ACD Acronym for Automatic Call Distributor - A device used to manage and distribute incoming calls to a specific group of terminals. / PBXAn acronym for Private Branch Exchange. A telephone switching device owned by a private company that serves a particular business or office. (for example, position ID, phone port, DN, or extension). Corresponds to the Voice Port column in the Recorded Interactions list. %A The agent-associated identifier in your ACD/PBX (for example, extension, agentID, and so forth). Corresponds to the Agent ID column in the Recorded Interactions list. %c For outbound calls, displays the phone number or extension that the agent called. For inbound calls, displays the number that the caller dialed to reach the agent. Corresponds to the Number Called (DNIS) column in the Recorded Interactions list. %C The caller's phone number (ANI). For inbound calls only. Corresponds to the CallerID (ANI) column in the Recorded Interactions list. %O Direction of call (Inbound or outbound). Corresponds to the Call Direction column in the Recorded Interactions list. Corresponds to the Call Direction column in the Recorded Interactions list. %D Day of the month on which the recording was made. Corresponds to the date in the Time Recorded column in the Recorded Interactions list. %d Day of the week on which the recording was made. Displays the day of the week in abbreviated form (for example, Fri). Corresponds to the date in the Time Recorded column in the Recorded Interactions list. %m Month during which the recording was made. Displays the name of the month in abbreviated form (for example, Jul). Corresponds to the date in the Time Recorded column in the Recorded Interactions list. %M Month during which the recording was made. Displays the number of the month (for example, 7). Corresponds to the date in the Time Recorded column in the Recorded Interactions list. %y Year during which the recording was made. Displays the year in 2-digit form (for example, 20). Corresponds to the date in the Time Recorded column in the Recorded Interactions list. %Y Year during which the recording was made. Displays the year in 4-digit form (for example, 2020). Corresponds to the date in the Time Recorded column in the Recorded Interactions list. %H The time during which the recording was made. Displays the hour in HH form (for example, 09). The time displays in either AM/PM or 24-hour format, depending on how your system is configured. Corresponds to the time in the Time Recorded column in the Recorded Interactions list. %N The time during which the recording was made. Displays the minutes in MM form (for example, 34). Corresponds to the time in the Time Recorded column in the Recorded Interactions list. %S The time during which the recording was made. Displays the seconds in SS form (for example, 58). Corresponds to the time in the Time Recorded column in the Recorded Interactions list. %T The length of the call. Displays the call length in seconds. For example, a call that is 2 minutes long would display as 120 . Corresponds to the Duration column in the Recorded Interactions list. %W The amount of time between the end of the audio portion of the call and the time the agent finished working with PC applications related to the call. Corresponds to the Wrap Duration column in the Recorded Interactions list. Applies only if your organization uses NICE UptivityNICE Uptivity Screen Recording and if the interaction includes a screen recording, and if wrap time was configured in the schedule under which the interaction was recorded. Otherwise, the field displays 00:00:00. %U<#> User-defined fields. Corresponds to the user-defined columns in the Recorded Interactions list. - If you want to see a preview of how the mask looks when applied to the selected file, click the refresh icon next to the Preview field.
- Click Save, then select the new file name mask from the list.
- Click OK. The system notifies you when it finishes the export.
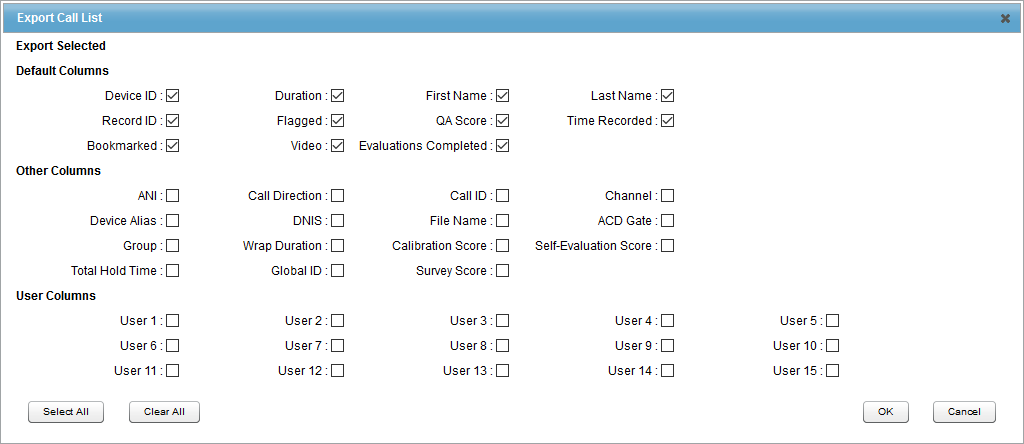
Export the Recorded Interactions List
You can export some or all of the information from Recorded Interactions list. This allows you to generate a comma-separated values (CSV) file containing information that you define during the export process. The file can be used in external reports or for other purposes.
You can choose the fields to be exported for each recording. If you have a filter in place when you export the list, only the filtered results appear in the CSV file.
- Locate one or more call recordings that you want to export in a call list and select them in the Recorded Interactions list.
- Right-click on one of the selected recordings and click Export Call List.
- Select or clear the checkboxes as needed to customize the information about the selected calls that you want to be included in the call list.
- Click OK.
- Choose whether to Save or Open the generated call list and click OK.
Modify Archive Options
Required Permission — Allow Archive Administration
Archiving strategies are set by your Uptivity administrator. However, there may be times when you want to change the archiving options for certain recordings. For example, your system may be set to purge call records after six months, but you find a recording that you want to keep indefinitely for training purposes. Or you might find a recording that should not have been made and needs to be purged immediately.
When you modify the archiving options for a recording, you can select from one or more archive actions that your Uptivity administrator has defined and select the date on which the action will take place. Additionally, you can see the archive action that will apply to the recording and the date it will occur if you make no changes to the archive action (in the Current Archive Action and Current Archive Date fields).
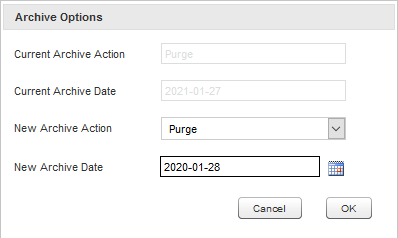
- In the NICE Uptivity Web Portal, click Interactions List.
- Right-click on the recording you want to modify and click Archive Options.
- Select the New Archive Action you want to apply to the selected recording.
- Click in the New Archive Date field and select the date on which you want the selected archive action to happen.
- Click OK.
Modify Recording Metadata
Required Permission — User Edit Field for at least one custom-defined field
Some fields may be reserved for use by automated functionality in your system. In addition, some fields accept more data than others. You should ask your administrator before editing custom-defined fields.
- Locate the recording you want to modify in the Recorded Interactions list, right-click, and click Edit Call.
- Make your changes to the fields as needed.Learn more about the fields in this step.
By default, the Edit Call fields are named User #, but your Uptivity administrator can change the name of any or all of the fields. If any fields have been custom named, the custom name will display instead of the default name.
- Click OK.
Delete Recordings
Required Permission — Allow Recording Record and File Deletes
Deleting a call record removes the record of the call from the database and also deletes any audio and video files associated with the call. The audio, video, and metadata files will be deleted the next time files are purged. However, any evaluations and scores associated with the interaction are not deleted in order to preserve historical and reporting accuracy. A record of the user performing the deletion is written to the system's audit log.
Deleting recorded interaction cannot be undone.
- In the NICE Uptivity Web Portal, click Interactions List.
- Locate the recording you want to delete, right-click, and click Delete Call.
- If you are sure this is the call you want to delete, click OK.


