The Recorded Interactions list displays all of the recorded interactions available for you to work with. You can customize the information displayed about each recording by adding or removing columns from the display on the page. You can also rearrange the columns. You are the only one affected by these changes. Uptivity remembers the settings and displays the list the same way the next time you log in.
- On the Recorded Interactions page, click Settings.
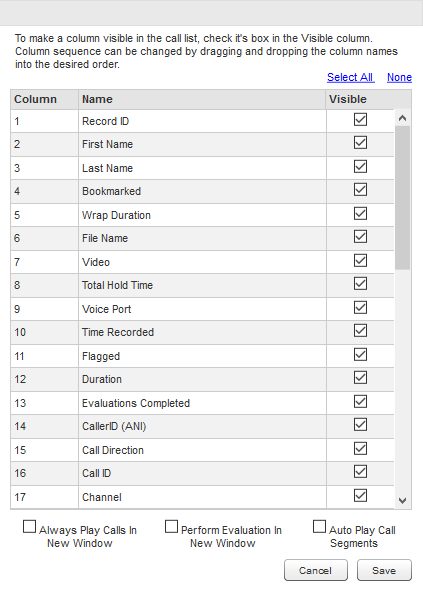
- Select or clear the checkboxes for the columns that you want to see on the Recorded Interactions.
Learn more about the fields in this step

Column
Description
Record ID Displays the internal identifier generated by Uptivity for the specific recording. Column displays by default. Description Unique identifier assigned to a recorded interaction in the Uptivity database. Displays In Recorded Interactions Filter/Search By Recorded Interactions Format Numeric Size Varies Limitations Value is determined (assigned or calculated) by system and is not user-editable. Terminology N/A First Name Displays the first name of the agent involved in the recording. For internal calls (that is, involving two agents), displays the first name of the agent who originated the interaction. Column displays by default. Description The first name of a user (agent). Displays In Recorded Interactions Filter/Search By Recorded Interactions Format Alphanumeric Size 127 characters Limitations This field cannot be blank. Terminology N/A Last Name Displays the last name of the agent involved in the recording. For internal calls (that is, involving two agents), displays the last name of the agent who originated the interaction. Column displays by default. Description The last name of a user (agent). Displays In Recorded Interactions Filter/Search By Recorded Interactions Format Alphanumeric Size 127 characters Limitations This field cannot be blank. Terminology N/A Bookmarked Displays a bookmark icon if a user has added bookmarks to the recording. Column displays by default. Wrap Duration Displays the duration of wrap time for the interaction. Description Period between the end of the audio portion of the call and the time the agent finished working with PC applications related to the call. Displays In Recorded Interactions Filter/Search By Recorded Interactions Format Numeric Size Displays as HH:MM:SS Limitations Applies only if all these conditions are met: your organization uses NICE Uptivity Screen Recording, the interaction includes a screen recording, and wrap time was configured in the schedule under which the interaction was recorded. Otherwise, the field displays 00:00:00. Terminology N/A File Name Displays the full UNC path, including file name, for the recording. Description Displays the path and filename for an audio recording. Displays In Recorded Interactions Filter/Search By Recorded Interactions Format Alphanumeric Size 260 characters Limitations Value is determined (assigned or calculated) by system and is not user-editable. Terminology N/A Video Displays a video icon if screen activity was recorded for this interaction. NICE Uptivity Screen Recording is an optional component. Even if your organization uses screen recording, the system may not record screens for every call. Column displays by default. Total Hold Time The total amount of time a call was in a "hold" status, according to your PBX/ACD. Availability of this feature and how it is calculated varies depending on your integration. Hold time is treated the same way as silence in playback. Voice Port Displays the device or "hardware" identifier in your ACD/PBX associated with the recording. Column displays by default. Description The device or "hardware" identifier in your ACD Acronym for Automatic Call Distributor - A device used to manage and distribute incoming calls to a specific group of terminals. / PBXAn acronym for Private Branch Exchange. A telephone switching device owned by a private company that serves a particular business or office. (for example, position ID, phone port, DN, or extension).Displays In Recorded Interactions, Agent Call Summary report, ad hoc reporting Filter/Search By Recorded Interactions, ad hoc reporting Format Alphanumeric Size 100 characters Limitations Populated by information passed to Uptivity from the integrated ACD/PBX. Terminology This field label is editable and may appear differently in some parts of your system based on your terminology settings. Time Recorded Displays the date and time the interaction was recorded. By default, Uptivity displays time based on the time zone in which the recording server resides, but provides the option to allow times to be shown based on each user's time zone. Your system administrator can tell you how the system is configured. Column displays by default. Description Displays the date and time the interaction was recorded. The time displays in either AM/PM or 24-hour format, depending on how your system is configured. Displays In Recorded Interactions, Call Recording Detail report, ad hoc reporting Filter/Search By Recorded Interactions, Call Recording Detail report, ad hoc reporting Format Date/Time Size Displays as MM/DD/YYYY HH:MM Limitations Value is determined (assigned or calculated) by system and is not user-editable. Terminology N/A Flagged Displays a flag icon if a user has flagged the recording. Column displays by default. Duration Displays the duration of the recorded contact. Column displays by default. Description Displays the duration of the recorded contact. Displays In Recorded Interactions, Call Recording Detail report, ad hoc reporting Filter/Search By Recorded Interactions, ad hoc reporting Format Numeric Size Displays as HH:MM:SS Limitations Value is determined (assigned or calculated) by system and is not user-editable. Terminology N/A Evaluations Completed Displays the number of NICE Uptivity Quality Management evaluations that have been completed and saved for this recording. Column displays by default. CallerID (ANI) Displays the caller's number. Applies to inbound calls only. Description Displays the number of the calling party (also known as the ANI). Displays In Recorded Interactions, Call Recording Detail, ad hoc reporting Searchable In Recorded Interactions, ad hoc reporting Format Alphanumeric Size 20 characters Limitations Available only for inbound calls. Populated by information passed to Uptivity from the integrated ACD/PBX. Terminology This field label is editable and may appear differently in some parts of your system based on your terminology settings. Call Direction Displays an I for inbound calls or an O for outbound calls. Description Displays the directionality of the call as either Inbound, Outbound, or Unknown. In this context, Unknown means that Uptivity was not able to identify the directionality of the recorded contact. Displays In Recorded Interactions, Call Recording Detail, ad hoc reporting Filter/Search By Recorded Interactions, ad hoc reporting Format Alpha Size 1 (I/O) Limitations Value is determined (assigned or calculated) by system and is not user-editable. Terminology N/A Call ID Displays the unique PBX/ACD identifier for the call if the information was available at time of recording. Description Displays the unique PBX/ACD identifier for the call if the information was available at time of recording. Displays In Recorded Interactions Filter/Search By Recorded Interactions Format Alphanumeric Size 16 characters Limitations Populated by information passed to Uptivity from the integrated ACD/PBX. Terminology N/A Channel Displays the internal identifier generated by Uptivity for the channel on which the interaction was recorded. Description Channel on the Uptivity server that recorded the contact. Displays In Recorded Interactions, Call Recording Detail report Filter/Search By Recorded Interactions Format Numeric Size Varies Limitations Value is determined (assigned or calculated) by system and is not user-editable. Terminology N/A Agent Number Displays the PBX/ACD identifier associated with the agent who made or received the call. Description Agent-associated identifier in your ACD/PBX (for example, extension, agentID, and so forth). Displays In Recorded Interactions, Agent Call Summary report, ad hoc reporting Filter/Search By Recorded Interactions, ad hoc reporting Format Alphanumeric Size 100 characters Limitations Populated by information passed to Uptivity from the integrated ACD/PBX. Terminology This field label is editable and may appear differently in some parts of your system based on your terminology settings. Number Called (DNIS) For outbound calls, displays the phone number or extension that the agent called. For inbound calls, displays the number that the caller dialed to reach the agent. Values in this field are dependent on the information being available at the time of recording. Description For inbound calls, displays the number the caller dialed to reach you. For outbound calls, displays the number your agent dialed. Displays In Recorded Interactions, Call Recording Detail report, ad hoc reporting Filter/Search By Recorded Interactions, ad hoc reporting Format Alphanumeric Size 20 characters Limitations Populated by information passed to Uptivity from the integrated ACD/PBX. Terminology This field label is editable and may appear differently in some parts of your system based on your terminology settings. ACD Gate Displays the PBX/ACD gate associated with the recording. Description Displays the call gate, split, or queue associated with the contact (different PBX vendors use different names for this setting). Displays In Recorded Interactions, Call Recording Detail report, ad hoc reporting Filter/Search By Recorded Interactions Format Alphanumeric Size 20 characters Limitations Populated by information passed to Uptivity from the integrated ACD/PBX. Terminology This field label is editable and may appear differently in some parts of your system based on your terminology settings. Global ID This field is no longer used in Uptivity. Group Displays the PBX/ACD group associated with the recording. Applies to inbound calls only. Description The group setting in your ACD/PBX (for example, hunt group, skill group, or labor group). Displays In Recorded Interactions, Call Recording Detail report, ad hoc reporting Filter/Search By Recorded Interactions, ad hoc reporting Format Alphanumeric Size 30 characters Limitations Populated by information passed to Uptivity from the integrated ACD/PBX. Terminology This field label is editable and may appear differently in some parts of your system based on your terminology settings. User # These additional custom data fields can be used differently by each organization. For example:
- Data received from third party IVR, CRM, or ACD platforms can be inserted into these fields.
- Agents can enter information via NICE Uptivity On-Demand or the NICE Uptivity Web Portal.
- If your organization uses NICE Uptivity Speech Analytics, classification rules can be used to add speech tags to these fields.
Other applications may be available. Your Uptivity administrator can tell you which of these fields (if any) are used by your organization, and you can choose to display them by adjusting the list settings.
Survey Score Displays the overall score for a call if the customer completed a survey after the call ended. Applies only if the organization uses NICE Uptivity Survey. The value is calculated when the page is displayed by dividing the total score for all surveys by the total possible score for all surveys associated with the interaction. QA Score Displays the average overall score for all NICE Uptivity Quality Management evaluations that have been completed and saved for this recording. Column displays by default. Description Displays, as a percentage, the average QA score across all evaluations performed on a recorded interaction. The score is calculated at the time a report is run (or the field is displayed) by dividing the QA Score by the Possible QA Score. The value is not stored in the database. Displays In Recorded Interactions (as QA Score), ad hoc reporting Filter/Search By Recorded Interactions, ad hoc reporting Format Numeric Size 10,2 (for example, 12345678.90) Limitations Value is determined (assigned or calculated) by system and is not user-editable. Terminology N/A Calibration Score Displays the average overall score for all NICE Uptivity Quality Management calibrations that have been completed and saved for this recording. The value is calculated when the page is displayed by dividing the total score for all calibration evaluations by the total possible score of all calibration evaluations associated with the interaction. Scores are rounded to the nearest whole number (that is, 49.7% displays as 50%). If there are no calibration evaluations for the interaction, the field is blank. Self-Evaluation Score Displays the average overall score for all NICE Uptivity Quality Management self-evaluations that have been completed and saved for this recording. The value is calculated when the page is displayed by dividing the total score for all self-evaluations by the total possible score for all self-evaluations associated with the interaction. Scores are rounded to the nearest whole number (that is, 49.7% displays as 50%). If there are no self-evaluations for the interaction, the field is blank. - You can click Select All to display all Recorded Interactions list columns or None to clear all selections and start over.
- You can drag columns up or down to change the order in which they appear on the Recorded Interactions page.
- You can select or clear the Always Play Calls in New Window, Perform Evaluation in New Window, and Auto Play Call Segments check boxes, which change the default behavior of Media Player.Learn more about the fields in this step
Field
Description
Always Play Calls in New Window Select if you want recordings to open in a new window by default when you click the Play icon on the Recorded Interactions page. Perform Evaluation in New Window Select if you want the evaluation page to open in a new window by default when you perform an evaluation from the Recorded Interactions page. Auto Play Call Segments Select if you want Uptivity to automatically play the next call segment. Applies only if the recording integration and system configuration support call segments.
- Click Save.
- You can rearrange the columns on the Recorded Interactions page by clicking and dragging them left or right.
- You can click a column header on the Recorded Interactions page to sort the Recorded Interactions list by the contents of that column. Sorting choices are not saved when you leave the Recorded Interactions page.