

Required permissions : View Scripts, Create/Edit Scripts
Manage your Text-to-Speech (Cloud TTS Hub) service provider in NiCE CXone. To use the service in your contact center, you need to add it to your Studio scripts using the CLOUD TTS action.
Add a New TTS Provider Profile
You only need to add a TTS provider profile if you're using your own account with that provider. If you're using an account provided by NiCE CXone, use the default profile for the provider you want to use. Default profiles don't have an Edit button and cannot be deleted.
You can use one TTS provider profile with multiple Cloud TTS actions in the same script, or in different scripts. Each action can use a different voice.
- In Studio, open the script you're modifying and add a Cloud TTS action, if it doesn't contain one already.
- Double-click the Cloud TTS action to open the Cloud Text-to-Speech page.
-
Click Add New TTS.
- Enter a name for this provider in the Text to Speech Config Name field.
- Click the Text to Speech Config Provider that you're using.
- Click Next.
-
Complete the Configuration page with the information required to authenticate your account with the TTS provider you chose. This information is different for each provider.
 Learn about AWS Polly configuration options
This provider is part of a controlled release program. Contact your NiCE CXone account representative for information about using this provider.
Field Description Access Key Enter your AWS Polly access key. Create your access key
 in AWS.
 Secret Key Enter the secret key for your AWS Polly account.
Region Enter the region for your AWS Polly. For example, us-east-2. Engine Select which Polly TTS engine you're using, Standard or Neural. Language Select the language you want this profile to use. Learn about Google TTS configuration options
Field Description Base64 Service Account Enter the ID for your service account in base64 format. The description under this field on the Configuration page includes a link to a converter you can use to convert your ID to base64.
Use Custom Voice Select this option to use a custom Google TTS voice model.
Note: Google Custom Voice TTS is only available for use with Google accounts that are directly billed to your organization (BYO TTS). It is not available if your organization is billed through the NiCE CXone Google account (OEM service account).
Note: Additionally, Google has a known issue with the custom voice option. When you use a custom voice in Dialogflow, there can be a noticeable, unexpected quota consumption of a standard TTS voice. This relates to how quota usage is tracked within the Google TTS infrastructure. Dialogflow may register quota usage against the custom voice and a default standard voice, even though only the custom voice is used. Google is working to address this issue.
Language Select the language of your custom voice model. This option appears only when Use Custom Voice is enabled. Custom Voice Model Enter the name of the custom voice model you're using. This option appears only when Use Custom Voice is enabled. Learn about Microsoft Azure TTS configuration options
This provider is part of a controlled release program. Contact your NiCE CXone account representative for information about using this provider.
Field Description Cognitive Service API Key The API key for your Azure TTS instance. You can find this in the Azure Cloud Services management console. Region The region where your Azure TTS runs. You can find this in the Azure Cloud Services management console. Use Custom Voice Click to enable if you want to use a custom voice with Azure TTS. Language Select the language for the custom voice model. This option only appears if you enable Use Custom Voice. Custom Voice Model Enter the name of the Azure custom voice model you want this profile to use. This option only appears if you enable Use Custom Voice. Endpoint ID The endpoint ID of the custom voice model you're using with this profile. This model must be deployed via your Azure Cloud Services management console. You can find the endpoint ID in the management console after you deploy the model.
This option only appears if you enable Use Custom Voice.
- Click Add.
Assign a TTS Provider Profile to a CLOUD TTS Action
When you want to use TTS in your script, add a Cloud TTS action to your script. You need a separate Cloud TTS action for each language you want to make available. You must assign the appropriate TTS provider and language to each Cloud TTS you include in your script.
- In Studio, open the script you're working with.
- If you haven't already added the Cloud TTS action to your script, do so now.
- Double-click the Cloud TTS action to open the Cloud Text-to-Speech page.
- Click to select a TTS provider from the list on the left side of the page.
-
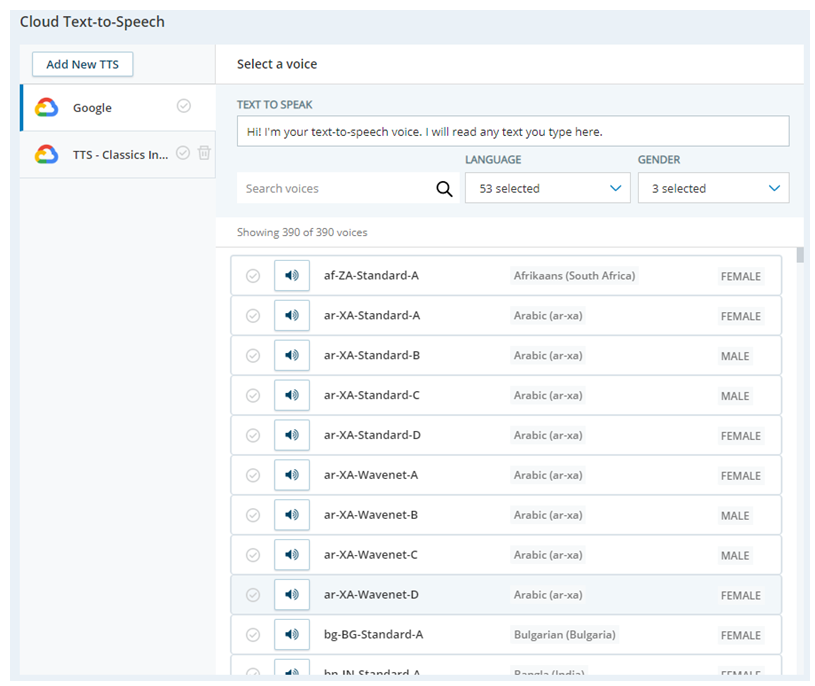
Scroll through the list of voices and select the language and voice that you want this action to use.
- Test the selected voice by entering text in the Text to Speak field and clicking the speaker icon next to the voice you're testing.
- When you are satisfied with the voice you've chosen, click OK to save your selection to the action's properties.
Use SSML to Modify the CLOUD TTS Action
Speech Synthesis Markup Language (SSML) allows you to modify a TTS voice. You can use it in your Studio script.
- Write the speech synthesis modifications that you want to apply to your selected TTS voice. Use SSML markup.
- In Studio, open the script you want to modify.
- Locate the CLOUD TTS action and place a SNIPPET action and a PLAY action after it. Connect them. If the script already has a SNIPPET action in this location, you can use the existing instance.
-
In the SNIPPET action, add a line for a variable assignment. Set the variable value to be the SSML markup you wrote. For example:
ASSIGN playSSML = "[SSML markup]"
- Configure the Play action's Sequence property with the name of the variable you added to the SNIPPET action. Include a percent sign ( % ) as a string reference character before the variable name to identify the value of the variable as text. Enclose the string reference character and variable name in double quotes. Enclose the variable name in curly brackets. For example: "%{playSSML}".
Test Your TTS Service
You can test your TTS![]() Allows users to enter recorded prompts as text and use a computer-generated voice to speak the content. service after adding a TTS provider profile to the Cloud Text-to-Speech page. If you're using a custom voice model with your selected TTS provider, it will appear in this list so you can test it.
Allows users to enter recorded prompts as text and use a computer-generated voice to speak the content. service after adding a TTS provider profile to the Cloud Text-to-Speech page. If you're using a custom voice model with your selected TTS provider, it will appear in this list so you can test it.
- In Studio, open the script you're modifying and add a CLOUD TTS action, if it doesn't contain one already.
- Double-click the CLOUD TTS action to open the Cloud Text-to-Speech page.
- Select your Text-to-Speech (Cloud TTS Hub) provider profile in the list on the left.
-
In the Text to Speak field, enter the text you want to hear the TTS service speak.
- Select at least one Language and Gender to filter the list of available voices.
- Click the language you want to read the provided text and click the speaker icon.
- Repeat as needed. Before you leave the page, select the voice you want to be the default voice for this TTS service. This is the voice used if no voice is specified in the properties of the TTSVOICE action in your Studio script.
View TTS Audit Log Data
You can view audit log data for every Text-to-Speech (Cloud TTS Hub) provider profile. The audit log shows you a history of the changes made to the profile. It records the action taken with the profile, such as creating or modifying it. It also shows the date the change happened, the name of the affected profile, and the user who made the change.
When a profile is deleted, the audit log data is stored for 30 days. After that time, they are automatically deleted. You can create another profile with the same name as one you previously deleted. Its audit log history is maintained separately and is not affected by the auto-deletion of the old profile's data.
- In Studio, open the script you're modifying and add a CLOUD TTS action, if it doesn't contain one already.
- Double-click the CLOUD TTS action to open the Cloud Text-to-Speech page.
- Click the history icon
 next to the profile you want to view. The Change History page appears and displays the available audit log data.