NiCE CXone developed a sample proxy tunnel for you to use. You can set up this example custom integration to gain a better understanding of how custom integrations work. This example simulates a custom text virtual agent integration using NiCE CXone ACD chat.
The sample code in this example is different from the proxy tunnel used in an actual integration. In a real integration, the proxy tunnel is set up to communicate with a virtual agent's endpoints. The sample code doesn't communicate with an actual virtual agent. Instead, it's configured to echo back the input from the user who tests it. So if you type Hello chatbot in the test window, the reply is Hello chatbot.
To set up the example integration, you must download and install the sample proxy code in your environment. The sample proxy tunnel is available in several different programming languages. Your team can use the language they're most comfortable working with.
The template for the custom virtual agent integration technical design document (TDD) includes examples based on this example integration. The examples in the TDD template can help you better understand a custom virtual agent integration.
Some links on this page open sites outside of the NiCE CXone online help.
Requirements
To test the example integration, you must have:
- Studio installed on your computer.
- Downloaded the sample code ZIP file. Sample code is available in the following languages:
- C# .NET
- Java
- Node.js
- PHP
- Python
- IDE and compiler dependencies for the language of the sample code you're using:
- C# .NET: VS Code or other code editor.
- Java: VS Code Community, Jet Brains, Net Beans, Intelli J, Eclipse, or others. If you use the VS Code editor, you need to download and install the Java Extension pack from the Visual Studio Marketplace website.
- Node.js: NPM.
- PHP: VS Code or other code editor.
- Python: VSCode or other code editor.
- Ngrok installed on your computer. You can find the installation on this site: https://ngrok.com/download.
Complete each of these tasks in the order given.
Set Up the Proxy Tunnel Endpoint
Run this API call on a localhost port. Copy down the port number that the service runs on. You will need the number in a later step. Click the drop-down to view instructions for setting up the endpoint for each available language.
- Extract the contents of the ProxyTunnelExamples.zip file.
-
In your code editor, navigate to the folder containing the C# proxy tunnel code in the extracted files.
cd ProxyTunnel/examples/c#/ProxyTunnel
-
Open the Program.cs file. This file contains the code.
-
Open Powershell and run the following command:
dotnet run
-
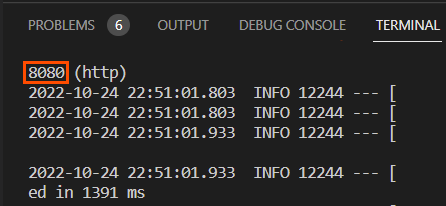
Remember the port number that the service is running on. In the following example image, it's running on port 8080.

You can set up the proxy tunnel endpoint using a code editor. If you don't have a Java code editor, you can use a utility such as Apache Maven, which allows you to run Java files. Both methods are described here.
Use a Code Editor
If you use the VS Code editor, you need to download and install the Java Extension pack from the Visual Studio Marketplace website. This extension pack places a Run | Debug option above the main function.
- Extract the contents from the ProxyTunnelExamples.zip file.
- In your code editor, open the folder containing the Java proxy tunnel code. The path to the Java proxy tunnel code is:
ProxyTunnel\examples\java\src\main\java\com\icx\javaproxytunnel
-
Run the endpoint using the Run button that appears at the top of the main function. It looks like this:
![The Java proxy tunnel code in VS Code editor showing the Run | Debug option above the main function: public static voice main (String[] args).](images/VAH_SampleJavaRunButton.png)
-
The application is initialized. Note what the port is at the top of the output in the terminal. In the following image, the port is 8080.
Use Java Utilities
- Install the following utilities:
- Apache Maven: Download the binary zip archive option from the Apache Maven website.
- Java: Download Java for Windows from the Java website.
- Set up the environment variables required to run the Java program locally:
- On your computer, search for Advanced System Settings or Environment Variables.
- On the Advanced tab of the System Properties window, click Environment Variables.
- In the System variables section, select Path and click Edit.
Create two new paths for the Maven and Java bin folders by browsing to the location where each utility is installed. For example, the paths might be:
C:\Program Files\apache-maven-3,8,6-bin\apache-maven-3.8.6\bin
C:\Program Files\Java\jdk-18.0.2\bin
-
Extract the contents from the ProxyTunnelExamples.zip file.
- Initialize the application:
Open Powershell or Command Prompt and change the directory to the folder containing the application. For example:
cd ProxyTunnel\examples\Java
Run the following commands to compile the application and convert it into a Maven package:
mvn compile
mvn packageThis generates a JAR file in a directory named \target.
Run the generated JAR file.
java -jar target/javaproxytunnel-0.0.1-SNAPSHOT.jar
Note the port number from the initialization output in the command prompt window. In the following example, the port is 8080.

Make sure that the node and NPM are installed on your computer before completing this task.
-
Extract the contents from the ProxyTunnelExamples.zip file.
-
Open Command Prompt or PowerShell and change to the location of the Node.js files.
cd ProxyTunnel/examples/Nodejs
-
Run this command from the Nodejs code folder:
npm install
-
Run the endpoint. Use the command for the operating system you're using.
Linux:
export DEBUG='javascriptechoproxy:server'
npm run startWindows using powershell:
npm run devstart
- Note the port number from the initialization output in the command prompt window. For example, it might be 8080.
You need to have PHP installed on your computer to use this option. If you don't have PHP installed already, there are two options for installing it:
-
Use Chocolatey, a software management tool. This is the preferred option. To install PHP with Chocolatey, open Powershell as an admin and enter this command:
choco install php
- Install PHP directly from the Windows PHP website.
After you install PHP, follow these steps to set up the proxy tunnel expoint:
-
Extract the contents from the ProxyTunnel_PHP.zip file.
-
Use Command Prompt or PowerShell to change to the \PHP folder.
cd ProxyTunnel/examples/php
- Run this command from the PHP folder:
php -S localhost:8000
The application is initialized and is running on port 8000. Remember this port number for use later in the setup process.
-
Extract the contents from the ProxyTunnelExamples.zip file.
- In your code editor, open the proxy tunnel Python folder.
- Use the code editor console to change to the folder containing the API file.
-
In the terminal pane of your code editor or using the command prompt, install Flask on your system using this command:
pip install flask
- Use this command to run the proxy tunnel:
python echo-proxy-tunnel.py
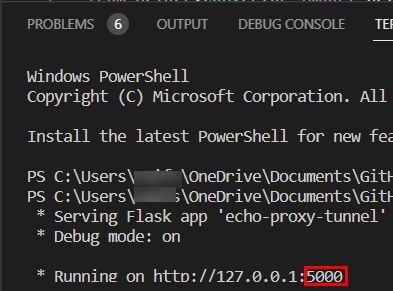
Note the port number from the initialization output in the terminal window. Remember this port number for use later in the setup process. In the following example image, the port is 5000.
Expose Proxy Tunnel Endpoint
The proxy tunnel endpoint must be exposed so that NiCE CXone can access it globally. Use Ngrok to expose the endpoint.
- Install Ngrok, if you haven't done so already.
-
Start Ngrok using this command from the command prompt:
ngrok http [port number]
where [port number] is the port number you wrote down when setting up the endpoint.
-
Copy the server URL that Ngrok exposes and the required API endpoints.
In the example image, the exposed URL is https://4db3-5-46-62-207.nrgok.io. The is base URL for the webhook. Determine which endpoint to use with your URL. Save the URL to use when you configure the textbot Studio action in a later task.
 View information about endpoint URLs for your example
Language Endpoint Details C# The server accepts Virtual Agent Hub requests at the POST proxy/performbotexchange method. Your webhook URL is:
https://[base URL]/proxy/performbotexchange
Java The server accepts Virtual Agent Hub requests at the POST api/proxy method. Your webhook URL is:
https://[base URL]/api/proxy
Node.js The server accepts Virtual Agent Hub requests at the POST api/relay method. Your webhook URL is:
https://[base URL]/api/relay
Python The server accepts Virtual Agent Hub requests at the POST relayExchangeResponse method. Your webhook URL is:
https://[base URL]/relayExchangeResponse
PHP The server accepts Virtual Agent Hub requests at the POST proxy.php method. Your webhook URL is:
https://[base URL]/proxy.php

The steps to determine the endpoint that are described in this section apply only to the example integration. When you create your own endpoint, it can be anything that meets the needs of your organization.
Set Up a Simple Chat Script in Studio
- Download this simple chat script.
- Extract the TextBotExchangeExample.xml file to your computer.
- In Studio, click File > Import from File, select the extracted file, and click Open.
- Save the script. Remember the name you give the script. Leave the script open. You will return to it in a later task.
Create a Chat Skill and Point of Contact in NiCE CXone
You need to create a chat skill![]() Used to automate delivery of interactions based on agent skills, abilities, and knowledge. and point of contact
Used to automate delivery of interactions based on agent skills, abilities, and knowledge. and point of contact![]() The entry point that an inbound contact uses to initiate an interaction, such as a phone number or email address.. The point of contact calls the script you imported. This is how NiCE CXone routes contacts to your virtual agent.
The entry point that an inbound contact uses to initiate an interaction, such as a phone number or email address.. The point of contact calls the script you imported. This is how NiCE CXone routes contacts to your virtual agent.
- In NiCE CXone, click the app selector
 and select ACD.
 - Click Contact Settings > ACD Skills and create a chat skill. You must give the skill a Name and assign it to a Campaign. You may want to create a campaign to use for the sample integration. You can accept the defaults for all other skill options.
-
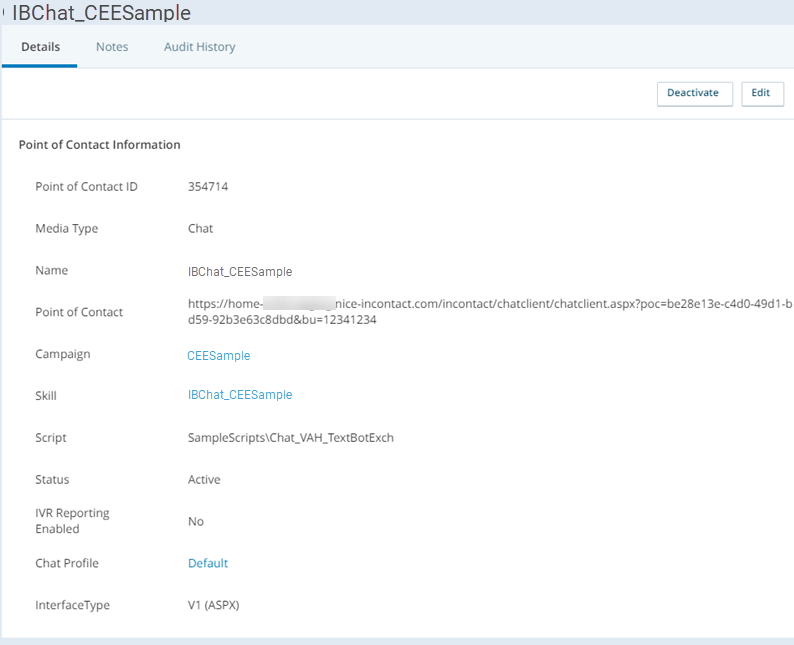
Go to Contact Settings > Points of Contact and create a point of contact with the following settings:
- Media Type: Select Chat.
- Script: Select the name of the script you imported to use with the example integration.
- Skill: Select the name of the skill you created in this task.
-
After you create the point of contact, copy the Point of Contact URL displayed on the Details tab. Paste it into a tab in your browser. You will use this URL in a later task to test the script.
Configure the Textbot Exchange Action
This step configures NiCE CXone to communicate with the sample proxy tunnel endpoint.
- In Studio, open the sample script you imported, if it's not already open.
-
Double-click one of the Textbot Exchange actions to open Virtual Agent Hub.
- Click Add Bot.
- Enter a Virtual Agent (Bot) Name, then select Custom Exchange Endpoint as the Bot Provider.
- Click Next.
- Enter your Webhook URL. This is the URL you saved after exposing the proxy tunnel endpoint.
- Click Next.
- On the Voice page, select Text Only under Voice Integration Options, then click Next.
- On the Test + Add page, click Start with welcome intent. Test other options, such as sending custom payload, as desired. If there are no errors, continue to the next task. If your test results in errors, review the previous tasks to verify the set up and exposure of the proxy tunnel endpoint and the configuration in Virtual Agent Hub.

Test the Script from a Chat Window
When you have resolved any errors that occurred while testing the configuration of the Textbot Exchange action, you can test the script using the point of contact![]() The entry point that an inbound contact uses to initiate an interaction, such as a phone number or email address. URL you copied in a previous task.
The entry point that an inbound contact uses to initiate an interaction, such as a phone number or email address. URL you copied in a previous task.
- In Studio, open the sample script you imported.
- Click Debug > Capture Script > Next Instance Only.
- In the browser tab where you pasted the point of contact URL, type a message in the Enter your text field and click Send.
-
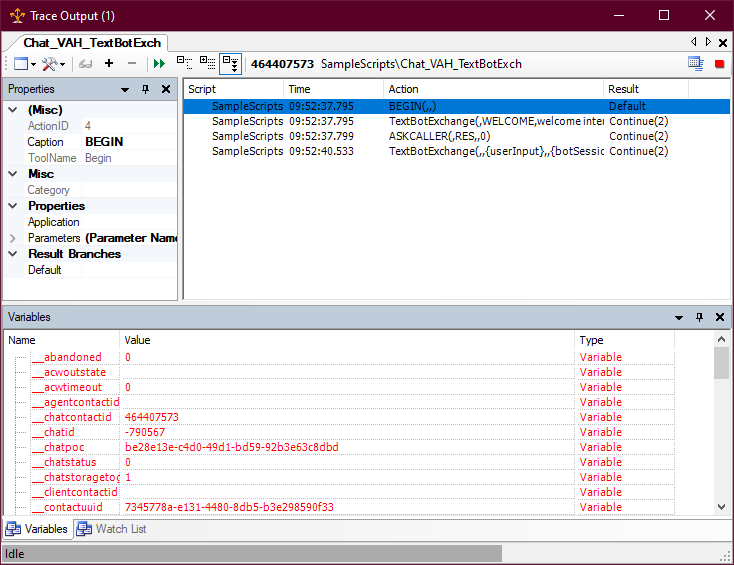
In Studio, the Trace Output window opens. It displays the progress of the script as you send messages and the script responds.
Click an action in the main pane in the
- The Variables tab shows all of the variables that exist in the script when the selected action has completed. It also shows the value that each variable holds at that point in the script.
- The Properties tab shows you the properties for the selected action. You can use this to verify the action's current configuration.
- Return to the script and make changes, if necessary.
- To access the online help for an action, select it on the canvas and press F1 on your keyboard. The online help page for each action describes the properties and other information about using the action in a script.
- If you want to start over, click End Chat, refresh the browser window, and repeat this process, starting with step 2.