

Agent-managed NiCE CXone Personal Connection (PC) voice dialing uses one of two dialing modes per ACD skill![]() Used to automate delivery of interactions based on agent skills, abilities, and knowledge.: progressive or predictive. Progressive dialing places one call per agent at a time to guarantee PC won't abandon any calls. Predictive dialing places a higher ratio of calls per agent at a time for a higher rate of productivity. With predictive dialing, PC begins by dialing one call per agent and gradually increases the number of call attempts per agent. The gradual increase in calls helps to prevent the abandon rate from spiking. When the agent assigned to a call attempt is busy on a connected call, PC "hops" any extra calls to free agents.
Used to automate delivery of interactions based on agent skills, abilities, and knowledge.: progressive or predictive. Progressive dialing places one call per agent at a time to guarantee PC won't abandon any calls. Predictive dialing places a higher ratio of calls per agent at a time for a higher rate of productivity. With predictive dialing, PC begins by dialing one call per agent and gradually increases the number of call attempts per agent. The gradual increase in calls helps to prevent the abandon rate from spiking. When the agent assigned to a call attempt is busy on a connected call, PC "hops" any extra calls to free agents.
For both dialing modes, you can optionally enable preview dialing, which requires agents to accept calls before PC delivers them.
If you want to enable predictive dialing and you previously had your account representative restrict dialing to 1:1 at the business unit![]() High-level organizational grouping used to manage technical support, billing, and global settings for your NiCE CXone system. level, contact your account representative to remove the restriction.
High-level organizational grouping used to manage technical support, billing, and global settings for your NiCE CXone system. level, contact your account representative to remove the restriction.
Complete each of these tasks in the order given.
If you want to send your outbound traffic through a telecom route other than the default, contact your account representative to set that up for you. Once they have configured your additional telecom routes, you can select the one you want to use as you create your outbound voice ACD skills![]() Used to automate delivery of interactions based on agent skills, abilities, and knowledge..
Used to automate delivery of interactions based on agent skills, abilities, and knowledge..
Customize Your Global Dialing Settings
Required permissions: External Business Unit Edit
Before you configure your dialing ACD skills![]() Used to automate delivery of interactions based on agent skills, abilities, and knowledge. and their custom settings, configure the global PC settings for your business unit
Used to automate delivery of interactions based on agent skills, abilities, and knowledge. and their custom settings, configure the global PC settings for your business unit![]() High-level organizational grouping used to manage technical support, billing, and global settings for your NiCE CXone system..
High-level organizational grouping used to manage technical support, billing, and global settings for your NiCE CXone system..
-
Click the app selector
 and select ACD.
 -
Go to ACD Configuration > Business Units.
-
Click the business unit you want to modify to open it.
-
In the Details tab, click Edit.
- Scroll down to the Outbound Strategy section.
- If you want to cancel all call suppression scripts and allow dialing in the areas where the scripts are suppressing calls, select Suspend All Call Suppression.
- If you want to change the do not call group that's assigned to all ACD skills on creation unless manually changed, select the group you want from the Default Do Not Call Group drop-down.
-
If you want to enable priority blending, which switches your agents to inbound ACD skills or digital skills from Personal Connection ACD skills when inbound contact priority hits a certain threshold, select Enable Priority-Based Blending of Outbound Skills with Inbound Queues.
-
If you want to change the default calling list global settings, update the Enable Filtering, Configurable Callback Cancellation on Re-Upload, Default Contact Expiration, and Days until list source is flagged for deletion settings as needed.
 Learn more about fields in this step
Field
Details
Enable Filtering Allows you to configure custom filter criteria that restrict records available for calling on an ACD skill. You must enable this feature to configure filtering in skills. See Filter Calling Lists for more information.
Configurable Callback Cancellation on Reupload Cancels scheduled callbacks Holds a customer's place in queue and automatically calls the customer when they move to the front of the queue. when you upload a contact list that includes a contact with a scheduled callback.Default Contact Expiration
The default amount of time after being imported that the contact expires, meaning that NiCE CXone can no longer dial this contact. This is the default value for new ACD skills, but you can change the value on the ACD skill.
Days until list source is flagged for deletion The number of days after you create a calling list source that NiCE CXone flags the temp file and database file for deletion. This value should be greater than the Default Contact Expiration value. You can leave this value blank if you don't want to automatically delete calling list records. This can be useful if you are creating new sources with each file you import. - If you want to change the default abandon rate global settings, you can change the Abandon Rate Calculation Scope, which specifies whether the abandon rate applies to today Since Midnight or the Last 30 Days. You can also select Enable Skill Abandon Rate to customize the abandon rate on the ACD skill level.
- If you want to enable consideration of agent proficiency in delivery of Personal Connection calls, select Enable Dialing by Proficiency. Agents with higher proficiency levels receive higher priority as NiCE CXone delivers proactive calls.
-
If you want to use preview dialing for any of your Personal Connection ACD skills, enable the preview modes you want available to select in the ACD skills. Select a Default Confirmation Required Delivery Mode. Specify whether you want the Show Preview Timeout setting enabled.
Learn more about fields in this step
Field
Details
Enabled Preview Modes - 1 - Click-to-Call: The agent receives a pop-up before NiCE CXone places the call. The agent must accept or reject the call.
- 2 - Manual Dial with Keypad: The agent must dial the call manually using the keypad.
- 3 - Manual Dial with Keypad Auto Correct: The agent must dial the call manually using the keypad, but NiCE CXone fixes the number before dialing if the agent enters it incorrectly.
- 4 - Dial Outside NiCE Network: The agent must dial the call manually using a hard phone outside of the NiCE CXone network.
- 5 - Progressive - No Preview: The call is dialed for the agent without confirmation if the dialing ratio is 1:1.
Default Confirmation Required Delivery Mode Specifies the default mode the dialer uses to handle preview dialing. You can only choose an option that you enabled. Show Preview Timeout
Automatically sets the Confirmation Required Default Action in Delivery Preferences to Requeue and disables editing for the setting.
-
If you want to customize the experience for calls that require compliance for any of your PC ACD skills, enable compliance modes you want available to select in the ACD skills. Select a Default Compliance Required Delivery Mode. Specify whether you want the Show Compliance Timeout setting enabled.
Learn more about fields in this step
Field
Details
Enabled Compliance Modes - 1 - Click-to-Call: The agent receives a pop-up before NiCE CXone places the call. The agent must accept or reject the call.
- 2 - Manual Dial with Keypad: The agent must dial the call manually using the keypad.
- 3 - Manual Dial with Keypad Auto Correct: The agent must dial the call manually using the keypad, but NiCE CXone fixes the number before dialing if the agent enters it incorrectly.
- 4 - Dial Outside NiCE Network: The agent must dial the call manually using a hard phone outside of the NiCE network.
- 5 - Progressive - No Preview: The call is dialed for the agent without confirmation if the dialing ratio is 1:1. Don't use this mode for compliance dialing.
Default Compliance Required Delivery Mode Specifies the default method the dialer uses to handle compliance-required dialing. You can only choose an option that you enabled. Show Compliance Timeout
Automatically sets the Compliance Required Default Action in Delivery Preferences to Requeue and disables editing for the setting.
- If you want to receive notifications whenever a PC ACD skill is manually stopped, enter the email address in the Force Stop Skills Notify Email field.
- Click Done.
Create a Campaign
Required permissions: Campaigns Create
If you've already created a campaign![]() A grouping of skills used to run reports. that you plan to use, you can skip this step. For example, you may have a campaign that you intend to use across several channels.
A grouping of skills used to run reports. that you plan to use, you can skip this step. For example, you may have a campaign that you intend to use across several channels.
- Click the app selector and select ACD.
- Go to Contact Settings > Campaigns.
- Click Create New.
- Enter a value in the Campaign Name field.
- Choose the Division you want to assign the campaign to. This option is only available if your system is configured for divisions. After you have assigned the campaign to a division, you cannot change the division assignment.
- Click Create Campaign.
Create a Personal Connection ACD Skill
Required permissions: Skills Create and Skills Edit
The name of a skill should be meaningful and unique. It's helpful to be consistent when naming skills. Decide on a standard format for skill names that works for your organization.
A skill name must have a minimum of 2 characters and a maximum of 30. Skill names may only contain letters, numbers, and these special characters:
- Hyphens (-)
- Underscores (_)
- Periods (.)
- Colons (:)
-
Click the app selector
and select ACD. -
Go to Contact Settings > ACD Skills.
-
Click Create New > Single Skill.
- Set the Media Type to Phone Call, Inbound/Outbound to Outbound, and Outbound Strategy to Personal Connection.
- Enter a Skill Name.
- Select the Campaign you want the skill to be part of.
-
Configure the remaining optional fields in the Skill Information section as needed.
Learn more about fields in this step
Field Details Deliver Numbers Serially When Personal Connection (PC) assigns a dialing attempt to an agent, it attempts all numbers associated with a record in the order specified in the ACD skill cadence. This can help increase the odds of reaching the contact. The agent is tied to the connection attempts and is unable to take inbound contacts until the contact answers or PC attempts all numbers in the record.
After PC completes a round of attempts on the record, the record rests. When numbers in the record are available for dialing again, PC delivers the record to any available agent to attempt all the record's destinations again. When this setting is enabled, it overrides the Preview Required setting in the calling list.
When you enable Deliver Numbers Serially, the Cradle to Grave Option and Priority Interrupt options become visible.
Cradle to Grave Option Select to enable. Only an option when you enable Deliver Numbers Serially.
Allows you to have the agent who receives the first attempt on the record to be assigned to that record until it retires. Personal Connection doesn't attempt to dial numbers in the record again unless the agent who was first delivered the record is available. This option is only available if you enable Delivery Numbers Serially for the skill.
Important: For this to work correctly, you must also set the Record Request Mode setting to Next Best. You can access this setting by going to the skill's Parameters tab and opening Cadence Settings after the skill is created.
Priority Interrupt Select to enable. Only an option when you enable Deliver Numbers Serially.
Enables blending
Allows you to combine outbound calls with your inbound queue, based on call priority. with serial dialing so that when Personal Connection is attempting the numbers in a record, a high-priority Skill-based designation of the importance of contacts that determines delivery order. inbound call may interrupt the attempts. When the agent finishes handling the priority inbound call, PC resumes its attempts on the record. This option is only available if you enable Delivery Numbers Serially for the skill.Important: If you enable both Deliver Numbers Serially and Enable Priority-Based Blending and you want the experience to be interruptible, you must also select Priority Interrupt. Doing so applies the value set in Priority Initial Priority to all records in the ACD skill.
Agentless Personal Connection automatically dials phone numbers of contacts from a calling list and plays either a pre-recorded message or an IVR
Interactive Voice Response. Automated phone menu contacts use via voice or key inputs to obtain information, route an inbound voice call, or both. menu.This is selected by default for Proactive SMS, Proactive Email, and digital Bring Your Own Channel. It cannot be cleared.
Don't select for agent dialing.
When this is selected, Workforce Intelligence Minimum Agents and Workforce Intelligence Minimum Available Agents are not available.
Agentless Delivery Delay Seconds Allows you to manually pace the delivery of outbound agentless messages. Enter the number of seconds you want the system to wait before sending the next message. This field is empty by default. The maximum delay is 60 seconds.
Enable Priority-Based Blending When selected, this field enables priority-based blending
Agents can receive interactions from all eligible ACD, Personal Connection dialer, and Digital Experience (DX) skills assigned to them, based on relative skill priority. Personal Connection skills work as they normally would, no matter the dialing ratio. for the skill. This means that when an agent logs into the system and sets the state to available, they receive communications from all eligible skills. The order of contact delivery is based on the relative skill priority. If you choose to use priority-based blending, you must configure priority-based blending for all skills you want an agent to use at the same time.Override Caller ID Enables you to override the default tenant
High-level organizational grouping used to manage technical support, billing, and global settings for your NiCE CXone system. caller ID number. If you want to, select this open, then choose a new caller ID from the Caller ID drop-down list. By law, the number you display as caller IDs must reach your contact center when a contact The person interacting with an agent, IVR, or bot in your contact center. calls the number back.Caller ID The phone number contacts
The person interacting with an agent, IVR, or bot in your contact center. see when an agent calls with this ACD skill. The default is your tenant caller ID number. By law, this must be a phone number where the contact can reach you. If you selected Override Caller ID, select a different phone number. DNC Group This field is read-only for Proactive SMS.
Custom Script A Studio script that runs when agents place a call with this skill. Your Studio script can control things like agent script sessions, dispositions, and custom screen pops.
Treat Carrier Error as Temporarily Unavailable Select to enable. Allows you to have an agentless Personal Connection skill retry calls when the dialer encounters carrier errors (SIP 480 Cause Code 16). This option has a custom scripting requirement. This option is only available for agentless Personal Connection skills. Maximum Ringing Duration Controls the length of time in seconds that the phone rings before timing out. The call automatically ends after timing out. The default maximum is 55 seconds. Changing this field impacts your dialing time.
When the Maximum Ringing Duration value is reached, the system automatically dispositions the call as Not Answered. This includes calls placed by the dialer and manual outbound calls placed by agents. Agents cannot manually disposition calls that reach the maximum ringing duration because the calls don't connect.
Telecom Route Override Enables you to select a telecom route for the outbound traffic of this skill. This field is only available if you've worked with your NiCE CXone account representative to set up additional telecom routes for your environment.
Message Template The message template for this skill. This option only applies to Proactive SMS and Proactive Digital BYOC skills.
Do not allow transfers to skill when closed Determines whether interactions can be transferred to this skill when its hours of operation profile is set to Closed. Select to prevent transfer or leave unselected to allow transfer during closed hours.
Workforce Intelligence Minimum Agents The minimum number of agents that must belong to this ACD skill. This setting prevents automatic actions associated with Workforce Intelligence rules from removing too many agents from the ACD skill. When the number of agents reaches this number or lower, all skill removal actions, even automatic ones, require approval.
This setting doesn't affect agentless ACD skills.
Workforce Intelligence Minimum Available Agents The minimum number of available agents that must be maintained for this ACD skill. This setting prevents automatic actions associated with Workforce Intelligence rules from removing too many agents from the ACD skill. When the number of available agents reaches this number or lower, all ACD skill removal actions, even automatic ones, require approval.
This setting doesn't affect agentless ACD skills.
-
If your system is configured for divisions, use the Division field to specify which division
Separate data securely between lines of business. Data can only be accessed from within the division it's part of. to assign the skill to. After you have assigned the skill to a division, you cannot change it. To configure this option, you must have the Division Assignment permission. - If you want to use screen pops A pop-up window with information about the contact that appears on an agent's screen after an event such as connecting to a contact. for this skill, select the Use Screen Pops checkbox. Modify the optional settings in the Screen Pops section if you want to customize your screen pops. This capability is only supported for Agent Workspace (Agent) suite. You can also do this later.Learn more about fields in this step
Field Details Use Custom Screen Pops Select to enable. Allows you to use a separate application or website to run the screen pops. Application or
Webpage
Select how your screen pops will appear.
If you chose Application, enter either the entire path to the executable. if you chose Webpage, enter the full URL.
To have custom variables appear in the screen pop, the variable must be configured to do so in your custom Studio script.
You can customize the title of the tab that pops up in the MAX interface by appending the icAgentPanelTitle= parameter to the URL.
- Click Create. Complete additional configurations to customize or manage your skills.
Assign Users to the ACD Skill
Required permissions: Skills Edit, Skills User Assignment
- Click the app selector and select ACD.
-
Go to Contact Settings > ACD Skills.
-
Click the skill
Used to automate delivery of interactions based on agent skills, abilities, and knowledge. you want to edit. -
Click the Users tab.
- Select the checkbox for each user you want to assign to the skill. Click Add Users.
-
Set the Proficiency for each user in this ACD skill to a number between 1 (highest) and 20 (lowest). Click Save Proficiencies.
If you don't click Save Proficiencies before leaving the page, all users you added to the skill profile will be removed.
Create a Do Not Call Group
-
Click the app selector
and select ACD. -
Go to Lists > DNC.
-
Click Create New.
-
Give the group a DNC Group Name and, if you want, a Description.
-
Click Save.
Assign the ACD Skill to Do Not Call (DNC) Groups
-
Click the app selector
and select ACD. -
Go to Lists > DNC.
-
Click the DNC group you want to modify.
-
If you want to specify which skills allow agents to add contacts to this group's DNC list:
- Click Contributing.
- In the Select the skills to be contributing to DNC table, select the checkbox of the skills you want to add.
- Click Add.
- Click Save.
-
If you want to specify which outbound skills are restricted from dialing contacts in DNC list of this DNC group:
- Click Scrubbed.
- In the Select the skills to be added to DNC table, select the checkboxes of the ACDskills you want to add.
- Click Add.
- Click Save.
Set the Maximum Dialing Ratio
Required permissions: Skills Edit and access to campaigns
-
In the ACDskill settings, click the Parameters tab.
-
Click Edit or Configure for the General Settings parameters.
-
Under General Pacing Settings, change the Maximum Ratio to the number of calls you want PC to dial per agent.
- For progressive dialing, set the value to 1.
-
For predictive dialing, set the value to a number greater than 1. Higher ratios settings are available (4-6 per agent) if you've had have your account representative enable those settings for you. The actual dialing ratio when the ACD skill is active changes depending on various parameters. For information about throttling, see Diagnose Call Throttling.
The dialing ratio affects the number of ports required. For example, if 10 agents are logged in to a skill
Used to automate delivery of interactions based on agent skills, abilities, and knowledge. with a 3:1 dialing ratio, you must have 30 available ports. - If you're configuring progressive dialing, select Block Multiple Calls under Pacing Safety Controls.
- If you're configuring predictive dialing, set Percentage of Agents Before Overdial under Pacing Safety Controls to the percentage of agents who must be available before PC will dial more than one call per agent at a time. This setting protects the abandon rate by preventing PC from launching multiple calls until sufficient agents are available to receive "hopped" calls.
-
Click Done.
Set Up Calling Lists
Required permissions: Calling List Create
Calling lists can be created, uploaded, and maintained manually by using the following instructions. You can also manage your calling list using proactive XS scripts, which integrate with your CRM to pull contacts in, modify them according to what has occurred, and return them.
Follow these instructions in order if you want to manage your calling list manually. To manage your calling list automatically by integrating with your CRM, contact your NiCE CXone account representative.
Create Calling List
Calling list files can't exceed 256 MB in size or 500,000 records. Smaller calling lists result in faster upload and fresher records. Each individual record in a calling list cannot exceed a length of 512 Unicode characters. Calling list uploads support Unicode UTF-8 encoding, which includes Chinese characters and all other languages. If you're creating or editing calling lists in Microsoft Excel, take care to preserve the UTF-8 encoding format.
NiCE CXone strips the formatting from phone numbers in calling lists and stores the phone numbers in a universal format. This allows phone numbers to pass between calling lists and do not call (DNC) lists without conflict.
- Open a spreadsheet editor or a text editor.
- You can use the first row to label your columns. This helps with automatic field mapping when you upload the calling list. If you're using a text editor, decide whether to separate the values with commas or tabs.
-
Create the columns for your list.
For a Proactive Voice calling list, you must have a unique identifier column and a phone number column.
Learn more about other system fields you can map to
Field
Details
External ID Required. An alphanumeric string that is the unique identification of the record. Score
A relative numeric value you can use to sort records a certain way. For example, if you want PC to dial one record before another, you could give the first record a Score of 1 and the second record a Score of 2 and sort the calling list by score.
Customer Field 1 and 2 A numeric value you can use for any purpose. For example, it could be an alternate record ID or an amount due.
These fields are not a method for creating custom fields in the agent application. To do that, configure the Custom Display fields in List Management PC skill parameters.
Caller ID The phone number you want to display as the caller ID for this contact. The number here replaces the default caller ID value set in the skill. This number can be a 10-digit number, NANP format, or E164+ phone numbers. You are required by law to display a valid phone number that contacts can use to reach you. Priority A boolean value that indicates whether the record is a priority record. Compliance Required A boolean value that indicates whether the record requires compliance handling. Time Zone The time zone of the contact. You can use either the full name or the list of approved abbreviations for the time zone.
- AFT: Afghanistan Time
- AKST: Alaska Standard Time
- AST: Atlantic Standard Time
- ACST: Australian Central Standard Time
- AEST: Australian Eastern Standard Time
- AZOST: Azores Summer Time
- CVT: Cape Verde Time
- AMT: Caucasus Standard Time
- CST: Central Standard Time
- BTT: Bhutan Time
- BST: British Summer Time
- CET: Central European Time
- CEST: Central Summer European Time
- SBT: Soloman Islands Time
- BIT: Baker Island Time (Dateline)
- EAT: East Africa Time
- EAST: Easter Island Standard Time
- EEST: Eastern European Summer Time
- ESAST: E. South American Standard Time
- EST: Eastern Standard Time
- EET: Eastern European Time
- EGST: Egypt Standard Time
- YEKT: Yekaterinburg Time
- FJT: Fiji Time
- GMT: Greenwich Mean Time
- GNST: Greenland Standard Time
- GST: Gulf Standard Time
- HST: Hawaiian-Aleutian Standard Time
- IST: Indian Standard Time
- IRST: Iran Standard Time
- IST: Israel Standard Time
- KST: Korea Standard Time
- MYT: Malaysia Time
- MST: Mountain Standard Time
- MMT: Myanmar Standard Time
- NCAST: N. Central Asia Standard Time
- NPT: Nepal Standard Time
- NZST: New Zealand Standard Time
- NST: Newfoundland Standard Time
- KRAT: North Asia Standard Time
- IRKT: North Asia East Standard Time
- PST: Pacific Standard Time
- PSAST: Pacific SA Standard Time
- RST: Romance Standard Time
- MSK: Russian Standard Time
- SAEST: SA Eastern Standard Time
- SAPST: SA Pacific Standard Time
- SAWST: SA Western Standard Time
- SMST: Samoa Standard Time
- THA: SE Asia Standard Time
- SAST: South Africa Standard Time
- SLT: Sri Lanka Standard Time
- TIST: Taipei Standard Time
- TAST: Tasmania Standard Time
- TST: Tokyo Standard Time
- PHOT: Tonga Standard Time
- VLAT: Vladivostok Standard Time
- AWST: W. Australia Standard Time
- ECT: W. Central Africa Standard Time
- WET: W. Europe Standard Time
- PKT: West Asia Standard Time
- WPST: West Pacific Standard Time
- YAKT: Yakutsk Standard Time
Preview Required A Boolean value that indicates whether the record requires preview handling. This setting will be ignored when Deliver Numbers Serially is enabled in the PC skill or when the record is being delivered as a callback. Agent Requests a specific agent to speak with the contact. The value is the agent ID. Override Finalization A boolean value overriding the system finalization reason. Use it to upload a record that was previously finalized and continue dialing it. If you map this column and set a contact record to False and any previous final outcomes exist for the record on this skill, PC rejects the record.
If you don't map an Override Finalization column, you can override finalized records by re-uploading them as long as the record was finalized more than two hours ago. If you upload a record that was finalized less than two hours previously, PC rejects the record.
Overriding finalized records can corrupt reporting. If you want to place additional calls as a follow-up to a previous interaction, you should upload the record to a new skill and manage it as a new interaction effort.
Call Request Date/Time The date and time when PC begins delivering a scheduled callback to a skill or agent. The field contains both the date, time, and time zone in the following format: MM/DD/YYYY HH:MM:SS [-H:MM|Z].
Call Request Stale Minutes The number of minutes after the Call Request Date/Time that PC continues to try to deliver a call request before retiring it. After the stale time expires, PC finalizes the record and no longer attempts it. Expiration Date The date and time when the contact record expires. PC ceases all attempts to reach the contact after the specified date and time. This is an optional field that overrides the expiration date configured for the skill and the Batch Expiration Date configured for this calling list. Start Time The number of minutes after midnight PC begins dialing the record. For example, if you want PC to begin attempting the record at 8:00 AM in a record's respective time zone, set the value in the calling list to the value of 480. If you map this field to a calling list, PC ignores the default start time for any applicable records.
End Time The number of minutes after midnight the dialer stops dialing the record. For example, if you want PC to stop attempting the record at 12:00 PM in a record's respective time zone, set the value in the calling list to 720. If you map this field to a calling list, PC ignores the default end time for any applicable records.
-
Enter the data for each record in its own row.
- Save the file in one of the approved formats shown in the following images.
XL or XLS.
Comma-delimited TXT or CSV
Tab-delimited TXT or CSV


Create Custom Fields
If you have columns in your calling list that don't corresponding to hard-coded system fields, create a custom field for each one. System fields include address, agent, call request date/time, call request stale minutes, caller ID, city, compliance required, confirmation required, customer field 1 and 2, expiration date, external ID, first name, last name, notes, override final statuses, phone number, priority, score, state, time zone, and zip.
Create Custom Phone and Email Fields
If you're including an email address or more than one phone number for each record in the calling list, you must create custom fields for the email address and each additional phone number.
Upload Calling List
If you're re-uploading a calling list after making critical updates, stop the associated ACD skill. Restart the ACD skill when you're done uploading calling lists.
-
Click the app selector
and select ACD. -
Go to Lists > Calling.
-
Click Select File.
-
Read the compliance agreement and click Accept to continue.
-
Enter a List Name. Select the Upload New radio button if you want to select a new list from your computer, or Select Existing if you want to modify a list you already uploaded.
If uploading, click Choose File. If modifying, type the File Name or click Browse. Find and select the calling list you want to upload or use. Configure any optional fields as needed.
Learn more about fields in this step
Field
Details
List Expiration Date The date the calling list is removed from NiCE CXone. This setting doesn't affect the expiration of the individual records in the list. To set the expiration date for the records in the list, use the Batch expiration date field in the next step of the upload wizard. Skill If you want to assign the calling list to a specific ACD skill Used to automate delivery of interactions based on agent skills, abilities, and knowledge., select one from the Skill drop-down. You cannot upload the list to a Proactive SMS skill if there is no message template assigned to the skill.Start Skill When Completed
The Skill you selected starts automatically when NiCE CXone finishes processing the calling list.
- Click Next.
- If you used the first row of your calling list to label the columns, select Use First Row as Column Names next to Header. Review the automatic mapping done by PC, map any unmapped fields, and configure time zone handling and an expiration date. Learn more about fields in this task
Field
Details
No time zone found? The action NiCE CXone takes if it can't use calling list data to map a time zone to the record. NiCE CXone checks the record first for a time zone, then a zip code, then a city and state, and finally the area code of the primary phone number.
If NiCE CXone can't match a time zone to the record, it takes the action you specify here:
- Reject: Removes the record from eligibility for dialing.
- Select time zone: Attaches a default time zone to the record. Use the drop-down to select the default time zone.
If you live outside of North America, or if you believe the automatic time zone mapping won't work for your calling list, designate the appropriate time zone for each record on your list. See Time Zone for a list of time zone abbreviations and full names.
Batch expiration date The default expiration date for all records in this batch. Once the contact expires, PC no longer attempts to reach that contact. You can specify expiration dates for individual records in the calling list by including an expiration date column in the calling list itself and then mapping the column to the Expiration Date field.
The expiration occurs at the beginning of the date you select (12:00 AM).
-
If it's not already done for you, map your phone numbers and email addresses in Map Destinations. Add and remove destinations as needed.
If you map a phone field to a specific ACD skill, it appears under the cadence options for that skill. If you don't want to include a specific phone number in the Maximum Attempts or cadence calling order, don't map those phone number to fields. Once you map the field, you can't remove it from the cadence settings.
- When the file uploads, PC displays the progress and the number of records that loaded successfully and unsuccessfully. If the calling list contains invalid records, use the following steps to fix the errors.
Click Download Link in the warning box that appears.
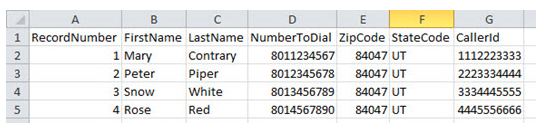
Open the file to view the problems with the upload. In this example, the record in row 6 doesn't have a phone number:

- Fix the problem in the calling list and save it.
- Upload the updated file.
Configure General PC ACD Skill Settings
Required permissions: Skills Edit and access to campaigns
-
In the ACD skill, click the Parameters tab.
-
Click Edit or Configure for the General Settings parameters.
-
Under General Settings, modify the default settings for your ACD skill as needed.
Learn more about fields in this step
Field
Details
Minimum Retry Minutes The number of minutes PC waits before retrying a record. This option is also available in the Retry Settings parameters page. When you change the setting in one location, the value in the other section updates automatically. Maximum Attempts
The maximum number of times PC attempts to dial a record before exhausting it. This option is also available in the Retry Settings parameters page. When you change the setting in one location, the value in the other section updates automatically. Minimum Retry Minutes and Maximum Attempts are ACD skill default settings if you don't overwrite them at the phone number or outcome level.
Default Contact Expiration The period of time you can keep contacts from an external system in your PC environment before they're automatically removed. Consecutive Attempts without a Live Connect In a priority blending environment, the maximum number of attempts PC should make to deliver a call to an agent before treating the call as inbound. Inactive Blending Timer The minimum number of seconds an agent is retained for outbound activity before being released to handle other work. Get Priority Contacts on Contact Insertion Contacts flagged as priority immediately go to the top of the calling list. For example, if a customer clicks a link on your website to indicate interest in a deal, you can mark the customer's record with a priority flag. The Get Priority Contacts on Contact Insertion setting would ensure an agent calls that contact first. Load Callbacks Includes numbers scheduled for callback Holds a customer's place in queue and automatically calls the customer when they move to the front of the queue. in the calling queue.Load Fresh Includes numbers from records PC has not yet attempted to call in the calling queue. Load Non-Fresh Includes numbers from records PC has already attempted in the calling queue. You can clear this field to ensure PC only tries records once. This option is also available in the Retry Settings parameters page. When you change the setting in one location, the value in the other section updates automatically. Override Business Unit Abandon Rate Only available when you select the Enable Skill Abandon Rate checkbox in the
- Begin Dampen Percentage: When the abandon rate reaches this percent of the threshold, the ACD skill throttles the ratio being used to limit the risk of abandoned calls Call that enters the contact center system, but the caller ends the call before reaching an agent..
- Abandon Rate Cutoff: This value is subtracted from the Abandon Rate Threshold to determine when the system limits calling to 1:1 to limit the risk of abandoned calls.
- Abandon Rate Threshold: The maximum percent of abandoned calls the system allows.
Maximum Ringing Duration The period of time a call can ring before PC automatically marks the call as a ring with no answer. - Begin Dampen Percentage: When the abandon rate reaches this percent of the threshold, the ACD skill throttles the ratio being used to limit the risk of abandoned calls
-
Modify the default Notification Settings as needed.
Learn more about fields in this step
Field
Details
End-of-list Notification Delay The period of time between when the system detects a low number of calling records and when it notifies a supervisor on the Skill Control page. Notify Agents When List Is Empty
Agents receive notification through the marquee that PC reached the End-of-list Notification Delay time and the calling list is empty.
-
Click Done.
Start the Proactive Voice Skill
Required permissions: Outbound Strategy Manager Edit and access to campaigns
If you plan to create a schedule, you can skip this step. If you want to manually turn your PC ACD skill off and on, do the following steps after completing all configuration.
-
Click the app selector
and select ACD. -
Go to Contact Settings > ACD Skills.
-
Click the skill
Used to automate delivery of interactions based on agent skills, abilities, and knowledge. you want to start. -
Click Start.
-
When you are done using the skill, click Stop.
Customization Tasks
Depending on how your organization uses Personal Connection (PC), you might also want to: