Required permissions: Calling List Create
You can schedule callbacks![]() Holds a customer's place in queue and automatically calls the customer when they move to the front of the queue. with contacts at a specific time using three different methods:
Holds a customer's place in queue and automatically calls the customer when they move to the front of the queue. with contacts at a specific time using three different methods:
- You can create dispositions that enable agents to schedule callbacks for themselves or for any agent assigned to the outbound dialer skill
 Used to automate delivery of interactions based on agent skills, abilities, and knowledge..
 - You can schedule callbacks when you import contacts with Proactive XS.
- You can schedule callbacks when you upload a calling list.
This topic provides instructions for uploading calling lists that contain callbacks in NiCE CXone.
Key Facts About Timed Call Requests
- When you upload callbacks to NiCE CXone using a calling list, they are assigned to the skill you specify on calling list upload. You can request a specific agent to handle the callback by entering the agent ID in a dedicated agent column. If the time comes for a callback to be delivered and the agent no longer has the skill required to handle the call, the callback is retired or released to any agent available on the skill, depending on your Release Agent-Specific Calls setting.
- For performance reasons, you can upload or import a limited number of callbacks per 15-minute period, based on the number of agents logged in to the skill. If no agents are currently logged in to the skill, the limit is 50 timed call requests per 15-minute period. Every agent who logs in to the skill increases the limit by 100. For example, if you have 4 agents logged in to a Personal Connection (PC) skill, you can upload up to 450 timed call requests for that skill in a 15-minute period. When you upload or import a batch of callbacks with more than are allowed in a 15-minute period, the calling list is rejected.
- The dialer delivers all callbacks as confirmation required contacts: it delivers a notification to an agent when the time for the callback arrives and the agent must accept the call before PC dials it.
- It can take a minute after an agent logs in for PC to deliver an agent-specific timed call request.
Enable Callback Cancellation on Contact Reupload
Required permissions: External Business Unit Edit
You can configure your business unit![]() High-level organizational grouping used to manage technical support, billing, and global settings for your NiCE CXone system. to delete scheduled callbacks when you upload a calling list that contains the same contact. It allows the upload process to completely overwrite the existing contact data to include replacing the timed call request data.
High-level organizational grouping used to manage technical support, billing, and global settings for your NiCE CXone system. to delete scheduled callbacks when you upload a calling list that contains the same contact. It allows the upload process to completely overwrite the existing contact data to include replacing the timed call request data.
-
Click the app selector
 and select ACD.
 -
Go to ACD Configuration > Business Units.
- Click the business unit you want to modify to open it.
- In the Details tab, click Edit.
- Scroll down to the Outbound Strategy section.
- Select Configurable Callback Cancellation on Re-Upload.
- Click Done.
Upload Timed Call Requests in a Calling List
-
Create or open a calling list file where you want to add scheduled callbacks
Holds a customer's place in queue and automatically calls the customer when they move to the front of the queue.. - Add the contacts you want to schedule to the calling list. Enter any information required for each contact, including an external ID and phone number. Verify that each row with a timed call request contains only one phone number; the system rejects timed call requests with multiple phone numbers.
-
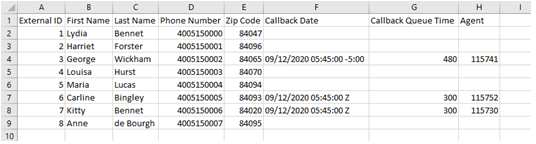
Add two new columns to the calling list named Callback Date and Callback Queue Time.
- If you want to assign calls to specific agents, create a third column called Agent.
-
In the Callback Date column, enter the date and time you want PC to deliver the contact to an agent in the format MM/DD/YYYY HH:MM:SS [-H:MM|Z]. Schedule your callbacks at the hour's five-minute intervals
A period between points, limits, or events, such as dates or times. (2:00 PM, 2:05 PM, or 2:10 PM). Learn more about the callback date format
For the time zone portion of the callback date and time format ([-H:MM|Z]), you have three options:
- You can specify the UTC time offset for the time zone you want associated time. For example, a value of 09/12/2020 05:45:00 -5:00 would cause the dialer to deliver the contact to the agent at 5:45 AM EST on September 12, 2020.
- You can replace the UTC offset with Z to have NiCE CXone process the time in standard UTC. For example, a value of 09/12/2020 05:45:00 Z specifies that PC begins attempting to deliver the contact at 5:45 AM WET (±0 UTC) on September 12, 2020.
- You can specify nothing for the time zone to have NiCE CXone apply the default business unit time zone. For example, a value of 09/12/2020 05:45:00 specifies that the dialer begins attempting to deliver the contact at 5:45 AM in your business unit default time zone on September 12, 2020.
-
In the Callback Queue Time column, enter the number of minutes you want PC to hold the contact in queue while agents are unavailable before it returns the contact to list management.
- If you want to request a specific agent for a callback, type the agent ID in the Agent column.
-
Save the calling list.
- Upload the calling list.
-
If you assigned callbacks to specific agents but you want the callbacks to go to other agents in the skill in the event that an assigned agent no longer has the required skill, enable the Release Agent-Specific Calls setting. Otherwise, the callback is retired when an assigned agent no longer has the skill.
Click the app selector
and select ACD.Go to Contact Settings > ACD Skills.
Click the PC skill you want to modify to open it.
Click Parameters.
In Retry Settings, click Configure or Edit.
In the Callback Settings section, select the Release Agent-Specific Calls checkbox.
Click Done.