

Prior to setting up proactive email, your
Create a Message Template
Required permissions: Message Templates Create
-
Click the app selector
 and select ACD.
 -
Go to Outbound > Message Templates.
-
Click Create New.
-
Set the Type to Email and enter a Name for the message template.
- Enter a Subject for the email and a From email address.
- If you want to send copies of the email internally or to others who are not on the contact list, add the email addresses to the CC or BCC field.
- Enter the Message Body. Select Use HTML if you want to add HTML tags directly in the message body to help format the email message.
- IF you want to add variables to the message body, type the exact name of a mapped field in the contact list and enclose it in curly brackets. For example, if your contact list has a column called FirstName and you enter {FirstName} somewhere in the Message Body, the contact's first name will appear in the email message in place of the variable. You can use variables regardless of whether or not you select Use HTML.
- Select the Direction you want.
- Click Create.
Create a Campaign
Required permissions: Campaigns Create
If you've already created a campaign![]() A grouping of skills used to run reports. that you plan to use, you can skip this step. For example, you may have a campaign that you intend to use across several channels.
A grouping of skills used to run reports. that you plan to use, you can skip this step. For example, you may have a campaign that you intend to use across several channels.
- Click the app selector and select ACD.
- Go to Contact Settings > Campaigns.
- Click Create New.
- Enter a value in the Campaign Name field.
- Choose the Division you want to assign the campaign to. This option is only available if your system is configured for divisions. After you have assigned the campaign to a division, you cannot change the division assignment.
- Click Create Campaign.
Create a Proactive Email Skill
Required permissions: Skills Create and Skills Edit
The name of a skill should be meaningful and unique. It's helpful to be consistent when naming skills. Decide on a standard format for skill names that works for your organization.
A skill name must have a minimum of 2 characters and a maximum of 30. Skill names may only contain letters, numbers, and these special characters:
- Hyphens (-)
- Underscores (_)
- Periods (.)
- Colons (:)
-
Click the app selector
and select ACD. -
Go to Contact Settings > ACD Skills.
-
Click Create New > Single Skill.
- Set the Media Type to Email and Inbound/Outbound to Outbound, and Outbound Strategy to Personal Connection.
- Enter a Skill Name.
- Select the Campaign you want the skill to be part of.
- Select a Message Template from the drop-down.
-
If your system is configured for divisions, use the Division field to specify which division
 Separate data securely between lines of business. Data can only be accessed from within the division it's part of. to assign the skill to. After you have assigned the skill to a division, you cannot change it. To configure this option, you must have the Division Assignment permission.
 - Click Create. Complete additional configurations to customize or manage your skills.
Create an Email Contact List
Required permissions: Calling List Create
You can work with your account representative to set up Proactive XS, which is a Studio script that pulls contact data from your CRM to use as a contact list. Alternatively, you can use the following steps to manually create a contact list and upload it in NiCE CXone.
You can't use the same calling list for both email and phone. However, you can upload the calling list twice to assign it to an email skill and a phone skill separately.
-
Click the app selector
and select ACD. -
Go to Lists > Custom Data Definitions.
-
Click Create New.
-
Enter a Field Name. If you plan to use the field as a script variable, don't use spaces in the name. Be careful not to give a custom field the same name as a system field.
- Set the Type to Email.
-
Click Add.
- Open a spreadsheet editor or text editor. If you're using a text editor, decide whether to separate the values with commas or tabs.
-
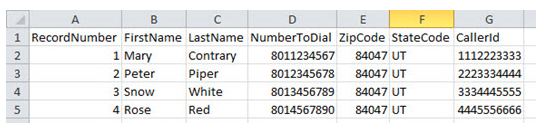
If you want to, use the first row to label your columns. Create at least two columns: one for a unique ID and one for an email address.
Learn about the system fields that map to your column names
NiCE CXone attempts to map fields from the contact list to system fields. It looks for an exact match or a partial match. The following table shows the exact and partial matches the system maps automatically. If you use this as a guide for naming columns in your calling lists, NiCE CXone can accurately map them to system fields.
System Field Name
Exact
Partials
PhoneNumber number, PhoneNumber phone Priority Priority, HotLead priority, hot ExternalId ExternalId record, unique, id, external FirstName FName, FirstName first LastName LName, LastName last, name Score Score score State State state Zip Zip zip, postal Address Address addr City City city CallerID CallerID caller ConfirmationRequired ConfirmationRequired confirm, required, confirmation Compliance IsCellPhone, Compliance compliance, comp TimeZone TimeZone zone, TZ OverrideFinalizationStatuses OverrideFinalizationStatuses override CallRequestDateTime CallRequestDateTime request, date, preferred, callback CallRequestStaleMinutes CallRequestStaleMinutes stale Notes Notes note ExpirationDate ExpirationDate exp Agent Agent, AgentId agent, agt SMSPhoneNumber SMSPhoneNumber, SMSPhone, SMSNumber SMS -
Enter the data for each contact.
- Save the file in one of the approved formats:
Spreadsheet (XLS, XLSX, or CSV)
Comma-separated values (CSV or TXT)
Tab-delimited (TXT)


Upload the Email Contact List
If you're re-uploading a calling list after making critical updates, stop the associated ACD skill. Restart the ACD skill when you're done uploading calling lists.
-
Click the app selector
and select ACD. -
Go to Lists > Calling.
-
Click Select File.
-
Read the compliance agreement and click Accept to continue.
-
Enter a List Name. Select the Upload New radio button if you want to select a new list from your computer, or Select Existing if you want to modify a list you already uploaded.
If uploading, click Choose File. If modifying, type the File Name or click Browse. Find and select the calling list you want to upload or use. Configure any optional fields as needed.
Learn more about fields in this step
Field
Details
List Expiration Date The date the calling list is removed from NiCE CXone. This setting doesn't affect the expiration of the individual records in the list. To set the expiration date for the records in the list, use the Batch expiration date field in the next step of the upload wizard. Skill If you want to assign the calling list to a specific ACD skill Used to automate delivery of interactions based on agent skills, abilities, and knowledge., select one from the Skill drop-down. You cannot upload the list to a Proactive SMS skill if there is no message template assigned to the skill.Start Skill When Completed
The Skill you selected starts automatically when NiCE CXone finishes processing the calling list.
- Click Next.
- If you used the first row of your calling list to label the columns, select Use First Row as Column Names next to Header. Review the automatic mapping done by PC, map any unmapped fields, and configure time zone handling and an expiration date. Learn more about fields in this task
Field
Details
No time zone found? The action NiCE CXone takes if it can't use calling list data to map a time zone to the record. NiCE CXone checks the record first for a time zone, then a zip code, then a city and state, and finally the area code of the primary phone number.
If NiCE CXone can't match a time zone to the record, it takes the action you specify here:
- Reject: Removes the record from eligibility for dialing.
- Select time zone: Attaches a default time zone to the record. Use the drop-down to select the default time zone.
If you live outside of North America, or if you believe the automatic time zone mapping won't work for your calling list, designate the appropriate time zone for each record on your list. See Set Up Proactive Agentless Email for a list of time zone abbreviations and full names.
Batch expiration date The default expiration date for all records in this batch. Once the contact expires, PC no longer attempts to reach that contact. You can specify expiration dates for individual records in the calling list by including an expiration date column in the calling list itself and then mapping the column to the Expiration Date field.
The expiration occurs at the beginning of the date you select (12:00 AM).
-
If it's not already done for you, map your phone numbers and email addresses in Map Destinations. Add and remove destinations as needed.
If you map a phone field to a specific ACD skill, it appears under the cadence options for that skill. If you don't want to include a specific phone number in the Maximum Attempts or cadence calling order, don't map those phone number to fields. Once you map the field, you can't remove it from the cadence settings.
- When the file uploads, PC displays the progress and the number of records that loaded successfully and unsuccessfully. If the calling list contains invalid records, use the following steps to fix the errors.
Click Download Link in the warning box that appears.
Open the file to view the problems with the upload. In this example, the record in row 6 doesn't have a phone number:

- Fix the problem in the calling list and save it.
- Upload the updated file.
Start the Proactive Email Skill
Required permissions: Outbound Strategy Manager Edit and access to campaigns
If you plan to create a schedule, you can skip this step. If you want to manually turn your PC ACD skill off and on, do the following steps after completing all configuration.
-
Click the app selector
and select ACD. -
Go to Contact Settings > ACD Skills.
-
Click the skill
Used to automate delivery of interactions based on agent skills, abilities, and knowledge. you want to start. -
Click Start.
-
When you are done using the skill, click Stop.
Depending on how Proactive Email is used in your organization, consider whether to perform these optional tasks: