Install and Configure the Legacy Desktop Analytics (Fusion) Client
The Fusion client must be installed on every agent PC. Once installed, the application can be used by any user who logs into the PC. The same installer is used regardless of whether the target machine is 32- or 64-bit; Fusion installs and runs as a 32-bit application, even on 64-bit machines.
Before You Begin
Before installing a new version of the application, older versions must be uninstalled. You can do this through the Programs and Features control panel in Windows. The software will be labeled "CallCopy Fusion Software".
In addition, existing scripts will need to be tested and likely edited to work with the new version of Fusion.
Required Permissions
The Fusion installer must have administrator permissions on the client PC, with specific permission to modify or access these registry settings:
- HKEY_LOCAL_MACHINE\SOFTWARE
- HKEY_LOCAL_MACHINE\SOFTWARE\Classes\CLSID\
- HKEY_LOCAL_MACHINE\SOFTWARE\Microsoft\Windows\CurrentVersion\Run
- HKEY_LOCAL_MACHINE\SOFTWARE\JavaSoft\Java Runtime Environment
- The installer does not modify any value under this setting. It accesses it for reading the java version and java_home values.
Install the Fusion Client
Your NICE Uptivity deployment team will provide you with the files necessary to install the Fusion Client. Before beginning this procedure, copy the files to the agent workstation or to a network location that can be reached from the workstation.
To install Fusion on the user PC:
- Log on to the PC using an account with Administrator privileges.
- Navigate to the FusionSetup.msi file and double-click to launch the installer. This file is likely located at C:\Program Files (x86)\CallCopy\Fusion.
- Click Next.
- Select the I accept the terms in the License Agreement checkbox and then click Next.
- Do not change any settings on the Custom Setup screen. Click Next.
- Configure the settings on the Server Setup screen based on whether your installation uses the optional Fusion Server (for details, see the Server Setup Settings section below). Click Next.
- Click Install (if Windows prompts you to allow the installer to run, click Yes).
- Click Finish.
Server Setup Settings
The Server Setup screen in the Fusion installer requires different settings depending on whether your installation uses the optional Fusion Server for centralized script management. Unless otherwise specified, use the default settings.
The tables in the dropdowns below also include the names of the INI settings that match the settings on the screen. This is useful because the application settings are read from Fusion.ini, usually located at C:\Program Files (x86)\CallCopy\Fusion\. The contents of the file vary significantly depending on whether your installation uses the optional Fusion Server, so be sure to only use the appropriate settings for your site.
|
Setting |
Definition |
|---|---|
|
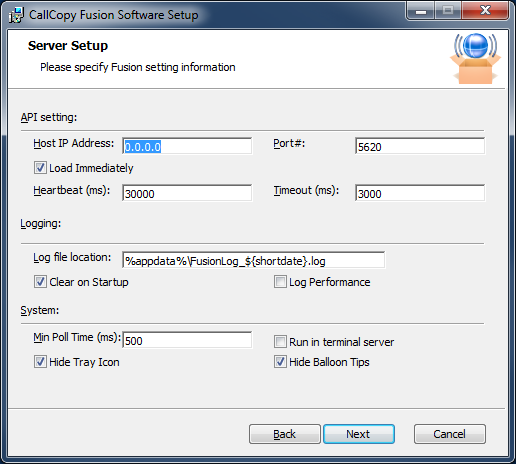
API setting section | INI section: [CallCopy] |
|
|
Host IP Address INI Setting: |
Specifies API server host IP address. The default value is 0.0.0.0. |
|
Port# INI Setting: |
Specifies TCP port on which the API server communicates. The default value is 5620. |
|
Load Immediately INI Setting: |
When selected (set to true), application to the API server when it starts. When cleared (set to false), application does not connect until the script first detects content to be blacked out or recorded. The default is selected/true. |
|
Heartbeat (ms) INI Setting: |
Specifies frequency in milliseconds (ms) that the application sends a "heartbeat" message to the API server to test the connection. The default value is 30000. |
|
Timeout (ms) INI Settings: |
Specifies time in milliseconds (ms) that the application waits for a read response from the API. If this time is exceeded, the application logs an exception. The default value is 3000. |
|
INI only: |
When set to true, causes client to load and use last available script if it cannot contact the Fusion server after 10 attempts. When set to false, nothing is captured until such time as the client can successfully connect to the server. The default value is true. |
|
Logging section | INI section: [Logging] |
|
|
Log file location INI Setting: |
Specifies location for log files. This location should not be changed. The default entry creates a different log for each day, which is useful for troubleshooting and is accessible for PC and terminal server uses. The default value is %appdata%\FusionLog_${shortdate}.log. For details, see Fusion Log File. |
|
Clear on Startup INI Setting: |
When set to true, clears log file on application startup. The default is selected/true. |
|
Log Performance INI Setting: |
When set to true, logs script execution metrics to log file. The default is cleared/false. |
|
System section | INI section: [System] |
|
|
Min Poll Time (ms) INI Setting: |
Specifies minimum polling interval in milliseconds (ms) for checking the user’s screen for content to block or record. This overrides the script setting. The default value is 500. |
|
Run in terminal server INI Setting: |
Set to true for users running terminals. The default is cleared/false. |
|
Hide Tray Icon INI Setting: |
When set to true, hides the Fusion icon in the system tray. The default is selected/true. |
|
Hide Balloon Tips INI Setting: |
When set to true, prevents balloon tips from popping up. If cleared, users can set this option by right-clicking the Fusion icon in the system tray and selecting Hide Balloon Popups. The default is selected/true. |
| INI only: MaxRamAllow |
Specifies maximum bytes of RAM that Fusion can use. The default value is 150000000. |
|
Setting |
Definition |
|---|---|
|
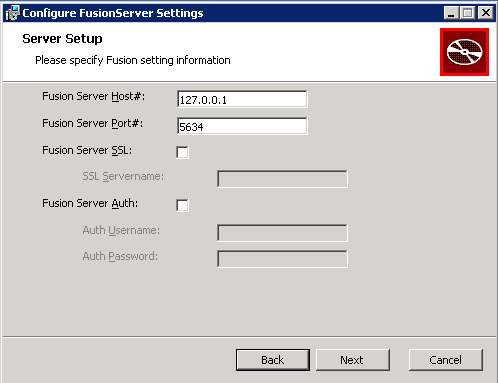
INI section: [FusionScriptServer] |
|
|
Fusion Server Host# INI Setting: |
IP address of the server hosting the Fusion Server service. The default value is 127.0.0.1. |
|
Fusion Server Port# INI Setting: |
Specifies the communication port used by the Fusion Server service. The default value is 5634. |
| Fusion Server SSL |
Select the checkbox if your installation uses SSL for communication between the agent PC and the Fusion Server. The default is cleared. In the SSL Servername field, type the name of the server where the SSL certificate is located. |
| Fusion Server Auth |
Select the checkbox if the client must authenticate to the Fusion Server. The default is cleared. In the Auth Username and Auth Password fields, type the authentication credentials. |
|
INI only: |
Required only if Location was configured in the server-side Fusion.ini, and is equivalent to that value. Determines the API server to which the client will connect. Value is set when the client installer runs and need not be set manually. Value can be modified to direct the client to communicate with a different API server. Setting is ignored if using Subnet. The default value is 100. |
|
|
|


