

API action scripts are an advanced Studio option. They're special Studio scripts that are saved as Desktop StudioFramework actions and are accessible with REST API endpoints. They allow you to create your own Framework actions to use in your scripts.
This page describes how to create and configure an API action script. The following list provides an overview of the process. All details are in the sections linked from each overview step.
- Create an API action script.
- Configure your API action script to be used as a Desktop Studio Framework action in other scripts, as a REST API endpoint, or both. In particular, ensure that you define the parameters and branches, as these determine the information moving in and out of the script, as well as the results of the script's execution.
- Configure the actions in the API action script to use the branches you defined.
- Test your API action script. The method for testing will depend on the functionality in your script, as well as whether you're using it as a Framework action or a REST API. If you use it as a Framework action, you can test and debug in Desktop Studio.
Changes take time to take effect after saving changes to your API action script. It can take up to five minutes after saving changes before the changes are reflected in the API.
Create an API Action Script
The first time you save an API action script, a custom action is added to the Framework tab in Desktop Studio. By default, the action has the same name as the API action script and is saved in a \Personal folder. The folder is created automatically if it doesn't already exist. The API action script itself is saved in your NiCE CXone system like your other scripts.
- In Desktop Studio, click File > New, then select Framework under Available Templates.
- Select API Action as the script type from the field on the right side of the window.
- Click OK.
-
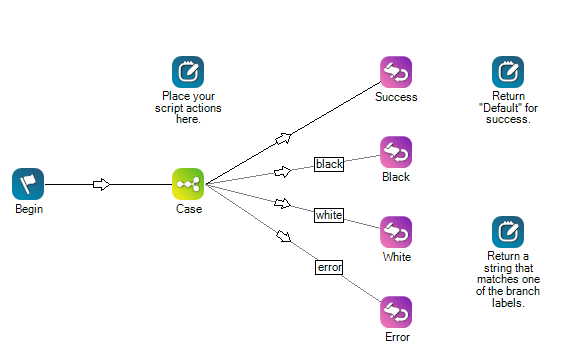
Modify the script. The template contains a BEGIN action, a CASE action, and four RETURN actions. It also contains some NOTE actions that offer suggestions on how to work with the script.
-
Save your script.
-
Configure your script to be used as a Desktop Studio Framework action in other scripts, as a REST API endpoint, or both.
Configure the REST API Settings
You only need to configure the API settings if you plan on using this script as a REST API. Some of the settings apply to using the script as a REST API endpoint and as a Framework action.
The configurations related to API action scripts are all found in the Settings section of the script properties. You can learn about the other script property settings.
-
In Desktop Studio, open the API action script you want to work with. You can open it as you would other Studio scripts, or you can navigate to the Personal folder on the Framework tab, right-click on the API action, and click Open Script.
-
Click on the white space of the script canvas to ensure that no actions are selected. This allows you to view the script properties.
-
On the Properties tab, expand the Settings section.
-
Configure the Parameters section to define the data that the script handles. You can define information coming in to the script, going out of the script, or both.
-
Create branches to define the results of the script's execution.
-
Click the Verb drop-down to choose the type of action this REST API takes.
-
Configure optional settings:
-
Update
-
Modify the REST API's URI.
-
Set Shared to True if you want this script action to be available to other Studio users in your NiCE CXone system.
-
-
-
Save the script.
Configure the Framework Action Settings
You only need to configure the API action settings if you plan on using this script as an action in other Desktop Studio scripts.
-
In Desktop Studio, open the API action script you want to work with. You can open it as you would other Studio scripts, or you can navigate to the Personal folder on the Framework tab, right-click on the API action, and click Open Script.
-
Click on the white space of the script canvas to ensure that no actions are selected. This allows you to view the script properties.
-
On the Properties tab, expand the Settings section.
-
Enter a Name for the Framework action created from this script. You can change this name without affecting the script name. The content of this field is used as the default caption that appears on the script canvas when you add the API action to another Studio script.
-
Enter a Description of this API action script. This text is used as a tool tip when hovering your cursor over the Studio action created from this script.
-
-
 in the Icon field to modify the default icon.
 -
-
Save the script.
Create Parameters
Parameters define the data coming into the script, going out of the script, or both. The parameters you define apply to both the Framework action created from this script and the script's REST API. These parameters become the Framework action's properties.
-
In Desktop Studio, open the API action script you want to work with. You can open it as you would other Studio scripts, or you can navigate to the Personal folder on the Framework tab, right-click on the API action, and click Open Script.
-
Click on the white space of the script canvas to ensure that no actions are selected. This allows you to view the script properties.
-
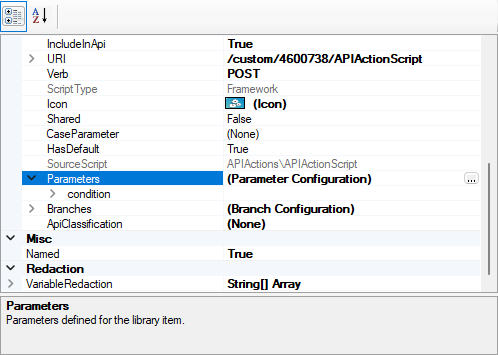
On the Properties tab, expand the Settings > Parameters section. The parameters currently defined in the script are listed in this section.
-
Click the ellipsis
in the Parameters field. -
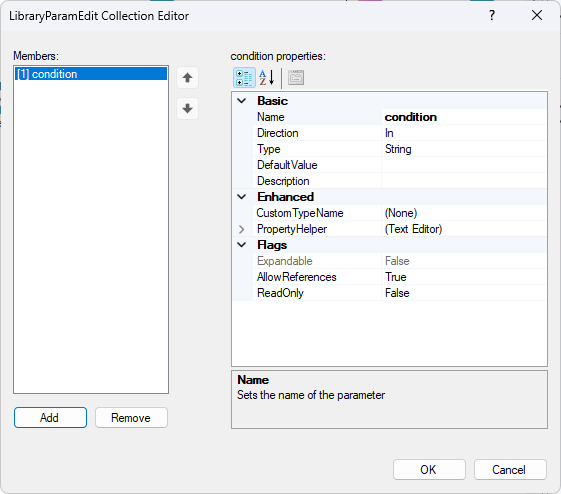
To modify an existing parameter, select it from the Members list on the left side of the window.
-
To create a new parameter, click Add, then select the new Unnamed parameter in the Members list on the left side of the window.
-
In the Basic section under Unnamed properties on the right side of the window, enter a new Name for the parameter. Names cannot include spaces or any special characters except underscore ( _ ).
-
Select the Direction of the parameter. This defines whether the data is coming into the script (In), going out of the script (Out), or both (BiDirectional).
-
Select the data Type of this parameter's value. You can choose from String, Boolean, Number, Date Time, Custom Type, StringArray, or CustomArray.
-
Enter a DefaultValue for the parameter, if it has one. This is the value that is always passed back if no other value is assigned to the variable when the script is called.
-
Add a Description of the parameter to help other users understand it.
-
Under Enhanced, select an option from the Custom Type Name drop-down list. You only need to do this step if you set Type to Custom Type. The options in this list are built-in classes in NiCE CXone and should only be used if you're familiar with how to use them.
-
Under PropertyHelper, select a field Type. This defines the type of field used for the property that corresponds to this parameter in the Studio action created from this script. The available options depend on the data type you selected for this parameter.
 Learn more about fields in this step
Field Details String Choose from None, Text Editor, and Custom Dropdown. Boolean
Choose None or True/False Dropdpown.
Number Choose from None, Expression Editor, and Custom Dropdown. Date Time Choose None or Text Editor. Custom Type Choose from None, Text Editor, and Custom Dropdown. String Array Choose None or Multi-Line Editor. Custom Array The only option is None. - To configure a drop-down with a static list of options:
- Under PropertyHelper, verify that Type is set to Custom Dropdown.
- Select LiteralList from the Source drop-down.
- Click the ellipsis in the Content field to open the String Collection Editor window.
- In the text field, enter the options you want to appear in the drop-down list. List each option on a separate line.
- Click OK.
- To configure a drop-down to populate with NiCE CXone data:
- Under PropertyHelper, verify that Type is set to Custom Dropdown.
- Select Query from the Source drop-down.
- Select an option from the QueryCommand drop-down list. The available options correspond to NiCE CXone data used in scripts, such as ACD skills, agent IDs, Studio scripts, hold music, and so on.
- Click OK.
- To configure a drop-down to populate from a custom API call:
- Under PropertyHelper, verify that Type is set to Custom Dropdown.
- Select Query from the Source drop-down.
- Select Custom API from the QueryCommand drop-down list.
- Enter the CustomAPIURI of the API call you want to use.
- Enter the member name of the JSON response string that you want to populate this drop-down with.
- Click OK.
- To prevent variable substitution for this parameter, set AllowReferences to False. The default is True.
- To make this property read-only, set ReadOnly to True. Read-only properties are greyed out in the properties list of the action created from this script. The default is False.
- Click OK.
Create Branch Conditions
Branches apply to both uses of API action scripts: as a Desktop Studio Framework action and as a REST API. In the Framework action, they are the branches you use to connect to other actions in the script where you use the action. In the REST API, they are the HTTP status code and description that are returned.
-
In Desktop Studio, open the API action script you want to work with. You can open it as you would other Studio scripts, or you can navigate to the Personal folder on the Framework tab, right-click on the API action, and click Open Script.
-
Click on the white space of the script canvas to ensure that no actions are selected. This allows you to view the script properties.
-
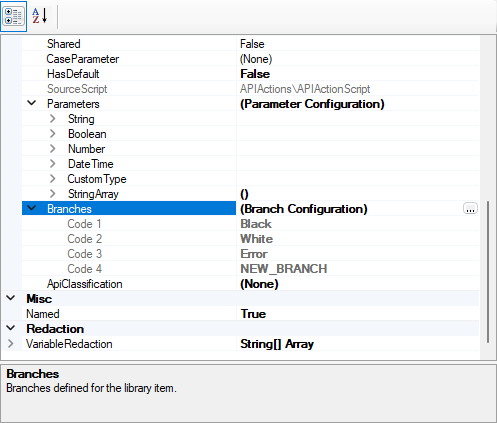
On the Properties tab, expand the Settings > Branches section. The branches currently defined in the script are listed in this section.
-
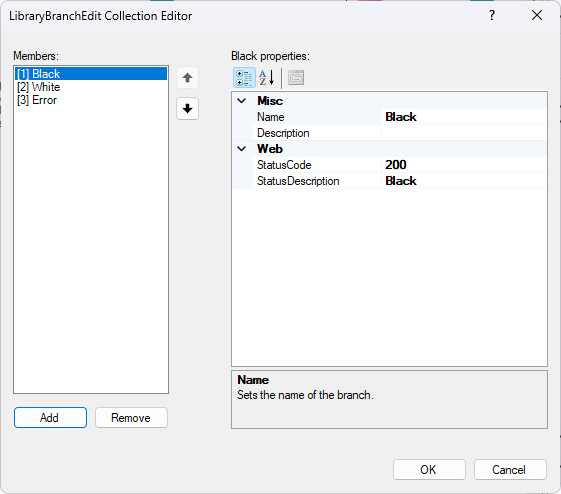
Click the ellipsis
in the Branches field. -
To modify an existing branch, select it from the Members list on the left side of the window.
-
To create a new branch, click Add, then select the new Unnamed parameter in the Members list on the left side of the window.
- To configure the branch condition for the Framework action, configure the Misc section under _Name properties:
- Enter a Name for the branch. Names cannot include spaces or any special character except underscore ( _ ).
Enter a Description of the branch. The description becomes a tool tip that appears when you hover the cursor over the branch in the properties of the Studio action created from this script.
-
To configure the HTTP status code for the REST API, configure the Web section under _Name properties:
-
Enter the StatusCode. The status code must be a numeric value.
-
Enter the Description that is returned with the code.
-
-
- Click OK.
Configure the Actions in an API Action Script
You can customize the behavior your API action script performs when it executes. The actions you add must be supported in API action scripts.
You must configure the RETURN actions in an API action script to use the branches created in the script settings. The script needs to have logic that determines which branch (RETURN action) to return when the script executes. In the default script template, the logic is provided by CASE, but you can design your own logic.
-
In Desktop Studio, open the API action script you want to work with. You can open it as you would other Studio scripts, or you can navigate to the Personal folder on the Framework tab, right-click on the API action, and click Open Script.
- Configure the script as needed by adding Studio actions and script logic between the BEGIN and CASE actions. The actions you add must be supported by API action scripts.
- Add or remove RETURN actions as needed depending on the number of branches your script has.
- For each RETURN action in your script:
- Right-click on the action and change the Caption property to indicate the branch it returns.
- Click the ReturnValue drop-down and select the branch you want this action to return. The options in this drop-down are defined in the Branches section of the API action script properties.
- Replace CASE if you designed your own logic in the script to determine which branch to return. Connect the actions you added to the RETURN actions so the script can return the appropriate response.
- If you use a CASE action:
- Ensure that your scripting results in a single variable that passes a value to the CASE action. The value will trigger CASE to choose the appropriate RETURN action to return.
- Select the CASE action on the script canvas and click the Properties tab.
- In the Variable property, enter the name of the variable that passes the decision-making value to CASE.
- Click the ellipsis in the CustomCases property to open the editor window. You need to define a case for each possible value of the Variable you defined. You can learn more about how cases work on the Decision-Making Statements help page.
- Click Add under Members on the left side of the window.
- Select the (Unassigned) entry in the Members list.
- In the Condition field on the right side of the window, enter the value that triggers the action to choose this case.
- Select the option in the Destination drop-down that corresponds to the RETURN action for the specified result.
- When you're finished adding cases, click OK.
- Save your script.
Customize the REST API's URI
The default URI is your NiCE CXone business unit![]() High-level organizational grouping used to manage technical support, billing, and global settings for your NiCE CXone system. number and the name of the API action script.
High-level organizational grouping used to manage technical support, billing, and global settings for your NiCE CXone system. number and the name of the API action script.
-
In Desktop Studio, open the API action script you want to work with. You can open it as you would other Studio scripts, or you can navigate to the Personal folder on the Framework tab, right-click on the API action, and click Open Script.
-
Click on the white space of the script canvas to ensure that no actions are selected. This allows you to view the script properties.
-
On the Properties tab, expand the Settings section.
-
Click the ellipsis
in the URI field. -
Click URI Namespace and select one of the options. The default is your NiCE CXone business unit number. The other option is the business unit number prefixed by bus.
-
Enter a unique identifier for this API action in the URI Fragment field.
-
Highlight and copy the Full URI (example) to use or test it.
Customize the API Action's Studio Icon
-
In Desktop Studio, open the API action script you want to work with. You can open it as you would other Studio scripts, or you can navigate to the Personal folder on the Framework tab, right-click on the API action, and click Open Script.
-
Click on the white space of the script canvas to ensure that no actions are selected. This allows you to view the script properties.
-
On the Properties tab, expand the Settings section.
-
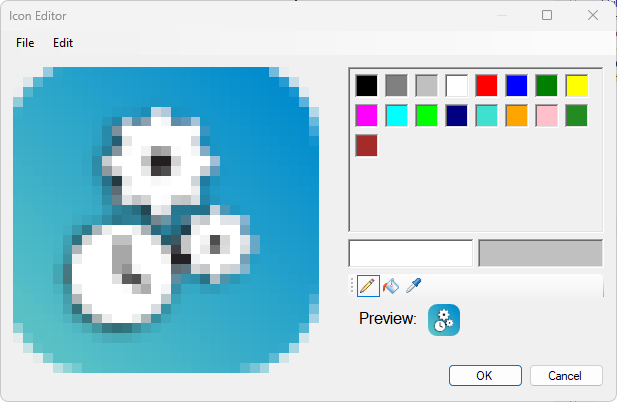
Click the ellipsis
in the Icon field. - To use an existing image as the icon, click File > Open Image File, then select a file and click Open. You can modify the selected image if you want to.
- On the Icon Editor window, choose a color, then click the pencil tool.
-
Draw on the image on the right side of the Icon Editor window.
-
To change colors, click the new color. The tool type cannot be changed. The only tool that works is the pencil.
-
To save the image file to your computer, click File > Save As, then choose a location and click Save.
-
To save the image in Studio, click OK on the Icon Editor window.
Obtain the REST API Endpoint
To use an API action as a REST API endpoint, you need the full URI, including the hostname. The hostname to use depends on the cluster where your NiCE CXone system is located. The first step in the following task shows you how to do this.
-
Discover the hostname for your NiCE CXone system. The Perform API Discovery section of the Getting Started
 page in the NiCE CXone developer portal describes how to do this. After following the steps on this page, use the value returned in the api_endpoint parameter in the response to your discovery query. For example, the value might be https://api-na1.niceincontact.com.
 -
In Desktop Studio, open the API action script you want to work with. You can open it as you would other Studio scripts, or you can navigate to the Personal folder on the Framework tab, right-click on the API action, and click Open Script.
-
Click on the white space of the script canvas to ensure that no actions are selected. This allows you to view the script properties.
-
On the Properties tab, expand the Settings section.
- Copy the value of the URI property. In the example image from the previous step, the value is /custom/4600738/APIActionScript.
- Combine the hostname you discovered and the URI value copied from the API action script. For example, if your hostname is https://api-na1.niceincontact.com and your URI is /custom/4600738/APIActionScript, the full URI is:
https://api-na1.niceincontact.com/custom/4600738/APIActionScript -
Before using the endpoint, verify the API-related script configurations , such as the verb, parameters, and branches.
Document Your API Action Script
Thorough documentation of your API action script is important so that it's easy to use later, or by other Studio users. As you create and configure your script, be sure that you:
- Choose descriptive, relevant names for parameters, branches, and other settings in the script.
- Carefully construct the descriptions of parameters, branches, and so on. Depending on the setting you're working with, the descriptions appear as tooltips, on the script canvas, in the Studio UI, or are returned with status codes. It's important that they make sense outside the context of the API action script, and in the context where they'll be seen by other users. They should be short, but provide enough key information that they help a user not familiar with the script understand the setting.
- Change the captions of the actions in the API action script. Use short, descriptive phrases to indicate the purpose the action serves in the script.
- Use Annotation or Note actions in the API action script. Thoroughly document the script using these actions.
- Add comments in any SNIPPET actions you use in your script.
Additionally, you may want to document the Framework action.
Work with Your Custom Framework Action
When your API action script is complete, you can use the custom Framework action in other Studio scripts. You can find the Framework action in the \Personal folder on the Framework tab in Studio unless a custom location was specified. The location of the action is defined in the Category property in Settings section of the script properties.
To use your custom Framework action:
- In Studio, open or create a script.
- On the Framework tab, locate the custom Framework action and drag it to the script canvas as you would any other action.
- Select the action and click the Properties tab in Studio.
- Configure the action's properties. The specific properties depend on the parameters you defined in the API action script.
- Connect the action using the available branch conditions. These branches are defined in the API action script.
All API Action Script Property Definitions
The API action script properties are described in the preceding seconds on this page in the context of configuring an API action script for a specific use as a Framework action or an API endpoint. However, if you want a complete list of the properties, refer to the table in this section.
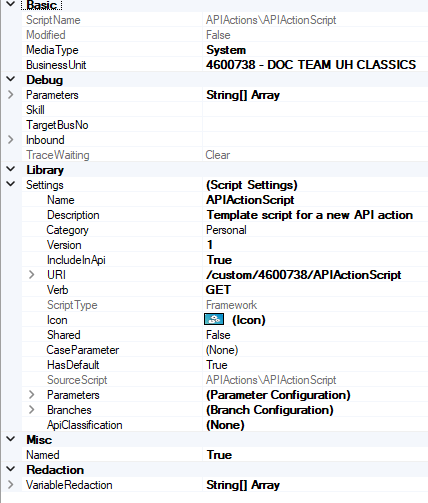
The only properties defined in this section are the ones located in the Settings section of the script properties, as shown in the following image. You can learn more about the settings in the other sections on the Work with Scripts help page.
| Field | Details |
|---|---|
| Name |
Enter a This property applies to using the script as a Framework action only. |
|
Description |
Enter a This property applies to using the script as a Framework action only. |
| Category |
This property applies to using the script as a Framework action only. |
| Version |
The version of the script. Update You can use this property to track the version of the script for either the Framework action or the REST API, or both. |
| IncludeInApi |
Set IncludeInAPI to True if you want this custom script action's API to be executable via a web browser. |
| Icon |
Click the ellipsis This property applies to using the script as a Framework action only. |
| Shared |
This property is currently not supported. |
| CaseParameter |
This defines the name output property that appears when you use this script as a Framework action in another script. The name you define will appear in the custom Framework action's property list with (out) after it. For example, if you set CaseParameter to CustomResult, the custom Framework action's property list will show a property called CustomResult (out). |
| HasDefault |
This property applies to using the script as a Framework action only. |
| Parameters |
Defines the data coming into the script, out of the script, or both. The parameters you define apply to both the Framework action created from this script and the script's REST API. These parameters become the Framework action's properties. Create parameters to customize the data that the script handles. This property applies to using the script as a Framework action and as a REST API. |
| Branches |
Create branch conditions to customize the script's return values. This property applies to using the script as a Framework action and as a REST API. |