

Complete each of these tasks in the order given.
Create a Security Profile
Required permissions: Security Profiles Create
-
Use one of the following methods to create the security profile and give it a name:
-
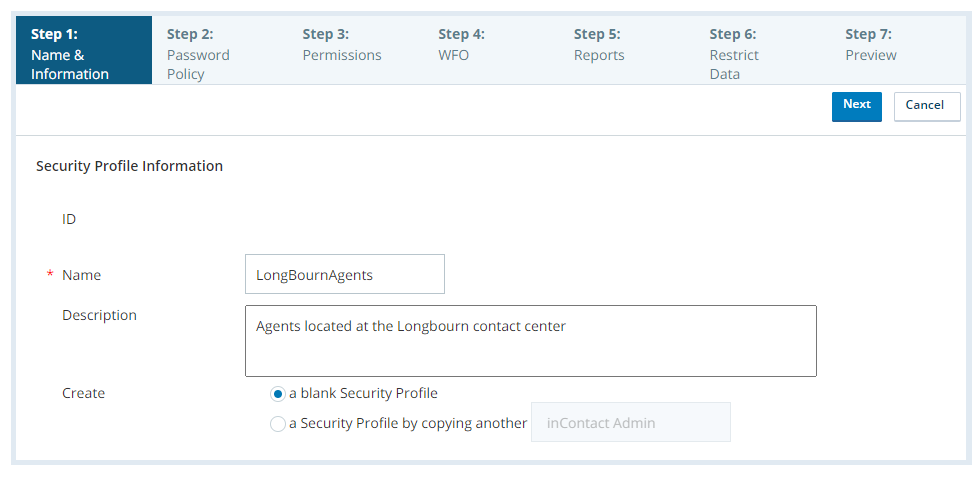
To create a new blank security profile:
- Click the app selector
 and select Admin.
 - Go to Security Profiles.
-
Click Create New.
-
Enter a unique Name for the security profile.
-
Enter a Description if you want one.
-
For Create, select a blank Security Profile.
- Click the app selector
-
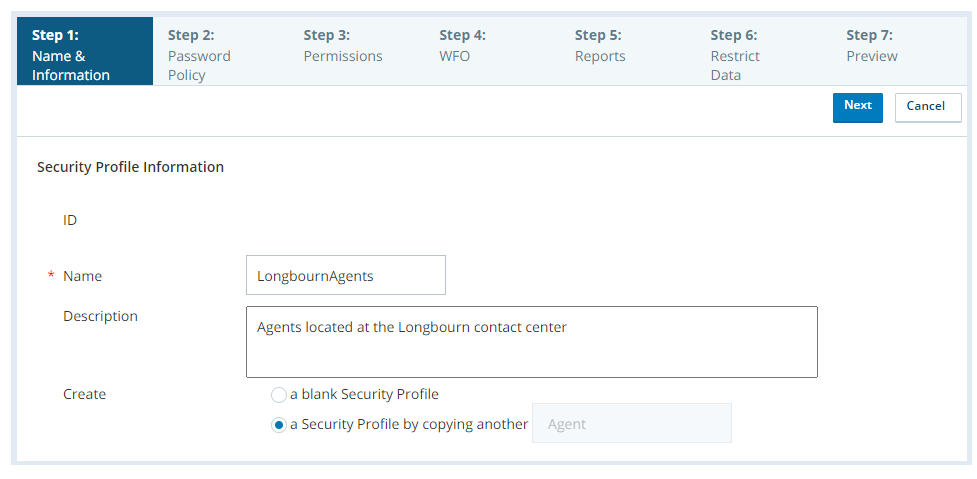
To quickly create a new security profile that copies an existing one:
- Click the app selector and select Admin.
- Go to Security Profiles.
-
Open the security profile you want to copy.
-
Click Copy.
-
Enter a unique Name for the security profile.
-
Enter a Description if you want one.
- Click the app selector
-
-
Click Next.
-
Enable permissions for each product and feature you want users to have. Some permissions, like User Settings and Security, are grouped. To see the permissions inside the groups, click Individual next to the group name.
-
Click Next.
-
Enable permissions for each report you want users to have.
-
Click Next.
-
Restrict data access by Campaigns
 A grouping of skills used to run reports., Teams, Assignable Profiles, Groups, and Business Units High-level organizational grouping used to manage technical support, billing, and global settings for your NiCE CXone system.. For each data type, select whether you want users to access All & Future data of that type, None, or Custom.
 -
If you chose Custom for a data type, use the pop-up window to specify which entities of that data type the users can access. Click Done.
New campaigns, teams, security profiles, groups, and business units aren't automatically added to custom lists when they're created. You must update the custom list if you want users to access the new data.
- Click Next.
- Click Create Security Profile.
Configure a Login Authenticator
Required permissions: Login Authenticator Create
- Click the app selector and select Admin.
- Go to Login Authenticator.
-
Click Create New.
-
Enter a unique Name for the login authenticator.
-
Enter an optional Description. Use plain text only. URLs or markup such as HTML will not be saved.
-
Select System as the Authentication Type.
Learn more about authentication types
Field
Details
System The login authenticator uses the built-in login process of NiCE CXone. It doesn't authenticate using an external single sign-on (SSO) identity provider. SAML SAML 2.0 allows you to set up single sign-on through an external identity provider. NiCE CXone supports multiple instances of SAML 2.0. You can assign different instances to different users. - Set up your password complexity.
Each user's password is checked against a repository of commonly used passwords. If their password matches one of the commonly used passwords, the system requires them to create a new password. Some of the passwords that are rejected include:
Any password that includes the word "password." For example, Password@1234.
Any password that includes the user's email address, username, first name, last name, or system name.
Passwords are checked against this repository whenever:
A new user is activated.
A user's password expires.
A user resets their password.
Learn more about fields in this stepField Details Require Lower Case (a-z) Requires users to use at least one lower-case letter in their passwords. Require Upper Case (A-Z) Requires users to use at least one upper-case letter in their passwords. Require Numeric (0-9) Requires users to use at least one number in their passwords. Require Non-alphanumeric (!,@,#,etc.) Requires users to use at least one non-alphanumeric character in their passwords. -
If you want to enable multi-factor authentication, select Require Multi-Factor Authentication. Set your MFA Type as HOTP and TOTP.
Learn more about the MFA settings
Field Details Require Multi-factor Authentication Requires users to enter a multi-factor authentication (MFA) token in addition to their password to log in to NiCE CXone. An MFA token is a one-time password generated by a hardware token or virtual MFA device (for example, an app like Google Authenticator) that you provide. When you enable MFA, users with the affected profile must configure an MFA secret key the next time they log in.
You should not enable MFA for the master administrator in your organization. If the device or secret is lost, the only way to reset the MFA secret is to file a ticket with NiCE CXone Support.
MFA Type Specifies whether you want to enable TOTP or HOTP MFA. -
Set your password policy.
Learn more about fields in this step
Field Details Password Length Enter the minimum number of total characters users must include in their passwords. For example, if you enter12, users must include at least 12 total characters in every password. The characters required in the Password Complexity settings count towards the total character count. You can set the password length to any number between 12 and 24. Enable Password Age Enables a text box where you can enter the maximum number of days a user can keep a password. After the specified number of days, the user must change their password. You can set the password age anywhere from 14 to 365 days. Enable Password History Enter the number of unique passwords a user must set before they can reuse an old one. You can set the password history anywhere from 4 to 50. For example, if you enter 10, users assigned to the login authenticator cannot use any of their last 10 passwords as their new password. Password Attempts Enter the maximum number of times a user can enter an incorrect password before the system locks them out of their account. The range is three to ten attempts and the default is six. -
Click Create Login Authenticator.
Assign Users to the Security Profile
Required permissions: Users Edit
A user in your contact center must have one security profile assigned to them. The NiCE CXone interface allows you to assign users to security profiles individually. Repeat these steps for each user, or you can update multiple users at once using the user file upload feature.
- Click the app selector and select Admin.
- Go to Users.
-
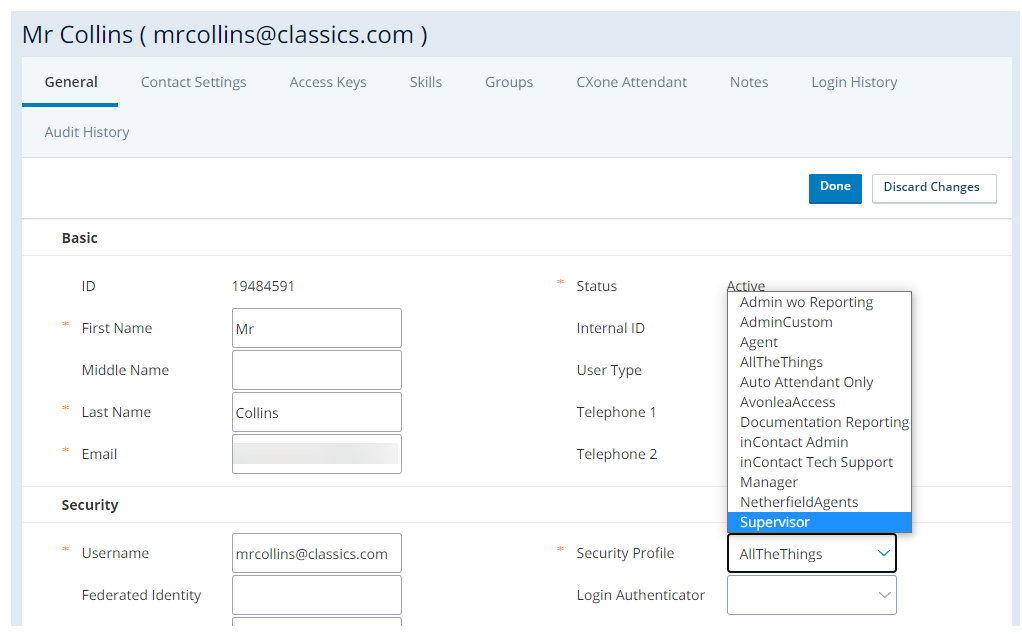
Open the user you want to edit.
- In the General tab, click Edit.
-
In the Security section, use the Security Profile drop-down to select the security profile.
-
Select a Login Authenticator.
- Click Done.