Filters to help you find recordings on the Recorded Interactions page . There are two kinds of filters: quick filters and custom filters. Quick filters are made using commonly used filter criteria, such as agent or date. Custom filters allow you to create your own filters using multiple parameters, and you can save them to reuse.
When you use a filter, the results show you only recordings that you have permission to access.
If your organization uses custom terminology settings, the labels for any or all of the column headings and fields will match those settings.
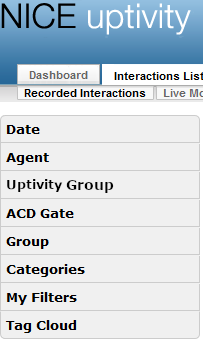
Use Quick Filters
- On the Recorded Interactions page, click one of the quick filters in the menu on the left side of the page.
- Click one of the options in the expanded menu for the filter you clicked. Learn more about the quick filters

Depending on the configuration of your Uptivity system, you may have some or all of these quick filters available to you.
Filter
Description
Date Filters based on the date a recording was made. Dates with recordings available are blue, while dates with no recordings available are black.
You can change the month and the year, then click the date you want. When you apply a date filter, it appears in the Filter bar at the top of the Recorded Interactions list as Recording Time.
Agent Filters based on agent ID to display all recordings made by a single agent. If an agent has multiple phone extensions or login numbers assigned to them, you can filter records for one of the numbers by clicking the triangle icon next to the agent icon and then the number you want to filter with.
Only the current extensions configured in the user account appear in the list. If the agent had other extensions in the past, that information remains on the call record, but you cannot filter for it.
Click an agent's name to see all of the recordings associated with that agent.
Uptivity Group Filters based on QA Groups, which are collections of users that your administrator has defined in a way that makes sense for your organization.
Click one of the QA Groups to filter on the recordings made by members of that group.
ACD Gate Filters based on ACD
Acronym for Automatic Call Distributor - A device used to manage and distribute incoming calls to a specific group of terminals. / PBX An acronym for Private Branch Exchange. A telephone switching device owned by a private company that serves a particular business or office. gates or queues. The options available to you depend on how your organization's telephony equipment is set up, and which queues or gates you have permission to view. Additionally, these options may be listed by name or number, depending on the system configuration. Click one of the options to view recordings of calls delivered to that queue or gate.
ACD Group Filters based on ACD / PBX groups (such as hunt or skill groups). The options available to you depend on how your organization's telephony equipment is set up, and which groups you have permission to view. Additionally, these options may be listed by name or number, depending on the system configuration.
Click one of the options to view recordings of calls delivered to that group.
Categories Filters based on user-created categories that are available to you.
Click the triangle icon of parent category that contains the category you want to filter on, then click the category name. You can also create your own categories.
My Filters Filters based on custom filters that you have made, or on filters created by other users and made available to you as public filters. You can apply existing filters or create a new one.
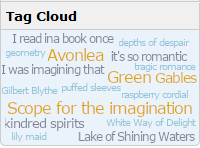
Tag Cloud Filters based on the frequency of words or phrases in recordings that NICE Uptivity Speech Analytics is configured to tag. The Tag Cloud filter is available only if your organization uses NICE Uptivity Speech Analytics. You can use the Tag Cloud to filter call recordings by the tag groups assigned when the speech analytics engine reviewed the recording.
- You can click a different quick filter to apply an additional filter.
- You can remove a previously-applied filter by clicking the name of the filter in the filter bar above the Recorded Interactions
Create a Custom Filter
You can create a new filter from scratch, or you can copy an existing filter and make changes, then save it as a new filter.
- Click Filter in the filter bar at the top of the Recorded Interactions list.
- Set the criteria and choose an operator for each criterion to filter the interactions you want to display.Learn more about the fields in this step
If your organization uses custom terminology settings, the labels for these fields will match those settings.
- You can click Save as My Filter, enter a name for the filter, select whether the filter will be Public or Private, and click OK.
- To use the filter now, click Apply.
Use a Custom Filter
If you have saved custom filters, you can use them anytime you want to find that kind of recordings:
- Click My Filters in the quick filter menu on the left side of the Recorded Interactions page, then click Private Filters or Public Filters to open the appropriate group of filters.
- Click Apply next to the filter you want to apply to the available recordings.
Set Your Default Filter
You can set a saved filter as your default filter so that the Recorded Interactions page opens with that filter in place. The default filter is an individual setting; other users can set different default filters.
- In the NICE Uptivity Web Portal, click Interactions List.
- Click My Filters in the quick filter menu on the left side of the page, then click Private Filters or Public Filters to open the appropriate group of filters.
- Click Default next to the filter you want as your default.
Manage Saved Filters
You can copy an existing filter to create a new one, or edit an existing filter.
- Click My Filters in the quick filter menu on the left side of the page, then click Private Filters or Public Filters to open the appropriate group of filters.
- Click Edit next to the filter you want to edit or copy.
- Revise the filter settings and criteria.
- Click Save As My Filter.
- To save this as a new filter, enter a name. Uptivity then saves it as a new filter and leaves the original filter unchanged. If you do not provide a new name, Uptivity overwrites the existing filter and changes the Owner to show your username.
- You can select whether the filter will be Public or Private. The default status is Private. If the filter you are editing was a Public filter, and you want it to remain public, you must select Public again.
- Click OK.
Filter with the Tag Cloud
Required Permission — Allow Analytics View
If your organization uses NICE Uptivity Speech Analytics, the Tag Cloud quick filter is available on the Recorded Interactions page. It sorts call recordings by the tag groups assigned when the speech analytics engine reviewed the recording.
- Click Tag Cloud on the Recorded Interactions page.
- Click a tag once to display all recordings that match the tag. The selected tag moves to the top left corner of the Tag Cloud menu.
- Click additional tags to refine your filter and open the Multiple Tags selector.
- To remove Tag Cloud filters, click the X next to an individual tag to remove that tag or click the X next to Tag in the filter bar to remove all tags.