Import Workstations
By default, Uptivity matches Windows usernames from user profiles and logged-in NICE Uptivity Screen Recording clients to associate workstations with agents.
This topic explains how to add multiple, statically mapped workstations in environments where the default method cannot be used.
For more information, see NICE Uptivity Screen Recording Overview.
A common reason for mapping workstations is that Windows usernames are not unique for each user. However, multiple Uptivity features do not work correctly in this scenario. See Workstation Considerations in NICE Uptivity Screen Recording Overview.
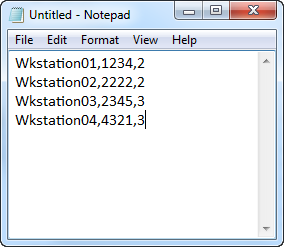
Before starting this task, create your import file using Microsoft Excel or another program that allows you to save a CSV (comma-separated values) file. Each mapped workstation entry must be on a separate row, as shown in the following image, with the fields in this order:
- Workstation
- Port
- Location ID
Do not include a header row.

If you do not know the Location IDs used in your system, open the NICE Uptivity Web Portal and click Administration System Settings Locations Settings. The Location ID for each location is shown in the Ident column.
- In the NICE Uptivity Web Portal, click AdministrationSystem SettingsWorkstations Settings.
- Click Import Workstations.
- Click Browse, locate your CSV file, and then click Open.
- Click Upload File.
- If all entries display the value True in the Verify column, click Import Now. Otherwise, troubleshoot your CSV file and then repeat this task.
See Also
- Add Mapped Workstations — for information on adding individual entries to the list of mapped workstations
