

When a contact starts a chat session, Salesforce Agent (SFA) prompts you to accept the incoming chat. All chats are inbound only. You must set your Availability status to Available and wait for a contact to initiate a chat. You can connect to a maximum of eight chat sessions, concurrently. Each chat opens in its own tab. You can copy text within a chat and paste the text into an email, case notes, or other media for future use.
Your administrator may have configured Advanced Chat, which allows you to handle chats with case information and, in a single-channel handling environment, the option for co-browsing. Co-browsing allows the contact to share the computer screen so you can better help the contact.
Handle an Inbound Chat
-
Click Accept when a chat confirmation window appears. If you take longer than 45 seconds to respond, the chat request is automatically rejected and your Availability state
 The availability status of an agent. is changed to Refused. When you click Accept, the chat window opens, and a chat control panel appears in the Salesforce Agent interface.
 -
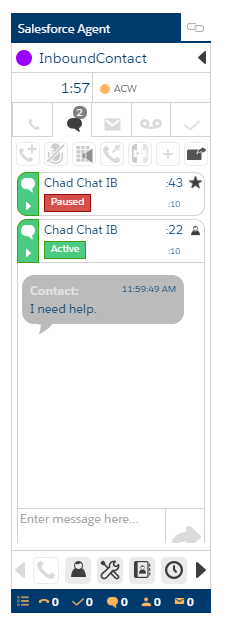
Pay attention to the information in the chat control panel.
-
The icon in the upper right corner of the chat control panel indicates who sent the last message.
-
A headset icon means you sent the last message.
-
A person icon means the contact sent the last message.
-
-
The timer in the large font indicates how much time has passed since you last sent or received a message. The timer in the small font indicates the total amount of time the chat has been in progress.
-
If you actively respond to a chat in under 90 seconds, the panel remains green.
-
If you take more than 90 seconds to respond to a message from the contact, the panel turns yellow.
-
If you take more than 180 seconds to respond to a message from the contact, the panel turns red to let you know you must respond as soon as possible.
-
-
- During the chat, you can copy text within a chat, transfer the chat, take notes, or take on additional chats.
- When you are finished chatting with the contact, end the chat. Hover your cursor over the arrow in the colored part of the chat control panel and then click Disconnect (indicated by a downward pointing arrow icon).
The chat control panel turns gray and says Disconnected for a few seconds before disappearing from your console. You now receive the after-chat task screen pop, which includes a transcript of the entire chat. If configured by your administrator, complete the task that populates in Salesforce regarding the contact.
Manage Multiple Chats
-
When handling a chat, click Add Chat (indicated by a flashing orange plus sign icon) to accept another incoming chat.
The Chat Queue icon number decreases by one and a new chat control panel appears below the others. Notice that the new chat is Active and the previous chat is Paused.
The individual chat control panels shrink to one line when you manage four or more chats.
-
Click Popout (indicated by a rectangle with an arrow icon) to open a chat in a new window.
-
To activate one of your paused chats, click the chat's control panel. Doing so pauses other chats.
Pay attention to the last response timers and the icons on the chat control panels so you do not neglect any of your contacts.
Transfer A Chat
-
Click the chat control panel of the chat you want to transfer. This makes the chat Active and pauses the others.
-
Hover your cursor over the arrow in the colored part of the chat control panel and then click Transfer (indicated by an arrow icon) to bring up the Skill List.
-
Choose a skill
Used to automate delivery of interactions based on agent skills, abilities, and knowledge. to handle the chat. - Click Yes to complete the transfer. The chat is removed from your console and an agent with the skill you chose receives a confirmation window for it. When a new agent accepts the chat, all messages from your original chat with the contact appear in that agent's chat window.
Take Notes During a Chat
Because you can engage in multiple chats simultaneously, and each conversation with a contact has its own set of notes, you access the notes panel differently for a chat than you would for a call.
-
If you are currently handling multiple chats, click the chat control panel of the chat you want to take notes for. This makes the chat Active and pauses the others.
-
Hover your cursor over the arrow in the colored part of the chat control panel and then click Notes (indicated by a page and plus sign icon).
-
Click the Notes tab and write your notes in the white space.
- Use the Who drop-down to select any associated individuals, such as a contact or a supervisor, and the What drop-down to select any associated accounts, cases, or opportunities.
- When you are done writing notes, click X on the right side of the Notes tab. Salesforce Agent saves your notes and closes the window.
Use Quick Replies During a Chat
Use quick replies in Salesforce Agent to send fast, generic responses to customers during an email or chat exchange.
-
Click Quick Replies (indicated by a pencil and paper icon).
-
Select the appropriate quick reply from the drop-down list.
-
If prompted, replace variables with specific information.
-
When the quick reply appears in your chat message, modify it if necessary.
-
Click Send.