

The sections on this page describe how to configure and enable NiCE CXone Agent Workspace for Salesforce Voice (Agent for SCV) features for agents.
Configure Agent Login Options
- In NiCE CXone, click the app selector
 and select Admin.
 - Click Security Profiles.
- Select the security profile assigned to your agents who use
- Click the Permissions tab, then click Edit.
-
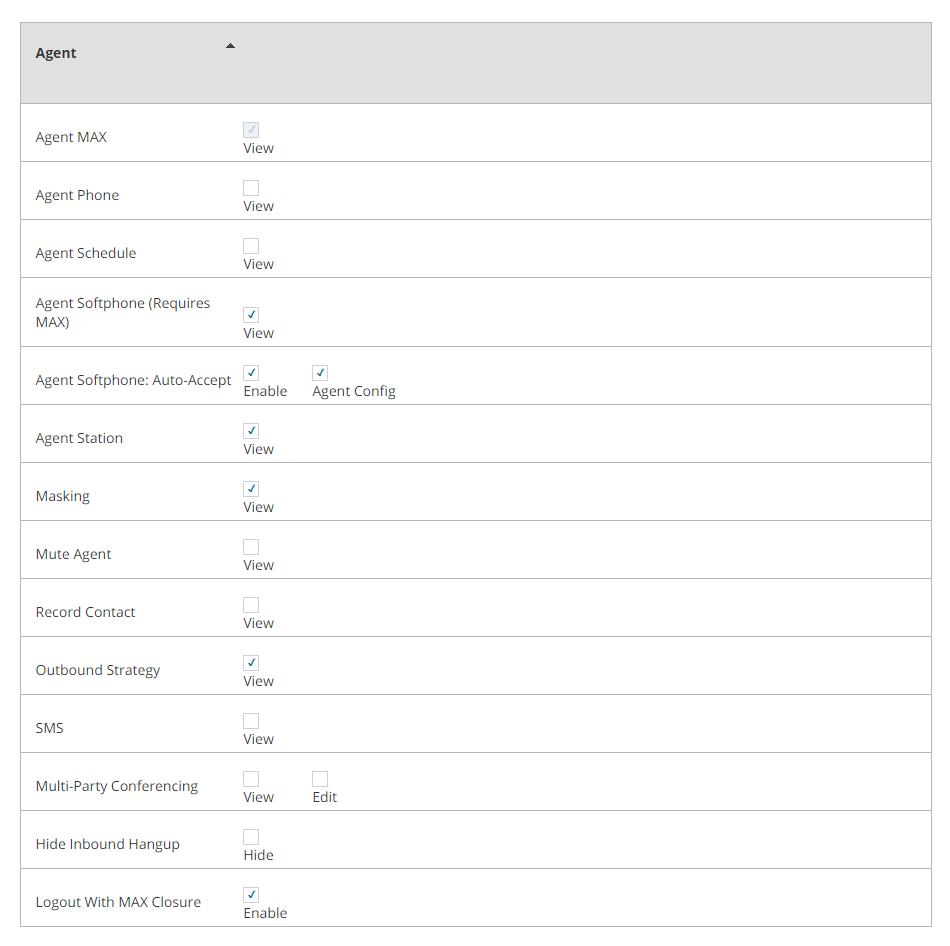
Enable at least one of the following permissions to specify the options agents see when logging in:
 Agent Phone
Agent Phone prompts agents to enter a phone number to log in to
Agent Station
Agent Station prompts agents to enter a station ID to log in to
- Scroll to the top and click Done.
Enable Default Outbound Phone Skill for Multi-Skill Agents
Agents can set their default outbound phone skill in Agent Workspace for Salesforce Voice (Agent for SCV). You must enable this for agents with multiple outbound voice skills![]() Used to automate delivery of interactions based on agent skills, abilities, and knowledge.. Those agents must have the UserSkillSettings custom object permission assigned to them in Salesforce.
Used to automate delivery of interactions based on agent skills, abilities, and knowledge.. Those agents must have the UserSkillSettings custom object permission assigned to them in Salesforce.
There are two ways to complete this process. Follow the steps based on how Setup  > Profiles appears in your Salesforce instance:
For Classic View Profiles
If Setup > Profiles in your Salesforce instance appears in classic view, follow these steps.
- Log in to your Salesforce org.
- Click Setup in the top right corner in Salesforce. Launch the Setup application.
- Search for Profiles. Select the Profiles search result.
- Select the profile you use for agents.
- Click Edit.
- Scroll down to the Custom Object Permissions section. Next to UserSkillSettings, enable the Read, Create, Edit, Delete, and View All Records permissions.
- Click Save at the bottom.
- In that same profile, scroll down to the Field-Level Security section. Next to UserSkillSettings, click View.
- Click Edit.
- Enable Read Access and Edit Access for the following fields:
- DefaultOutboundPhoneSkillId
- User
- Click Save.
For Object Setting Layout Profiles
If Setup > Profiles in your Salesforce instance uses the object settings layout, follow these steps.
- Log in to your Salesforce org.
- Click Setup in the top right corner in Salesforce. Launch the Setup application.
- Search for Profiles. Select the Profiles search result.
- Select the profile you use for agents.
- Click Object Settings.
- Find UserSkillSettings. Click Edit.
- Enable the Read, Create, Edit, and View All permissions for UserSkillSettings.
- Click Save.
- In that same profile, click Field Permissions.
- Find UserSkillSettings. Click Edit.
- Enable Read and Edit for the following fields:
- DefaultOutboundPhoneSkillId
- User
- Click Save.
Enable Integrated Softphone
Required permissions: Security Profile Edit
Ask your account representative to turn on Integrated Softphone for your business unit![]() High-level organizational grouping used to manage technical support, billing, and global settings for your NiCE CXone system.. After that, it is automatically enabled for your security profiles. You don't need to select these permissions unless you disabled them and want to re-enable them.
High-level organizational grouping used to manage technical support, billing, and global settings for your NiCE CXone system.. After that, it is automatically enabled for your security profiles. You don't need to select these permissions unless you disabled them and want to re-enable them.
- Click the app selector and select Admin.
- Go to Security Profiles.
-
Open the agent's security profile.
-
Click the Permissions tab. Scroll down to the Salesforce Agent section.
-
-
Select Enable to have calls accepted automatically.
-
Select Agent Config (Enable Config) to have agents accept calls manually.
-
Selecting both is not recommended. This disables the Accept and Reject buttons.
-
- Scroll to the top of the page and click Done.
Enable Mask
-
In NiCE CXone, click the app selector
and select Admin. -
In the left navigation menu, click Security Profiles.
-
Open the agent's security profile.
-
Click the Permissions tab, then click Edit.
-
Scroll down to the Agent section. Select the MaskingView permission.
-
Scroll to the top of the page and click Done.
Enable Multi-Party Conferencing
If you want your agents to be able to conference with more than two additional parties, follow these steps.
- In NiCE CXone, click the app selector and select Admin.
-
Click Security Profiles.
-
Open the agent's security profile.
-
Click the Permissions tab, then click Edit.
-
Scroll down to the Agent section, then select the Multi-Party ConferencingView permission.
-
Scroll to the top of the page and click Done.
Enable Mute
-
In NiCE CXone, click the app selector
and select Admin. -
Click Security Profiles.
-
Open the agent's security profile.
-
Click the Permissions tab, then click Edit.
-
Select the Mute AgentView permission.
-
Scroll to the top of the page and click Done.
Enable Record
-
In NiCE CXone, click the app selector
and select Admin. -
Click Security Profiles.
-
Select the agent's security profile.
-
Click the Permissions tab, then click Edit.
-
Scroll down to the Agent section.
-
Select the Record ContactView permission.
-
Scroll to the top of the page and click Done.