StandardBot behavior tests allow you to check how your text or voice virtual agent performs the core behaviors. You can perform all tests using the StandardBot test script. Currently the example script tests all behaviors for text virtual agents and some behaviors for voice virtual agents.
StandardBot tests work by having the script send a trigger to the virtual agent. The virtual agent is configured to respond to each trigger in a specific way. The script is set up to parse out and identify parts of the virtual agent's response. If the response doesn't contain what the script is looking for, the virtual agent doesn't pass the test. If it does, the virtual agent passes the test.

The triggers are unique to the StandardBot tests. By default, they're different from the words and automated intents that your virtual agent is trained to respond to in a production environment. The default StandardBot test triggers are unlikely ever to be used by contacts. For example, debugStandardBotExchange and debugStandardBotScriptPayload are two of the default trigger phrases in the script. Because of this, the StandardBot tests are safe to use in a production environment.
Test Categories
There are two types of StandardBot tests:
- Tests to verify that the virtual agent understands the input it receives:
- Tests to verify that the virtual agent responds with the expected format:
Pass Criteria
In addition to triggers and responses, each StandardBot test has criteria that must be met for a successful test. To pass a test, the virtual agent must return the correct response. For many of the tests, this response is different from the response the virtual agent would give in a live interaction. This means that you can be sure your virtual agent has passed each test.
For example, to pass the Bot Exchange test, a virtual agent must return the phrase bot response. This is not a phrase a virtual agent would ordinarily use during an interaction. It's unique and specific to the Bot Exchange test. This is how you know it's the correct response to the test.
Prepare for StandardBot Tests
Before you can run StandardBot tests on your virtual agent, you must:
- Upgrade your virtual agent to Virtual Agent Hub integration version 3.0, if it's not currently using this version.
-
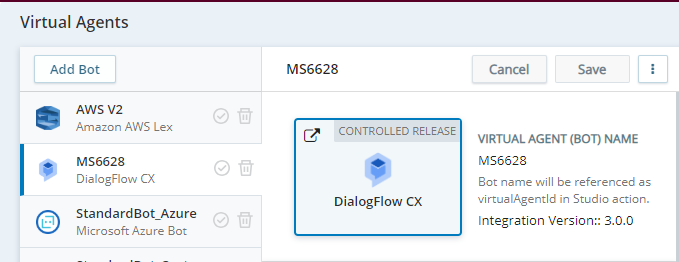
Make a note of the name of the virtual agent you're testing. The name is used as the virtual agent ID in Studio scripts. You need this information to set up the testing script. You can find it in the virtual agent's app in Virtual Agent Hub. For example, in the following image, the virtual agent's name is MS6628.
-
Train your virtual agent to respond to the trigger words, phrases, and automated intents used in the tests. Refer to the documentation from your virtual agent provider for information about how to train your virtual agent.
-
Download and set up the StandardBot script.
Convert to Integration Version 3.0
All new virtual agents that you add should be created using integration version 3.0. For existing virtual agents, converting to integration version 3.0 is optional. However, if you don't convert, you won't be able to use StandardBot with that virtual agent.
If you're converting to integration version 3.0 from a previous version, the compatibility between your configurations, script, and integration version 3.0 is unknown. To prevent any unexpected disruption to your organization's virtual agent service, it's best to verify the upgrade in a test environment before you convert your production environment.
You can use the StandardBot tests to determine if there are any problems with converting to the new version and what they are. The steps below outline one possible approach to a conversion:
- Clone the virtual agent app in Virtual Agent Hub that you want to convert.
- Click the cloned version of the app in Virtual Agent Hub.
- On the Properties page, select 3.0 from the Integration Version field.
- Click Save.
- In your virtual agent provider's management console, add the StandardBot behaviors to the virtual agent you are converting. This includes the automated intents and the trigger words.
- Run the StandardBot tests on the cloned version of the app using the appropriate StandardBot script in Studio.
- Make a note of anything that fails. Those are the virtual agent configurations or places in the script that you need to address before converting your production version.
- Fix any issues with your script and configurations. Corrections may involve making changes in your virtual agent provider’s console, the settings in Virtual Agent Hub, or the Studio script.
- Run the StandardBot tests and your cloned script again.
- Repeat these steps until your virtual agent passes all tests and your Studio script behaves as you expect it to.
- When your virtual agent passes all tests, you can copy the fixes into your production version. If you had to make extensive changes to your configurations and script, you may want to use the current testing version as your new production version.
Configure and Train Your Virtual Agent
You must train your virtual agent to recognize the trigger words, phrases, and automated intents used in the StandardBot tests. This is the only way the tests will work. If the virtual agent doesn't recognize a trigger as something it needs to respond to in a certain way, it will not respond appropriately and the test will be invalid. Refer to the documentation from your virtual agent provider to learn how to train your virtual agent.
The StandardBot script is configured to use a default set of triggers. If you want to use different triggers, you need to change the script configuration as well as train your virtual agent to respond to the new triggers. The default triggers are responses for each test are described on the Core Behaviors help page.
Set Up the StandardBot Script
Before you use the StandardBot script, you need to customize it. This includes adding the name of the virtual agent and an email address where you want the test outcome report emailed.
- Download and import the StandardBot script into Studio and save it.
- Double-click the Snippet action with the label Declare Objects & Set Bot to Test.
- Click the
- If you want to have the test report sent to an email address, locate the
- Configure the script with the name of the virtual agent you're testing:
- Change the value of BotsList[1].BotName to the name of the virtual agent you're testing. You can find this name in Virtual Agent Hub, as described in the Prepare for StandardBot Tests section on this page. For example, BotsList[1].BotName = "MS6628"
- If you have more than one virtual agent you want to test with this script, remove the comment characters ( // ) from in front of the next ASSIGN statement. Add the name of another virtual agent as the value. For example, // ASSIGN BotsList[2].BotName = "StandardBot_DialogFlow_ES" would become ASSIGN BotsList[2].BotName = "GDF2123".
- Configure which virtual agent you want the script to test:
- If the script is set up to test only one virtual agent, don't change the value of the BotToTest variable. It should not contain any text or spaces between the two double quotes. For example, BotToTest = "".
- If the script is set up to test more than one virtual agent and you want it to run the tests on all of them, don't change the value of the BotToTest variable. It should not contain any text or spaces between the two double quotes. For example, BotToTest = "".
- If the script is set up to test more than one virtual agent but you only want to run the test on one of them, change the value of BotToTest to the index value of that virtual agent in the BotsList object. For example, to test the GDF2123 virtual agent from the preceding step, enter 2 as the value for BotToTest.
-
Configure what tests the script runs. Change the value of testPath to one of the following, if needed. The default is testAll. The options are:
- testAll: Use this value if you want the script to run all StandardBot tests. This option runs the End Conversation test but not the Escalation test.
-
EscalationPath: Use this value if you want the script to run the Escalation test. This tests the virtual agent's ability to escalate an interaction to a live agent.
- Click OK to close the
- Click Close on the TextBot Exchange window. This adds your selected virtual agent or agents to the
- Save your script.
Customize the StandardBot Script
For most tests, you don't need to customize the StandardBot script. The Automated Intent test requires that you modify the script so that it can test the automated intents you use in your script. You can also follow these steps to modify other tests, if necessary.
If you make changes to the test values in the script, you must use the same values when configuring your virtual agent. If you only make the change in one place, the test will not work.

| Test | Details |
|---|---|
| Test 1 - Welcome Intent |
Modify here: Config test data snippet, TestData object Evaluate Results snippet, SWITCH CurrentTest statement, CASE 1 Default input: AutoIntent = "Welcome" Default pass criteria:
|
|
Test 2 - StandardBot Exchange |
Modify here: Config test data snippet, TestData object Evaluate Results snippet, SWITCH CurrentTest statement, CASE 2 Default input: Default pass criteria:
|
| Test 3 - Multiple Messages |
Modify here: Config test data snippet, TestData object Evaluate Results snippet, SWITCH CurrentTest statement, CASE 3 Default input: UserInput = " Default pass criteria: IF transcriptString.contains("one") && transcriptString2.contains("two") && transcriptString3.contains("three") |
| Test 4 - Rich Text Messages |
Modify here: Config test data snippet, TestData object Evaluate Results snippet, SWITCH CurrentTest statement, CASE 4 Default input: UserInput = " Default pass criteria: IF transcriptString.contains('dfomessage":') && transcriptString2.contains('type":') && transcriptString.contains('payload":') |
| Test 5 - User Input not Understood |
Modify here: Config test data snippet, TestData object Evaluate Results snippet, SWITCH CurrentTest statement, CASE 5 Default input: UserInput = " Default pass criteria: IF (BotIntent= "userinputnotunderstood") && BotDiagnostics.contains('userinputnotunderstood') |
| Test 6 - User Input Timeout |
Modify here: Config test data snippet, TestData object Evaluate Results snippet, SWITCH CurrentTest statement, CASE 6 Default input: AutoIntent= "StandardBotUserInputTimeout" Default pass criteria: IF (BotIntent = "userinputtimeout") && BotDiagnostics.contains('userinputtimeout') |
| Test 7 - Custom Payload to Script |
Modify here: Config test data snippet, TestData object Evaluate Results snippet, SWITCH CurrentTest statement, CASE 7 Default input: UserInput = " Default pass criteria:
|
| Test 8 - Custom Payload to Virtual Agent |
Modify here: Config test data snippet, TestData object Config test data snippet, customInputToBot object, any echoValue parameter Evaluate Results snippet, SWITCH CurrentTest statement, CASE 8 Default input: UserInput = " CustomPayload = customInputToBotJson Default pass criteria:
|
| Test 9 - Automated Intent |
Modify here: Config test data snippet, TestData object Evaluate Results snippet, SWITCH CurrentTest statement, CASE 9 Default input: AutoIntent = "StandardBotExchange" Default pass criteria:
|
| Test 10 - Branch Override |
Modify here: Config test data snippet, TestData object Evaluate Results snippet, SWITCH CurrentTest statement, CASE 10 Default input: UserInput = " Default pass criteria:
|
| Test 11 - End Conversation |
Modify here: Config test data snippet, TestData object Evaluate Results snippet, SWITCH CurrentTest statement, CASE 11 Default input: UserInput = " Default pass criteria:
|
| Test 12 - Escalation |
Modify here: Config test data snippet, TestData object Evaluate Results snippet, SWITCH CurrentTest statement, CASE 12 Default input: UserInput = " Default pass criteria: IF BotIntent.contains('escalat') && BotDiagnostics.contains('returncontroltoscript') |
- In Studio, open the StandardBot script you want to customize.
- Save a copy of the script as a backup in case you need to undo your changes.
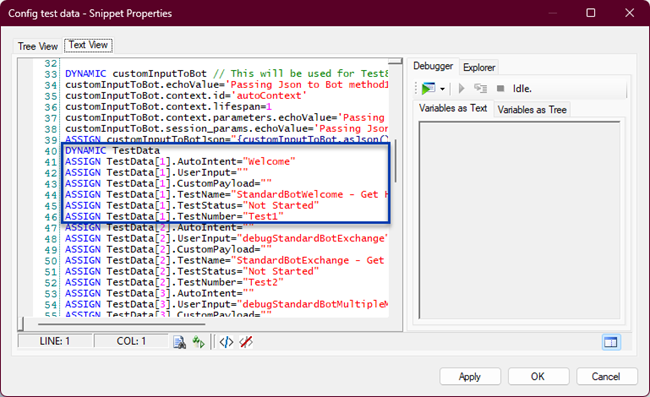
- Double-click the Config test data
-
On the Text View tab, scroll down to the DYNAMIC TestData line, then locate the set of ASSIGN statements for the test you're modifying. This object sets up the values sent to the virtual agent to trigger each test. Each test has the following parameters in this object:
AutoIntent = "" UserInput = "" CustomPayload = "" TestName = "" TestStatus = "" TestNumber = "" - Modify any of the values you need to change, following these guidelines:
- The parameters used in testing are TestData[#].AutoIntent, TestData[#].UserInput, and TestData[#].CustomPayload.
- Not all parameters are used in each test. The default values for each test indicate the parameters that it uses. You can add a parameter if necessary, but it won't affect the outcome of the test unless you also configure your virtual agent to respond to that parameter.
- There is no need to change TestData[#].TestStatus. The script automatically updates this parameter when it runs.
- To change the name of the test, modify TestData[#].TestName.
- To change the label that appears in the report at the end of testing, change TestData[#].TestNumber.
- Click OK to save your changes and close the
-
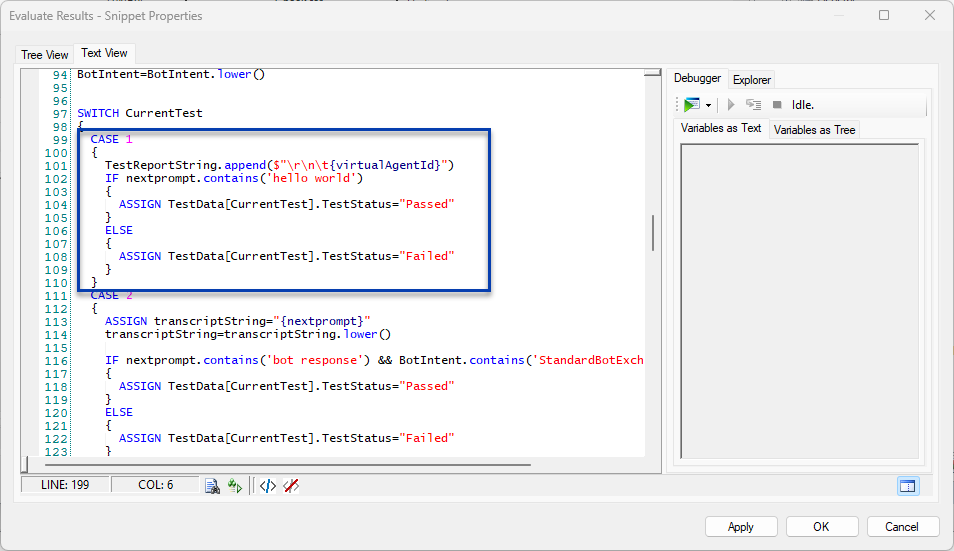
Double-click the Evaluate Results
Don't make changes to the values in the TestData object in this snippet. The script updates these values automatically. Any changes you make to these values will be overwritten when the script runs.
-
Scroll down to the SWITCH CurrentTest line. This is a SWITCH statement, which sets up a series of different actions the script takes depending on the value of the CurrentTest variable. This SWITCH statement establishes the criteria so the script can determine if the virtual agent passes each test.
- Locate the CASE statement with the number matching the test you're modifying. For example, to modify the pass criteria for test 9, Automated Intent, scroll down to CASE 9.
- In the IF statement within the CASE statement and change the value of the variables as needed.
- Click OK to save your changes and close the
- Save the script.
Run Tests from a StandardBot Script
You can test all behaviors at once using the StandardBot Test script. If you haven't done so already, configure and train your virtual agent and set up the StandardBot script.
- In Studio, open the StandardBot script you want to run.
- Click Start with Trace.
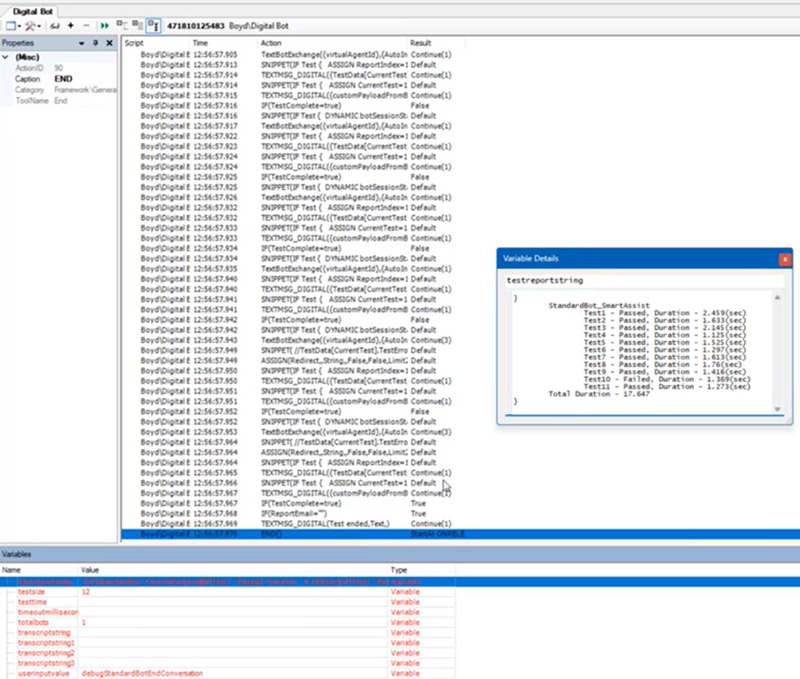
- In the Trace Output window, you can explore the results of the tests.
- Scroll to the bottom of the trace results and click on the last line, which is for the
-
On the Variables tab, locate the
Run a StandardBot Test from Virtual Agent Hub
You can test most behaviors from the Test pane in the properties page of your virtual agent's app in Virtual Agent Hub. This works for voice and text virtual agents.
To know what input to use and whether the virtual agent has passed the test, you need to look on the Core Behaviors help page. Each behavior on the page includes a StandardBot Test heading that has a table of data. The table has everything you need to know to run the test manually, including an indication of whether that test supports being run manually.
- In NiCE CXone, click the app selector
 and select Others > Integrations.
 - Click Virtual Agent Hub.
- Click on the virtual agent you want to test.
- For behaviors that trigger from human input:
- In the Test section of the properties of the selected virtual agent, enter the input described for the test you want to perform in the Type a message field. You can find the information in the Variable Input to Run Test in Script row of the test details table.
- Press Enter.
- For behaviors that trigger from automated intents:
- In the Test section of the properties of the selected virtual agent, click More Options
 next to the Type a message field.
 - Enter the automated intent you want to test. These are described for each test on the Core Behaviors help page. You can find the automated intents in the Input to Run Test Manually row of the test details table for behaviors that have automated intents.
- Click Trigger.
- In the Test section of the properties of the selected virtual agent, click More Options
- Note the virtual agent's response in the test chat window. Compare it to the pass criteria for that test.
- If your virtual agent does not pass the test, make the suggested changes to the script or virtual agent configurations, then repeat the test.
Set Up the Test Script to Run on a Schedule
You can set up the StandardBot script to run on a schedule. By doing this, StandardBot becomes a monitoring tool to inform you of issues quickly. The steps below have you modify the script so it only sends a notification if there is a problem with one of the tests.
- Open your StandardBot test script.
- If you need to, configure the email address where you want the failure notifications sent:
- Double-click the Snippet action with the label Declare Objects & Set Bot to Test.
- Click the
- Locate the
- Click OK.
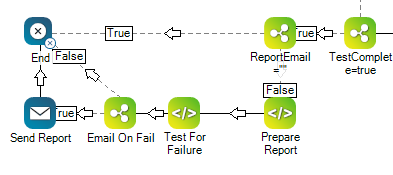
- Modify the script to only send an alert if a test fails:
- Delete the connector between the Prepare Report
Add an
- Change the captions on the two new actions to indicate their purpose. In the example, the
Double-click the
ASSIGN isProblem = testreportstring.contains("fail")- Save the snippet.
- Change the value of the Expression property of the new IF action to isProblem=1.
- Save the changes to your script.
- Delete the connector between the Prepare Report
- Set up a script schedule in NiCE CXone to run this script in the cadence you want.