If you have a single sign-on (SSO)![]() A method of controling access to multiple software systems. With Single Sign-On, a user logs in with a single ID and password to gain access to a connected system of tools, databases, or servers. infrastructure implemented using SAML 2.0
A method of controling access to multiple software systems. With Single Sign-On, a user logs in with a single ID and password to gain access to a connected system of tools, databases, or servers. infrastructure implemented using SAML 2.0![]() An acronym for Security Assertion Markup Language. This is the standard protocol for web browser Single Sign-On using secure tokens., you can integrate NICE Uptivity with your SAML system to authenticate user access to the Uptivity Web Portal.
An acronym for Security Assertion Markup Language. This is the standard protocol for web browser Single Sign-On using secure tokens., you can integrate NICE Uptivity with your SAML system to authenticate user access to the Uptivity Web Portal.
SSO is compatible with three third-party Identity Providers (IDPs): Okta, Microsoft Azure, and Google Apps. See Set Up Third-Party Identity Providers for SSO for more information.
Configure NICE Uptivity Web Portal Settings for SAML SSO
Required Permissions — Allow System Configuration
After making any changes on the Security page, the system may require an IIS restart for the changes to be reflected.
- In the NICE Uptivity Web Portal, navigate to Administration > Web Portal Settings > Security.
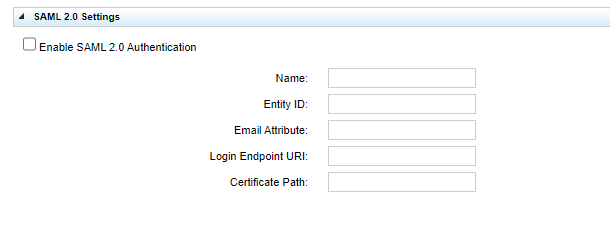
- On the Security Settings page, open the SAML 2.0 Settings section.
- Select the Enable SAML 2.0 Authentication checkbox.
- Enter your information in the Name, Entity ID, Email Attribute, Login Endpoint URI, and Certificate Path fields.
All five fields are required.
Learn more about the fields in this step

Field
Description
Name This field defines what is displayed on the login screen. For example, if you set this to SAML 2.0, the Uptivity login page will display Login with SAML 2.0. You can customize this to be anything with a maximum of 25 characters. Entity ID Enter the Uptivity application's ID as registered with your Identity Provider (IDP). This must be the full login URL of your NICE Uptivity Web Portal starting with http:// or https:// and ending with /Saml. This field has a maximum of 255 characters. Email Attribute Enter a valid field from your XML that corresponds to the user email address. It can be anything with a maximum of 255 characters.
Login Endpoint URI Enter the URL to the login page of the IDP. This is obtained while setting up your third-party IDP. Must be a valid http:// or https:// URL with a maximum of 255 characters. Certificate Path This is path to the certificate file, which is used to validate that the IDP is legitimate. This is obtained while setting up your third-party IDP. This must be a valid windows filename (no invalid path characters like ? or >) with a maximum of 255 characters. -
Click Save.
Configure NICE Uptivity Users for SAML SSO
Required Permissions — Allow User Administration
For SAML SSO to function successfully with NICE Uptivity, the email address for each Uptivity user must match the email address presented by the Identity Provider (IDP). If you need to edit users' email addresses to ensure they match, you can do so individually or you can use the Import User tool to edit multiple at a time. To do this:
- Export a list of Uptivity users.
- In the NICE Uptivity Web Portal, click Administration > Permissions > Users.
- Click Export Users.
- Download the file. The exported file will be saved to the downloaded files folder configured in your browser.
- Update user email(s) in the downloaded file.
- Open the downloaded CSV file.
- For each user in the file, edit the email value to match the user's email address presented by the IDP. Learn more about user account information in CSV files
The CSV file must contain the following values, with each value separated by a comma. If a value does not apply, or you do not want to supply it in the import file, you must still allow space for it.
- Ident (the Uptivity-generated identification number for the account; required if you are updating an existing user account)
- Username
- Password
- "Locked" value (Y/N)
- First name
- Last name
- Active agent (Y/N)
- System username
- System domain
- Employee ID
- Site ID
- Phone1
- Role ID (You must supply the Uptivity-created identification number for the role (not the name) displayed on the Roles page.)
- ActiveDirectoryDomain (if your system uses AD/Hybrid authentication)
- ActiveDirectoryUsername (if your system uses AD/Hybrid authentication)
- Save and close the file.
- Import updated file to Uptivity.
- In the NICE Uptivity Web Portal, click Administration > Permissions > Users.
- Click Import Users.
- Click Select.
- Browse to locate the CSV file that you updated and then click Open.
- If the file has a header row with column labels, you can select Import file has a header.
- Click Upload File.
- Click Perform Import.
When you import a file, Uptivity verifies that the entries in your file are in the correct format. If validation warnings are displayed, you must correct the file and then try the import again.


