Customer Integration Tasks
The information in this section is provided for your reference only. Detailed steps for Cisco configuration can be found in Cisco’s documentation, which is available on the Cisco website. You should always use the appropriate documentation from Cisco to install and configure Cisco components.
Instructions in these procedures assume that your Cisco environment uses the default settings. You should note any non-default settings and discuss them with your Uptivity installation team.
Uptivity supports buddy core failover/resiliency, in which multiple trunks are configured on the CUCM and added to a route group. A route group can be added to a route list, and the route list would be selected inside the route pattern instead of pointing it directly at a trunk. For detailed information on configuring these specific items, refer to the Cisco Unified Communications Manager Administration Guide.
While the TAPI-BiB integration supports buddy core failover configurations, it does not support multiple CUCM failover scenarios.
inContact strongly recommends that administrators performing the configuration tasks for any Cisco integration print the Customer Configuration Overview table and check each customer step as it is completed. You may also print each configuration procedure and check each step in the procedure as you complete it. The majority of Uptivity deployments which experience initial errors do so because of a Cisco setting being missed.
If you are combining the TAPI-BiB integration with an additional integration like MediaSense, UCCE, or UCCX, complete the customer procedures for this integration first. Then complete the tasks in the additional appropriate guide(s).
Identify Phones that Support Recording
For additional information about the Cisco Unified Reporting application, refer to the Cisco Unified Reporting Administration Guide.
You can use the Cisco Unified Reporting application to generate a complete list of devices that support monitoring and recording for a particular release and device pack.
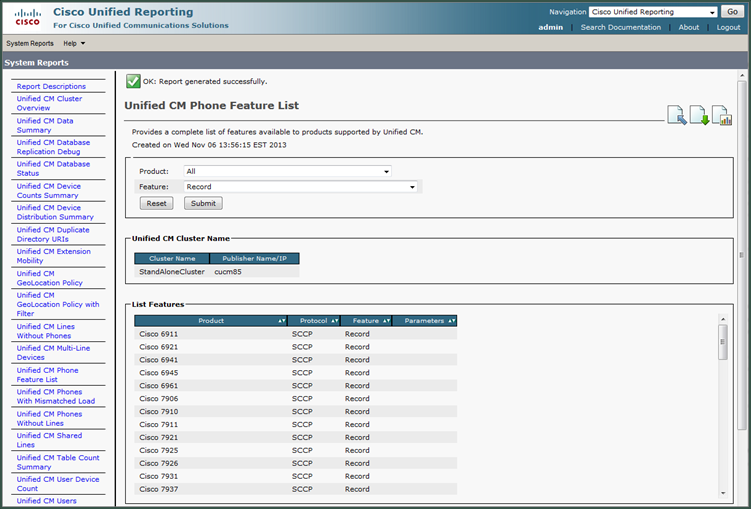
- Start Cisco Unified Reporting in one of these ways:
- Choose Cisco Unified Reporting in the Navigation menu in Cisco Unified Communications Manager Administration and click Go.
- Choose File > Cisco Unified Reporting at the Cisco Unified Real Time Monitoring Tool (RTMT) menu.
- Enter https://<server name or IP address>:8443/cucreports/ and then enter your authorized username and password.
- Click System Reports in the navigation bar and in the left column list of reports, click Unified CM Phone Feature List.
- Click Generate a new report to generate a new report or click Unified CM Phone Feature List if the report already exists.
- For Product, select All from the drop-down list.
- For Feature, select Record from the drop-down list.
- Click Submit.
The List Features pane displays a list of all devices that support the recording feature. You can click on the up and down arrows next to the column headers (Product or Protocol) to sort the list.
Configure a TAPI User Account for Uptivity
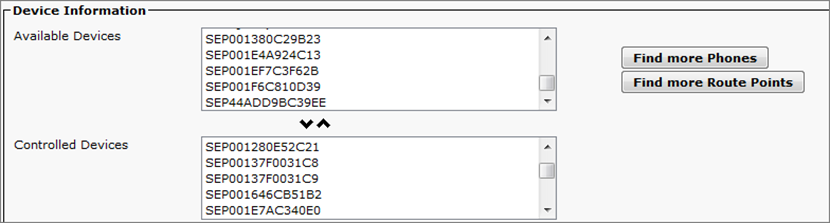
A user account must be created on the CUCM for Uptivity to use to connect and receive TAPI events for phones. This user account must be configured to monitor all devices that you want to record. If a device is not listed as a Controlled Device in the Device Information section of the user account, it will not be monitored or recorded. Device IDs shown in this section are the Selsius identifiers of the phones ("SEP" followed by the MAC address of the device).
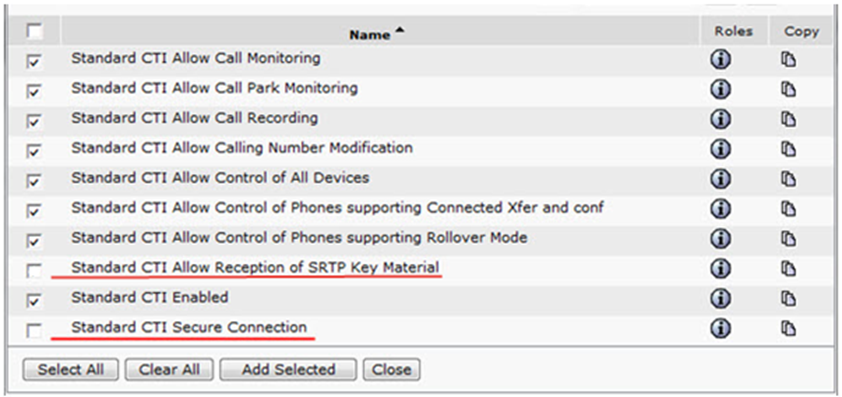
The Uptivity user account must also be added to all Access Control Groups whose names begin with "Standard CTI" except for the "Standard CTI Allow Reception of SRTP Key Material" and "Standard CTI Secure Connection" groups. Only select the Secure Connection group if TAPI encryption is configured. If you select this group and encryption is not configured, the CUCM can refuse "insecure" or non-encrypted connections, and call recording will not occur.
- Log in to the Cisco Unified CM Administration portal with an administrative account.
- Select User Management > Application User.
- On the Find and List Application Users page, click Add New.
- On the Application User Configuration page, set the User ID field and the Password in the Application User Information section. Note these values and provide them to your Uptivity installation team.
-
Under Device Information, move any devices that Uptivity will record to the Controlled Devices panel.
- Under Permissions Information, click Add to Access Control Group.
-
Select the appropriate groups, excluding the Standard CTI Allow reception of SRTP Key Material and Standard CTI Secure Connection groups, and click Add Selected.
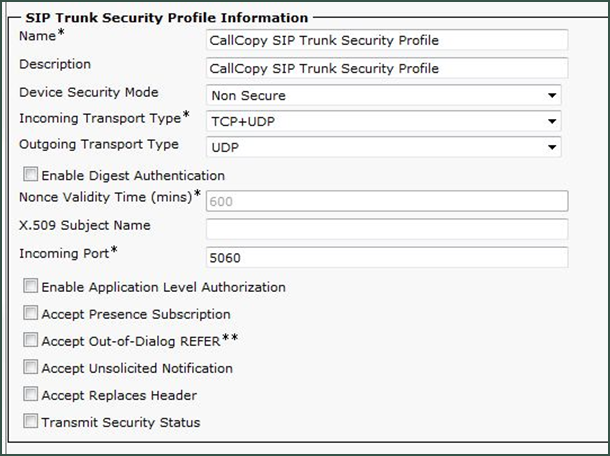
Configure a SIP Trunk Security Profile for the Recording Trunk
inContact recommends creating a separate SIP trunk security profile for the trunk between the CUCM and the recording server. This profile prevents changes made to other security profiles from interfering with call recording. Since changing security settings requires a restart of any trunks using these settings, creating a separate security profile also minimizes the need to reset existing SIP trunks.
- Log in to the Cisco Unified CM Administration portal with an administrative account.
- Select System > Security > SIP Trunk Security Profile.
- Click Add New.
- Enter a Name and a Description for this trunk.
- For Device Security Mode, select Non Secure from the drop-down list.
- For Incoming Transport Type, select TCP+UDP from the drop-down list.
- For Outgoing Transport Type, select UDP from the drop-down list.
- Do not select (or clear if selected) the checkbox for Enable Digest Authentication.
Leave all other settings at their default values.
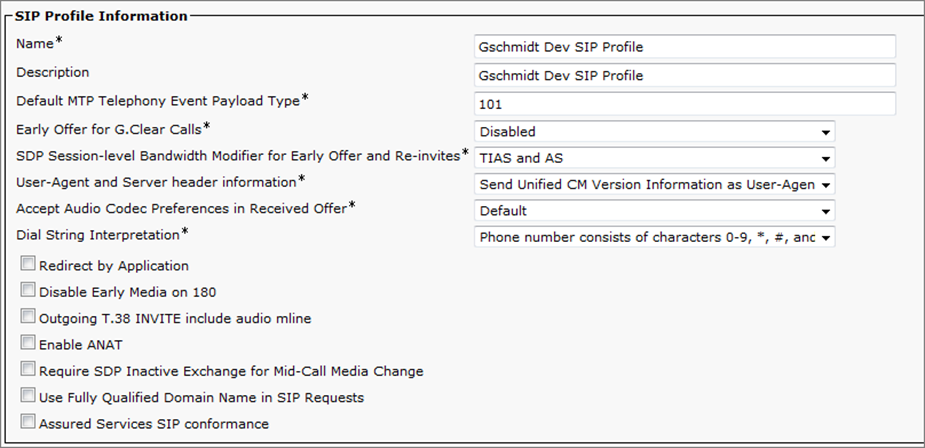
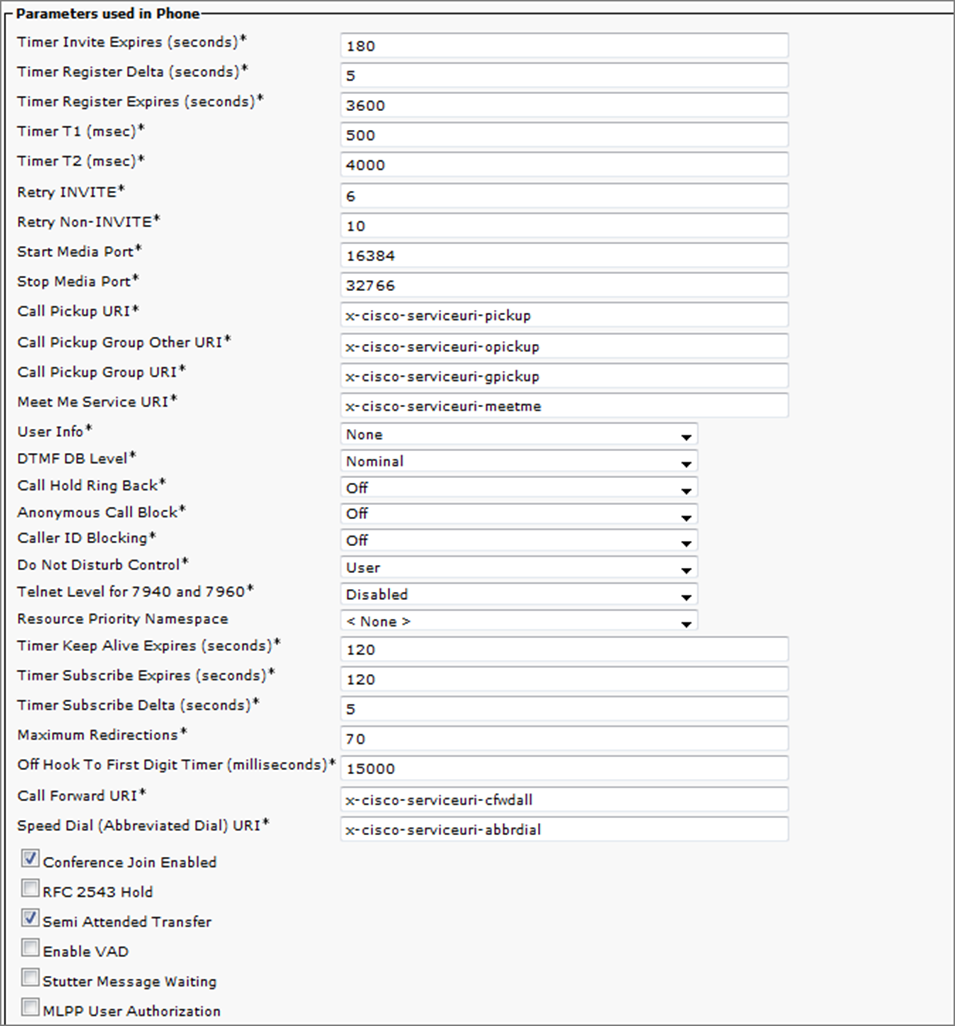
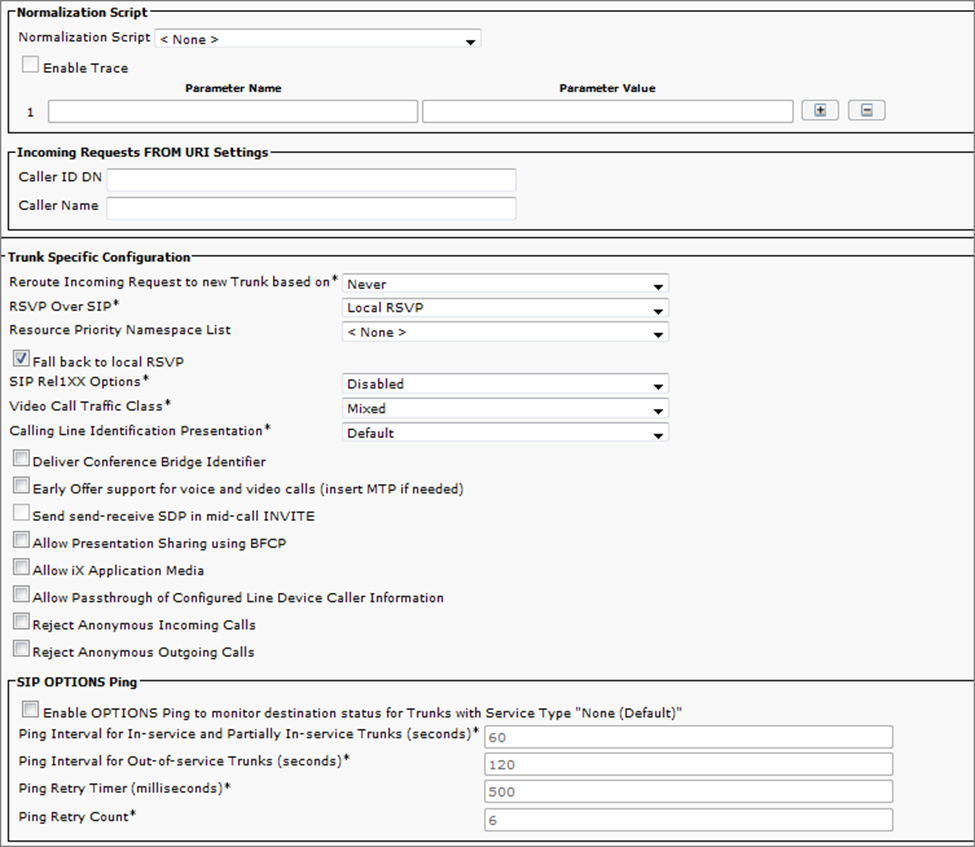
Configure a SIP Profile for the Recording Trunk
inContact recommends creating a separate SIP profile for the recording trunk, which protects it from changes made to SIP profiles for other trunks. All SIP devices using this profile must be restarted before any changes will take effect. This SIP profile should use the default settings shown in the images in this section. If any settings in your SIP profile do not match, discuss this with your Uptivity installation team.
- Log in to the Cisco Unified CM Administration portal with an administrative account.
- Select Device > Device Settings > SIP Profile.
- Click Add New.
- Enter a Name and Description for the SIP profile.
-
Verify the settings as shown in these images and then click Save.
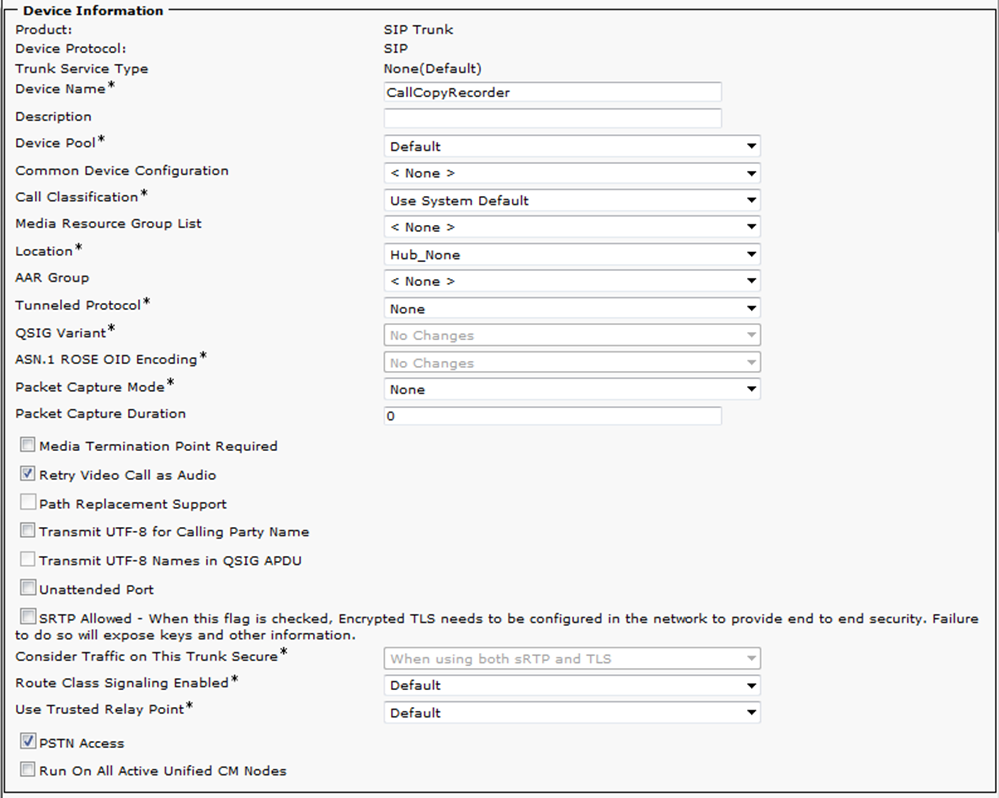
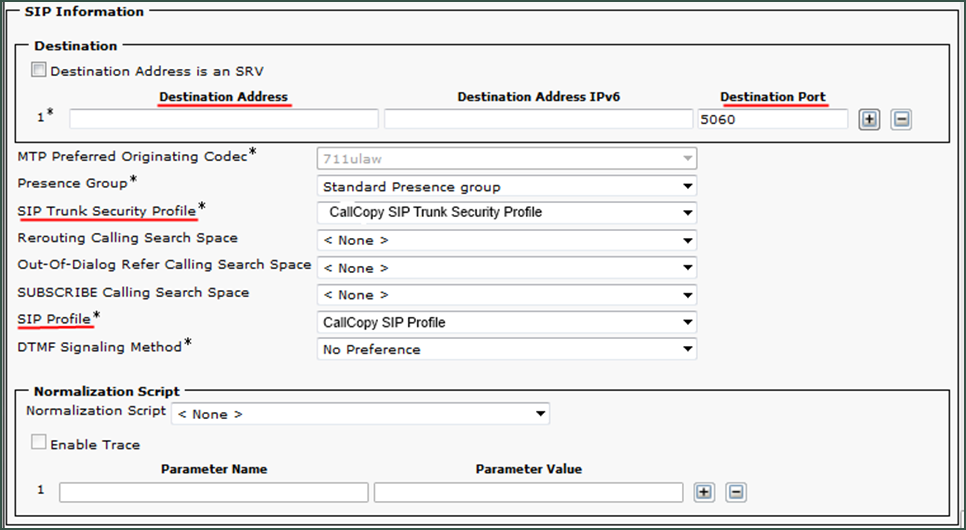
Create the SIP Recording Trunk
The audio streams to be recorded will be routed to Uptivity over a SIP trunk configured on the CUCM. Except where specifically noted, all settings should match the default settings shown in the images in this section. If any settings in your SIP profile do not match, discuss this with your Uptivity installation team.
- Log in to the Cisco Unified CM Administration portal with an administrative account.
- Select Device > Trunk.
- Click Add New.
- For Trunk Type, select SIP Trunk from the drop-down list.
- For Device Protocol, select SIP from the drop-down list.
- For Trunk Service Type, leave the setting at None (Default), and click Next.
- Enter a Device Name.
- For Device Pool, select Default from the drop-down list.
- In Destination Address in the SIP Information, enter the IP address assigned to the Uptivity recording server (that is, the server on which the CTI Core service for this integration is running). If multiple destinations are configured, you must enable the SIP Options Ping setting for the SIP Profile that is associated to the recorder’s SIP trunk.
- In Destination Port in the SIP Information, enter 5060.
- For SIP Trunk Security Profile under SIP Information, enter the name of the profile this trunk will use (see Configure a SIP Trunk Security Profile for the Recording Trunk).
- For SIP Profile under SIP Information, enter the name of the profile this trunk will use (see Configure a SIP Trunk Security Profile for the Recording Trunk).
-
Verify that all remaining settings on the Trunk Configuration page match the default settings in the images shown here, and click Save.
Create a Route Pattern for the SIP Recording Trunk
You must configure a route pattern extension to route audio streams from the BiB to the newly-created SIP trunk.
- Log in to the Cisco Unified CM Administration portal with an administrative account.
- Select Call Routing > Route/Hunt > Route Pattern.
- Click Add New.
- Enter a Route Pattern number.
- Set the Gateway/Route List value to the SIP trunk.
- Do not select (or clear if selected) the check box for Require Forced Authorization Code. This pattern cannot require a forced authorization code or Uptivity will not receive call audio.
- Click Save.
If you receive messages about activating an Authorization Code and resetting the Gateway, follow the direction specified in those messages.
Create a Recording Profile
You must create a recording profile for the route pattern assigned to the SIP recording trunk. This recording profile must reference the correct recording calling search space for the phones you wish to record. A misconfigured search space can result in recordings with no audio and line errors in logging.

- Log in to the Cisco Unified CM Administration portal with an administrative account.
- Select Device > Device Settings > Recording Profile.
- Click Add New.
- Enter a Name.
- For Recording Calling Search Space, select None, Default, or the appropriate search space from the drop-down list.
- For Recording Destination Address, enter the route pattern assigned to the SIP recording trunk.
- Click Save.
Enable Built-in-Bridge and Disable Privacy
Built-in-Bridge (BiB) and Privacy mode can be configured at both the device and server level. The instructions below are for devices.
You must enable the BiB feature on every phone to be recorded. This feature is what creates a separate audio stream of any in-progress call and routes it to the Uptivity system for recording. You can optionally use the Bulk Administration Tool to create and schedule a job that will update multiple phones at once. See your Cisco documentation for specific instructions.
BiB and Privacy have these setting options: On, Off, and Default. The Default option causes the device to use the server-level value for this setting and you must select this value if these settings are configured at the server level. If Default is not used, the device-level setting overrides the server-level setting. Conflicts between the server and device-level settings prevent call recording.
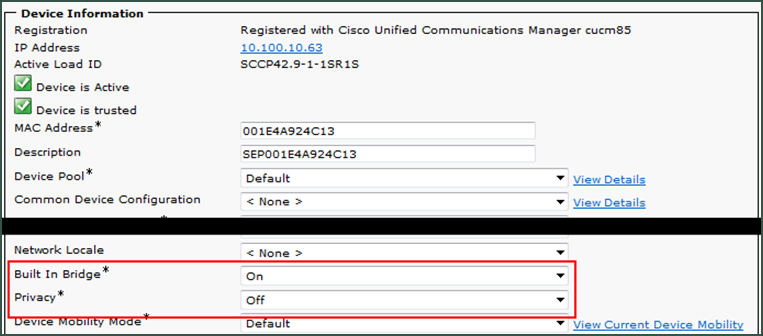
- Log in to the Cisco Unified CM Administration portal with an administrative account.
- Select Device > Phone.
- Run a query to locate devices you want to record. Queries can be run against many parameters, such as Device Name or a particular Directory Number associated with a device.
- From the resulting list of phones, click Device Name to edit the Phone Configuration.
- Under the Device Information section, set Built-in-Bridge to On.
- Set Privacy to Off. Phones with the privacy feature enabled cannot be recorded.
Repeat this task for all phones to be recorded.
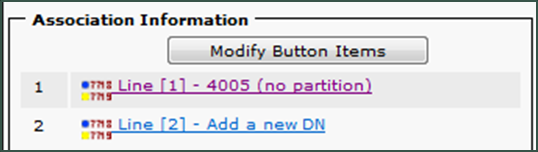
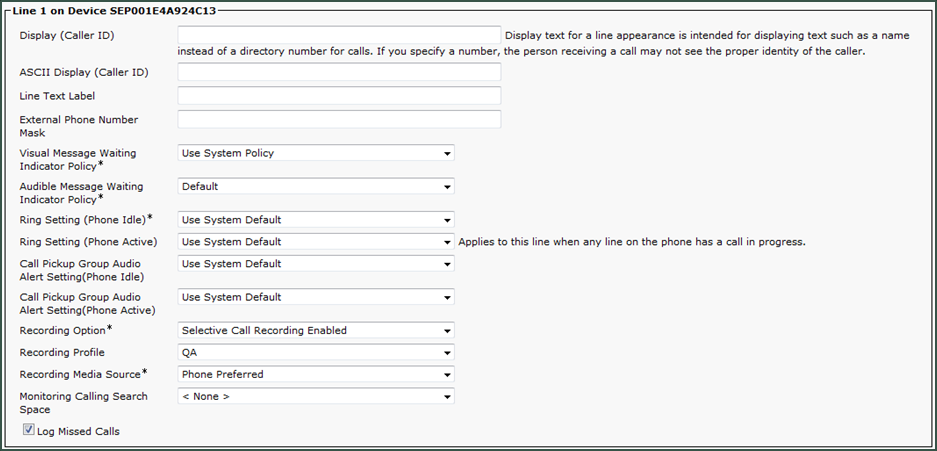
Add Recording Option and Recording Profile to Line Appearances
The recording profile (see Create a Recording Profile) must be added to each individual line appearance on a phone so that recording is allowed for that appearance. You also need to configure recording options for the appearance. This integration supports the Selective Call Recording Enabled and Automatic Call Recording Enabled options. Your Uptivity installation team needs to know which recording option you are using.
An alternate way of locating directory numbers is to select Call Routing > Directory Number. You can optionally use the Bulk Administration Tool to schedule a job that will update multiple line appearances at once.
When you create new phones, be aware that using the Copy or Super Copy option does not copy the line/directory number information. The Add Recording Option and Recording Profile to Line Appearances task must be performed manually.
- Log in to the Cisco Unified CM Administration portal with an administrative account.
- Select Device > Phone.
- Run a query to locate devices you want to record. Queries can be run against many parameters, such as Device Name or a particular Directory Number associated with a device.
- From the resulting list of phones, click Device Name to edit the Phone Configuration.
-
Click the Line Appearance to be recorded under the Association Information section.
- Enable the correct Recording Option in the Line Settings section.
- Set Recording Profile to the profile created earlier.
- Set Recording Media Source to Phone Preferred.
-
Click Save. Repeat this task for any lines that will be recorded.
|
|
|


