Schedules are collections of business rules that govern recordings in Uptivity. Recording schedules require you to set an archive action. Therefore, you should create archive actions before schedules. See Manage Archive Actions. For more information, see Recording Schedules Overview.
All of the following tasks are done from the Schedule Query Page.
Create Schedules
Follow the steps below to create a custom schedule. You can also Create Recording Schedules Based on Number of Calls or Create Recording Schedules for a Period of Time.
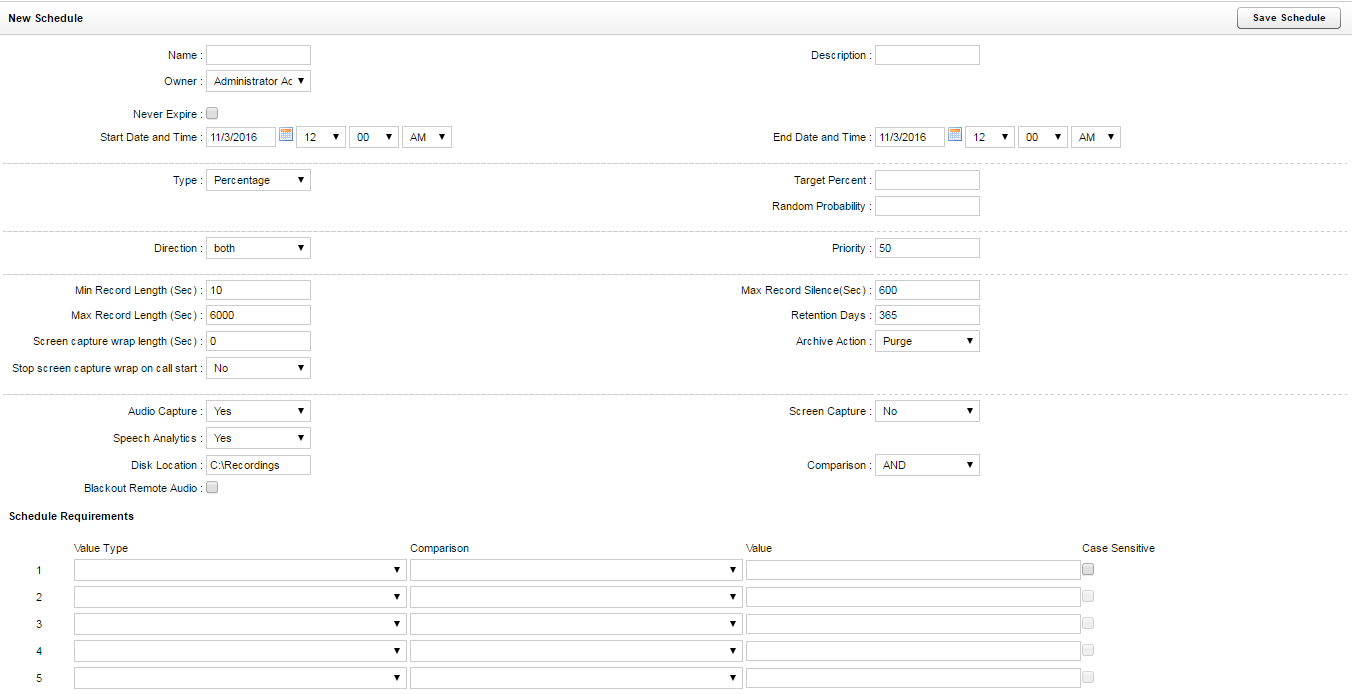
- Click Create Schedule.
- Click Create a Custom Schedule (Advanced).
- Configure the schedule criteria and parameters.Learn more about the fields in this step

Field
Description
- Name
Allows you to assign a meaningful name to the schedule for the benefit of other users. Names do not have to be unique, but using the same name for multiple schedules may be confusing. Description Allows you to provide additional information about the schedule. This information displays in the Schedule List. - Owner
Allows you to select, from a drop-down list, the person who should be contacted regarding changes to the schedule. The default value of Administrator can be used if no specific owner exists. Never Expire Allows you to specify, by selecting the checkbox, that the schedule should remain in effect until it is removed. The default value is cleared. Start Date and Time Allows you to set a starting date and time for the schedule if it should only be effective within a specific date range. The default value is 12:00 AM on the current date. End Date and Time Allows you to set an ending date and time for the schedule if it should only be effective within a specific date range. The default value is 12:00 AM on the current date. - Type
Allows you to select the type of schedule from the following choices: Set Number, Percentage, API Initiated, On-Demand, or Agent Percentage. The default value is Percentage. The parameters in this section vary depending on the type selected, with the following exception. Random Probability Allows you to type a number between 0 and 100. When a value is entered in this field, Uptivity automatically assigns its own number between 0 and 100 to each call, and then compares that value with this setting. If the call's number is equal to or less than the Random Probability value, the call is recorded. All schedule types include this setting, and it is recommended for any schedule where less than 100% of calls are recorded. When random probability is used, the schedule will generally record more calls than are specified in its requirements. However, these calls will be a better representation of calls received throughout the entire period.
Set Number This type of schedule is used to record a specific number of calls within a defined time period (for example, 500 calls in January or the next 10 calls on a specific extension).
Minutes Between Allows you to specify a minimum time period between recordings (for example, 15 minutes). The field accepts whole numbers. Target Calls Allows you to specify the total number of calls to be recorded under this schedule. Calls Between Allows you to specify a minimum number of calls between recordings (for example, 10 calls). Random Probability Randomness is applied once the Target Calls number has been reached. Percentage This type of schedule is typically set to never expire. The schedule records a specific percentage of calls.
Target Percent Allows you to specify the percentage of calls to be recorded out of the total number delivered. Setting the value to 100% will record all calls that meet the schedule criteria. Setting the value to less than 100% will record a sampling of calls which can be used for quality assurance or other purposes. Random Probability Randomness is applied once the Target Percent of calls has been reached. API Initiated This schedule type should only be configured when some or all calls are received from a third-party application via the Uptivity API. API Initiated schedules let you define different rules for these calls as opposed to calls received through other methods.
Target Percent Allows you to specify the percentage of calls to be recorded out of the total number delivered. Setting the value to 100% will record all calls that meet the schedule criteria. Setting the value to less than 100% will record a sampling of calls which can be used for quality assurance or other purposes. Random Probability Randomness is applied once the Target Percent of calls has been reached. On-Demand This schedule type should only be configured if your organization uses NICE Uptivity On-Demand. It will only apply to calls where recording is triggered by NICE Uptivity On-Demand.
Target Percent This value is ignored. Recording start/stop is controlled by the agent via NICE Uptivity On-Demand. Random Probability This value is ignored. Recording start/stop is controlled by the agent via NICE Uptivity On-Demand. Agent Percentage This schedule type allows you to type a percentage of calls (1-100) you would like to record for every agent. This percentage will apply to each agent, so if you set the percentage to 50%, then 50% of each agent's calls will be recorded.
Days Allows you to specify, by select checkboxes, the days of the week this schedule will be in effect. Target Percent Allows you to specify the percentage of calls to be recorded out of the total number delivered. Setting the value to 100% will record all calls that meet the schedule criteria. Setting the value to less than 100% will record a sampling of calls which can be used for quality assurance or other purposes. Random Probability Randomness is applied once the Target Percent of calls has been reached. Direction Allows you to limit recording under this schedule to inbound calls, outbound calls, or both. The default value is both. This information is not available for all integrations. Priority While not required, this setting is highly recommended if your organization uses multiple schedules. You can give schedules a priority rating from 1 (lowest) to 100 (highest). When a call is delivered that matches multiple schedules, Uptivity uses the schedule with the highest priority. If all matching schedules have equal priority, then the schedule with the oldest creation date is used. The default value is 50. For examples of how priority can affect recording, see Recording Schedules Overview. Min Record Length (Sec) Specifies the minimum length, in seconds, that a call must last in order to match the schedule. You can use this setting to avoid recording hang-ups. Calls not reaching the value in this field will not be recorded even if the Target Call percentage is 100%. The default value is 10. Max Record Length (Sec) Specifies the maximum length, in seconds, that a call can last in order to match the schedule. Longer calls require more disk space, so some organizations prefer to cap the recording length to prevent long calls from depleting system resources. The default value is 6000 (100 minutes). Screen capture wrap length (sec) Specifies the length of time an agent's screen should continue recording after the associated call has ended. This allows you to capture the agent's wrap time (that is, after call work). The default value is 0. This setting applies only if your organization uses NICE Uptivity Screen Recording. Stop screen capture wrap on call start Works in conjunction with the previous setting. When an agent is in wrap time, you can specify whether screen recording should stop when a new call is detected. If set to Yes, a new call or chat will trigger the end of the current capture and initiate a new one, even if the Screen capture wrap length value has not yet been reached. The default value is No. This setting applies only if your organization uses NICE Uptivity Screen Recording. Max Record Silence (sec) Specifies the maximum length of time for silence in a call before recording is automatically stopped. The default value is 600 (10 minutes).
Retention Days Specifies the number of days for calls recorded under this schedule to be saved before the first archive action is implemented. The default value is 365.
The value for Retention Days is applied when the call is recorded. Changing this value in a schedule only affects calls made after the change, not calls that have already been recorded.
Archive Action Allows you to select, from a drop-down list, one of the available archive actions in your system. The default value is Purge, which means the system will purge records when they reach the specified number of retention days.Default, which purges all records and their metadata at 365 days. For related information, see Archiving Overview.
The value for Archive Action is applied when the call is recorded. Changing this value in a schedule only affects calls made after the change, not calls that have already been recorded.
Audio Capture Specifies that audio (voice) should be captured and recorded. The default value is Yes. Screen Capture Specifies that agent desktop activity should be captured and recorded for the associated call. The default value is No. This setting applies only if your organization uses NICE Uptivity Screen Recording. Speech Analytics Specifies that the audio recording should be processed by speech analytics. The default value is Yes. This setting applies only if your organization uses NICE Uptivity Speech Analytics, and is only one of the items that must be configured for this feature. Disk Location Specifies the location (UNC path or local disk) to which recorded audio and video files for this schedule will be written. The default value is C:\recordings.
File paths should not contain spaces. If the path that you use includes spaces, Uptivity won't be able to access the folder.
Blackout remote audio Allows blackouts to be applied only to the external portion of a call. For example, organizations in states that require two-party notification can use this setting to record the agent for compliance purposes, but not record the customer. Comparison Defines how criteria are applied in determining whether a call should be recorded under this schedule. It works in conjunction with the settings in the Schedule Requirements section. The AND and OR settings let you define schedule requirements using simple business rules. Select AND if the call must meet all of the Schedule Requirements to be recorded. Select OR if the call must meet only one of the Schedule Requirements to be recorded. Select Expression to engage advanced business logic using a free-form expression. The default value is AND. Schedule Requirements: Simple Value Type Specifies the field that provides the value for comparison. These descriptions are in the context of creating basic schedule expressions. For more information on a field in general, see Recording-Related Fields. Select one of the following from a drop-down list:
- DeviceID — Physical device on which the call was taken
- Agent ID — Agent login or phone number
- Group — ACD/PBX group. This value must exactly match whatever is passed by the ACD in order to work as a scheduling parameter. For example, if the ACD passes a value of “30” for one of its groups, then you should use Value Type=Group, Comparison=Equals, and Value=30.
- ACD Gate — May also be called VDN, Queue, Application, and so forth, depending on your PBX
- Number Called — Number on which the call came in or which the agent dialed (that is, DNIS)
- CallerID — Number provided for the calling party by your ACD/PBX
- User1 - User 15 — The fifteen (15) user-defined fields that may contain data relevant to your organization.
Comparison Allows you to specify additional information about the comparison value. Select one of these comparison operators from a drop-down list:
- Equals
- Less than (<)
- Greater than (>)
- Not Equal To
- Starts With
- Ends With
- Contains
- Does Not Contain
Value Allows you to type a value to complete the schedule requirement statement. Case Sensitive Allows you to specify whether or not non-numeric values should be considered case sensitive. Schedule Requirements: Advanced When Comparison is set to Expression, you can type a free-form expression (64,000 characters max) for more complicated decision-making. If you select Expression, you must type an expression or no calls will record.
Schedule expressions can be created using standard conditional and Boolean operators, and multiple parameters can be combined in the same expression. The following table identifies the operators supported in schedule expressions.
== Equal to != Not equal to > Greater than < Less than >= Greater than or equal to <= Less than or equal to && Boolean AND || Boolean OR Single (') or double (") quotes can be used to set off strings within expressions. Parentheses () can be used to create groups or show precedence within expressions.
Variables in schedule expressions use the database field name, which can differ from the field label in the NICE Uptivity Web Portal.
The field accepts the following fields as expression variables, but not all variables are available with every integration. These descriptions are in the context of creating advanced schedule expressions. For more information on a field in general, see the Recording-Related Fields.
- DeviceID — Voice port or extension that receives or places the call
- Devicealias — ACDAcronym for Automatic Call Distributor - A device used to manage and distribute incoming calls to a specific group of terminals. number for the agent who receives or places the call
- Group — ACD/PBXAn acronym for Private Branch Exchange. A telephone switching device owned by a private company that serves a particular business or office. group; value must exactly match whatever is passed by the ACD
- Gate — For inbound-routed ACD calls, this is the ACD queue or skill to which the call was delivered
- ANIAn acronym for Automatic Number Identification - ANI is a service of telecommunications carriers, which identifies the telephone number of the calling party. It is commonly used for billing, call routing and database synchronization. There are several specific technologies that fit under the umbrella of ANI, including caller ID. — Calling party for the call (that is, CallerID)
- DNISAn acronym for Dialed Number Indentification Service - A carrier service for 800/888 and 900 numbers that forwards the number dialed by the caller to the number that reaches the agent. — Called party for the call
- User1 - User15 — The fifteen (15) fields that may contain data relevant to your organization
- callID — Call ID assigned by the PBX/ACD to identify the call
- calldirection — Possible values: inbound or outbound
- callinstancedescriminator — Internal variable assigned to the call by the Uptivity system for tracking purposes
- initiatedby — Identifies how the recording was started. Possible values: cti, agent, api, apichat, agentchat
- agentingroup — Sets a parameter based on whether an agent is in an QA Group. Possible values depend on the QA Groups in your system. For example, if you wanted to record agents who are in the Legends group, and that group ident is 49, then your expression would be agentingroup(49). For information on viewing QA Group identifiers, see QA Groups.
- agentnotingroup — Sets a parameter based on whether an agent is not in an QA Group. Possible values depend on the QA Groups in your system. For example, if you wanted to record agents who are not in the Legends group, and that group ident is 49, then your expression would be agentnotingroup(49). For information on viewing QA Group identifiers, see QA Groups.
- phoneingroup — Sets a parameter based on whether an agent is in an QA Group based on the phone(s) associated with that agent. Possible values depend on the QA Groups in your system. For example, say you want to record agents who are in the Legends group, and that group ident is 49. However, some agents in the Legends group also handle calls for a different group, and have a different phone associated with their accounts for those calls. In that case, using the expression phoneingroup(49) would record calls the agents handle for the Legends group, but not calls for the other group. For information on viewing QA Group identifiers, see QA Groups.
- phonenotingroup — Sets a parameter based on whether an agent is not in an QA Group based on the phone(s) associated with that agent. Possible values depend on the QA Groups in your system. For example, say you do not want to record agents who are in the Legends group, and that group ident is 49. However, some agents in the Legends group also handle calls for a different group, and have a different phone associated with their accounts for those calls. In that case, using the expression phonenotingroup(49) would exclude calls the agents handle for the Legends group, but still record calls handled for the other group. For information on viewing QA Group identifiers, see QA Groups.
- Month — Numeric value for the month. Possible values: 01, 02, 03, 04, 05, 06, 07, 08, 09, 10, 11, 12.
- Day — Numeric day of the month. Possible values: 01, 02, 03, 04, 05, 06, 07, 08, 09, 10 - 31.
- Year — Four-digit year
- Time — Time of day, formatted as 24-hour time, 00:00 to 23:59. When typing data in the Schedule Expression field, put single standard quotes (not "smart" or curly quotes) around time values. For example, for time between 6:00 AM and 7:00 PM, the expression would read: time > '06:00' || time < '19:00'.
- Weekday — Possible values: mon, tue, wed, thu, fri, sat, sun
- Date — Format as yyyy-mm-dd
- Pvalue — A random number from 0 to 99 that can be used for cases where a certain percentage must be met.
- Click Save Schedule.
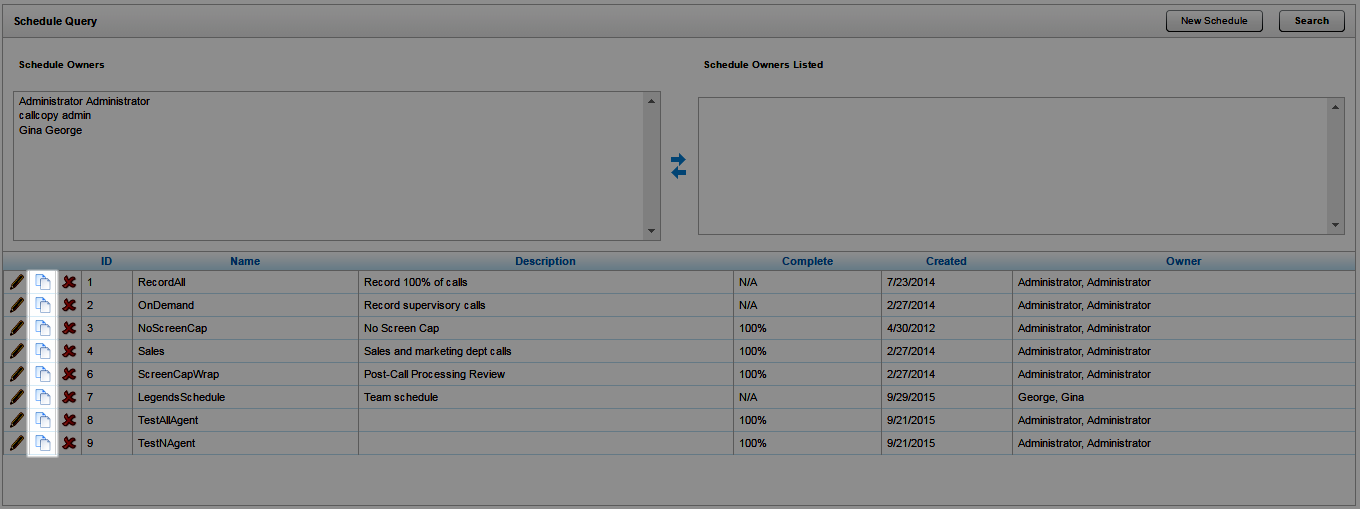
Find Schedules
- Click Find Schedule.
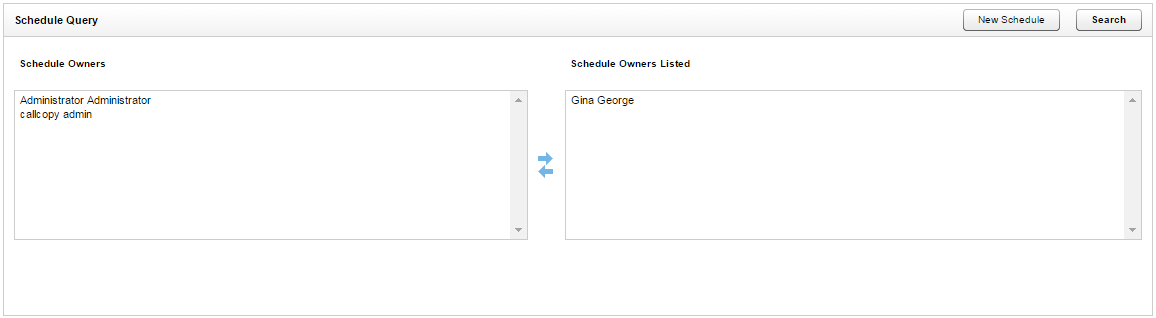
- Move users from Schedule Owners to Schedule Owners Listed to narrow your search to schedules created by or assigned to specific users; move users from Schedule Owners Listed to Schedule Owners to exclude them from your search. To retrieve all schedules, skip this step.

- Click Search.
- If you want to, click Edit (indicated by the pencil icon) or Delete (indicated by the red X).
- Double-click a schedule to view all of its criteria and parameters, or click one of the action icons for the schedule to edit, copy, or delete it.
Copy Schedules
- In the NICE Uptivity Web Portal, click Administration → Scheduling → Find Schedule.
- Move users from Schedule Owners to Schedule Owners Listed to narrow your search to schedules created by or assigned to specific users; move users from Schedule Owners Listed to Schedule Owners to exclude them from your search. To retrieve all schedules, skip this step.
- Click Search.
- Click Copy (indicated by the papers icon) for the schedule you want to copy. A new schedule window opens with the settings from the original schedule already configured.

- Revise the schedule's criteria and parameters as needed.
- Click Save Schedule.