Required Permission — Allow QA Form Administration
Quality Assurance (QA) evaluation forms are used to review the work of agents, including how they handle calls. This topic explains how to create a new evaluation form. Be sure you are familiar with the information in QA Evaluation Forms Overview before beginning this task.
This page has a 30-minute limit. If you do not save before 30 minutes of being on this page, it will time-out and all data is erased. After saving, the 30-minutes start over. It is important to click Save often on this page.
- In the NICE Uptivity Web Portal, click Coaching
 Quality AssuranceCreate a Form.
- Enter a unique identifier in Form Name (50 characters max).
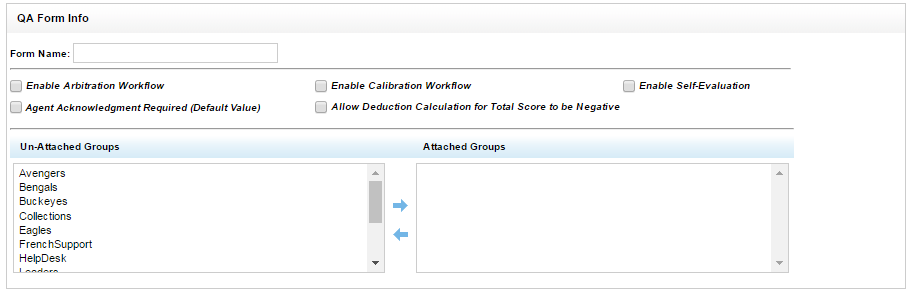
- Select only one of the following checkboxes:
- Enable Arbitration Workflow
- Enable Calibration Workflow
- Enable Self-Evaluation
Learn more about the options in this step
Field
Description
Enable Arbitration Workflow Allows you to enable all evaluations submitted using this form to use the arbitration workflow. Evaluators will be required to designate one or more arbitrators when they begin an evaluation with this form. For more information, see QA Arbitration and Review Process Overview. Enable Calibration Workflow Allows you to limit this form so it can be used only with the calibration workflow. For more information, see Calibration Overview. Enable Self-Evaluation Allows you to limit this form so it can be used only in agent self-evaluations. For more information, see Agent Self-Evaluation Overview. - If you selected the Enable Arbitration Workflow checkbox, also select the Agent Acknowledgment Required checkbox.
Learn more about the field in this step
Field
Description
Agent Acknowledgment Required Allows you to set all evaluations submitted using this form to require agent acknowledgment as default behavior. Evaluators can override this setting on a per-evaluation basis. For more information, see QA Arbitration and Review Process Overview. - You can select the Allow Deduction Calculation for Total Score to be Negative checkbox.
Learn more about the field in this step
Field
Description
Allow Deduction Calculation for Total Score to be Negative If your organization has chosen the global setting to display total evaluation scores as their actual value even if negative, this setting allows users, based on their permissions, to override that preference for an individual form. - Click any QA Groups you want to assign to this form under Un-Attached Groups and then click the right arrow button to move them to Attached Groups.
From here, you can either create a new form or import a form in XML format.
To create a new form:
- Click Create New Section. It doesn't matter what order you create sections; you can reorder them at any time during this process.
- Enter a unique name in Section Title (50 characters max).
- Add a question and responses for the question. Repeat this until you have finished all questions for the section.
- Click Add New Question. It doesn't matter what order you create questions; you can reorder them at any time during this process.
- Select the Question Type.
- If applicable, select the Critical checkbox. This can only be done for one question per form. Additional reporting is available for critical questions.
- In the Question field, type the text of the question as you want it to appear to the evaluator.
- Click Add New Response. It doesn't matter what order you create responses; you can reorder them at any time during this process.
- In the Response field, enter the text of the response as it will appear to the evaluator.
- You can select an Auto-Fail value.
Learn more about the option in this step
Field
Description
Auto-Fail Allows you to designate an auto-fail response for questions so important that failing them should result in the agent failing either the section or the entire evaluation. This setting is typically used to enforce service-affecting protocol, such as security verifications or adherence to scripts with legal disclaimers. The default value for this field is None. - Select Default if you want Uptivity to pre-populate the question with this response.
- In the Possible Points field, enter the maximum point value for this response. Learn more about the field in this step
Field
Description
Possible Points During evaluation and scoring, Uptivity adds the points scored on each question and divides that value by the total of the highest possible points for all applicable questions. This calculation generates a percentage score for a form. Responses that have an Auto-Fail value of Sections or Formsmust have a Possible Points value of 0. The field accepts positive and negative numeric values. - If applicable, repeat steps E-I to continue adding responses to this question.
- Repeat steps 1-3 as needed until you have added all desired sections with questions and responses.
- Click Save.
To import a form:
- Click Import, then click Browse and navigate to the XML file.
- Select the XML file and click Open, then click Import.
- Click Save.


